Unwrapping 3D Worlds: A Master Guide to Perspective Systems from 1-Point to Unwrapped Panorama – Elevate Your Drawing Skills

Transform your 2D drawings into lifelike 3D illusions with this definitive Unwrapping 3D Perspective Guide. Designed for artists transitioning from flat sketches to dynamic scenes, this professional tutorial breaks down the limitations and innovations of classical and modern perspective systems—1-Point, 2-Point, Beholder, and Unwrapped Panorama—using intuitive diagrams and real-world applications.
Perfect for illustrators, concept artists, and animators, this guide reveals how to compensate for the third dimension’s absence on a 2D canvas, whether you’re sketching interiors, characters, or panoramic landscapes. Dive into the annotated illustrations above for a step-by-step mastery of depth and distortion.
Core Concept: The Illusion of Depth
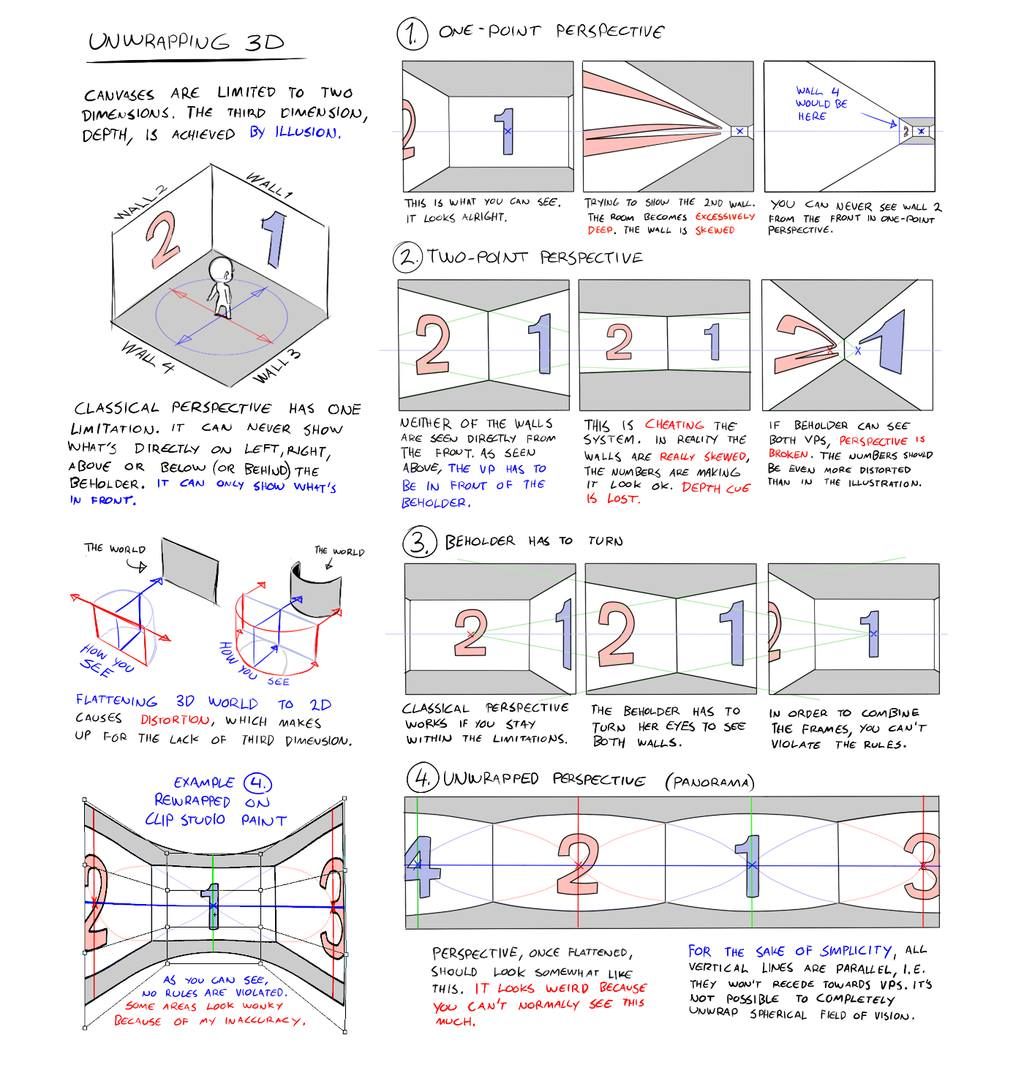
- Canvas Limitation: 2D surfaces lack the third dimension (depth).
- Solution: Use perspective to create an illusion of space through converging lines and vanishing points (VPs).
- Key Challenge: Classical perspective restricts what’s visible, while modern systems like unwrapped panoramas expand the field of view.
Step-by-Step Perspective Systems
1. One-Point Perspective (Basic Room Setup)
- Setup: One VP on the horizon line (eye level), typically along the X-axis.
- Application: Front-facing walls converge to a single point (e.g., a hallway or room interior).
- Rule: Only the front wall (Wall 1) is fully visible; side walls (Walls 2, 3, 4) taper toward the VP.
- Limitation: Cannot show walls from behind or below the beholder.
- Pro Tip: Place VP at eye height for natural depth.
2. Two-Point Perspective (Corner View)
- Setup: Two VPs on the horizon line, 90° apart (or 45° split for realism).
- Application: Ideal for corner views of buildings or objects, showing two walls (e.g., Walls 1 and 2).
- Cheat Warning: Adding a third wall (e.g., Wall 3) breaks rules unless foreshortened excessively.
- Pro Tip: Adjust VP distance to control depth—closer VPs = steeper convergence.
3. Beholder Has to Turn (Dynamic Adjustment)
- Setup: Extends 2-point by allowing the viewer to “turn” to see both walls.
- Application: Combines Walls 1 and 2 by rotating the frame, mimicking head movement.
- Limitation: Classical perspective fails if the beholder stays static; turning violates strict VP rules.
- Pro Tip: Use this for character POV shifts in comics or animation.
4. Unwrapped Perspective (Panorama)
- Setup: Wraps the scene around a cylindrical or spherical field, using multiple VPs (e.g., 3–6).
- Application: Creates a 360° view, like a panoramic sketch or fisheye lens effect.
- Innovation: Vertical lines remain parallel, avoiding spherical distortion.
- Pro Tip: Ideal for wide landscapes or multi-angle character scenes (e.g., Clip Studio Paint rewrap tool).
Technical Insights
Flattening 3D to 2D
- Distortion Cause: Converting a 3D world to 2D flattens depth, requiring compensation.
- Example: Rewrap in Clip Studio Paint adjusts perspective to match the beholder’s natural field of view.
- Fix: Use converging lines to “pull” the eye toward VPs, mimicking 3D space.
Classical vs. Unwrapped
- Classical: Works within limitations—static VP alignment.
- Unwrapped: Breaks traditional rules for a broader, more immersive view.
- Trade-Off: Unwrapped sacrifices some accuracy for simplicity but can’t fully replicate a spherical field.
Practical Workflow
- Choose Your System:
- 1-Point: Simple interiors
- 2-Point: Corner structures
- Beholder: Dynamic POV
- Unwrapped: Panoramic scenes
- Set Horizon Line: Align with eye level (e.g., 5–6 feet for standing view).
- Place VPs: One for 1-point, two for 2-point, multiple for unwrapped.
- Draw Converging Lines: From edges to VPs.
- Refine: Add details, ensuring depth cues (e.g., overlapping forms).
Time Estimate: 5–10 minutes per sketch with practice.
Pro Tips
- Avoid Overlap Errors: In 2-point, don’t force a third wall unless foreshortened.
- Enhance Depth: Use shading or color gradients toward VPs.
- Digital Advantage: Tools like Clip Studio Paint’s rewrap feature automate unwrapped perspective.
- Field of View: Limit to 60°–90° for classical; expand to 180°+ for unwrapped.
Common Mistakes & Fixes
| Mistake | Cause | Fix |
|---|---|---|
| Flat look | No VPs | Add at least 1 VP |
| Skewed walls | VPs too close | Space VPs wider |
| Over-rotated | Beholder turn | Stick to 2-point or unwrap |
| Distorted panorama | Uneven lines | Keep verticals parallel |
Tools & Materials
- Pencils: HB (guides), 2B (lines), 4B (shading)
- Paper: Graph or sketchbook
- Digital: Clip Studio Paint, Photoshop (rewrap plugin)
- Ruler: For precise VP alignment
Downloadable Resources
- PDF Guide: Printable perspective templates (1-point to unwrapped)
- PSD File: Layered examples for digital practice
- Video Tutorial: 15-minute walkthrough (coming soon)
- Reference Pack: 20 scene sketches with VP marked
Ideal For:
- Illustrators & concept artists
- Comic/manga creators
- 3D-to-2D transition learners
- Digital art enthusiasts
- Architecture sketchers
Unwrap the 3D World on Your Canvas. Master perspective from basic 1-point rooms to immersive 360° panoramas. This guide equips you with the tools to draw what you see—and beyond with professional precision.
Study the detailed diagrams above and start crafting depth today.