Mastering Human Anatomy Through Basic Shapes: A Step-by-Step Tutorial on Seeing Planes, Volumes, and Proportions for Realistic Figure Drawing

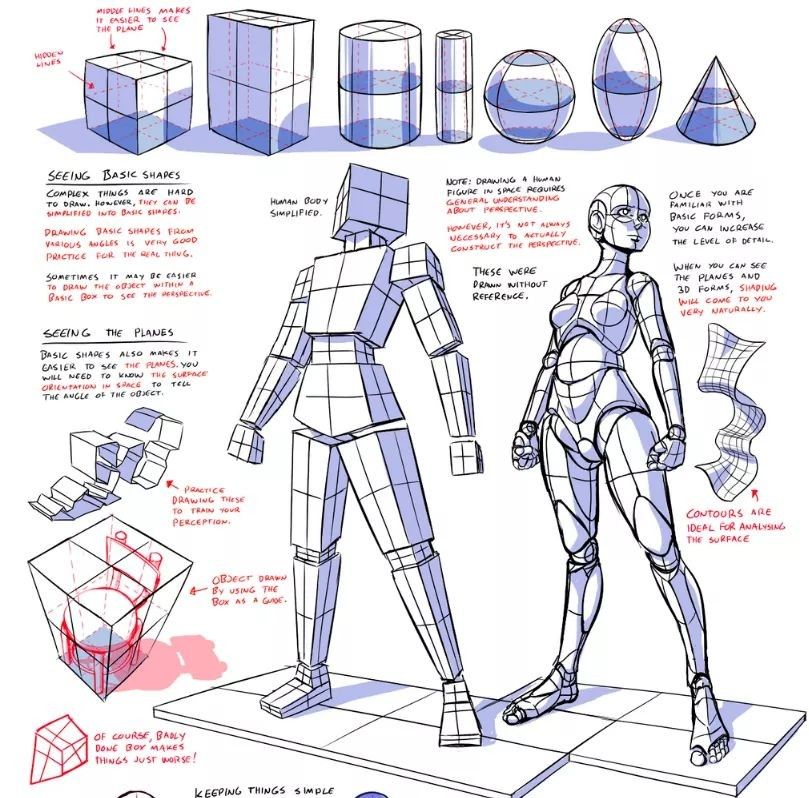
Understanding the human body as a collection of basic geometric shapes and planes is the cornerstone of accurate figure drawing, allowing artists to simplify complex forms, maintain correct proportions, and achieve convincing three-dimensionality. This in-depth, professional-grade tutorial is directly based on a highly detailed reference sheet titled “Seeing Basic Shapes” and “Seeing the Planes”, which breaks down the human figure into cubes, cylinders, spheres, and cones—then reconstructs it into a fully realized, anatomically sound form. Rendered in clean pencil lines with subtle shading, the image features two robotic-like figures (one male, one female) built from simplified volumes, alongside isolated 3D primitives (cube, cylinder, sphere, cone) and annotations in red and black. Key concepts include middle lines for symmetry, plane orientation, contour idealization, and volume perception, all illustrated with practical examples and warnings against common pitfalls.
This guide is designed for intermediate to advanced artists—whether working traditionally with graphite on smooth bristol board or digitally in tools like Clip Studio Paint, Procreate, or Photoshop—where layer organization (e.g., guidelines, volumes, contours) enables non-destructive refinement. We’ll follow the reference sheet’s structure in four comprehensive sections:
- Seeing and Drawing Basic Shapes
- Understanding Planes and Volume
- Constructing the Full Figure from Primitives
- Finalizing Contours, Proportions, and 3D Perception
Key techniques include construction lines, cross-contour visualization, symmetry checks, and light logic via planes. This method is essential for character design, comic art, concept illustration, medical drawing, or classical life studies, and aligns with the teachings of masters like Andrew Loomis and George Bridgman. Begin with light H or 2H pencils (or 10–20% opacity digital brushes), a ruler for symmetry, and an eraser for cleanup, progressing to HB–4B for final rendering. Given today’s date—05:47 AM EDT on Tuesday, October 28, 2025—we’ll use a soft dawn light source (top-left, 45° angle) to reveal form through subtle value shifts.
Section 1: Seeing and Drawing Basic Shapes (Foundation of All Forms)
The reference begins with six core 3D primitives—each with middle lines to define symmetry and orientation.
| Shape | Key Insight from Reference | Step-by-Step Application |
|---|---|---|
| Cube | Middle lines divide faces; hidden lines shown dashed | 1. Draw square front face 2. Add middle lines (horizontal + vertical) 3. Project back edges at 30–45° to vanishing point 4. Connect with dashed hidden lines |
| Cylinder | Two middle lines (height + circular top/base) | 1. Draw top/bottom ovals (same width) 2. Connect with verticals 3. Add center line through both ovals 4. Curve hidden edges subtly |
| Sphere | No edges—only cross-contours | 1. Draw circle 2. Add horizontal + vertical middle lines 3. Sketch 2–3 elliptical cross-contours 4. Shade gradient from light to dark |
| Cone | Apex aligned with base center | 1. Draw base oval 2. Mark center 3. Draw two slanted lines to apex 4. Add middle line from apex through base |
Pro Tip: “Drawing basic shapes from various angles is very good practice for the real thing.” Exercise: Fill one page with 12 random primitives (3 cubes, 3 cylinders, etc.) in different rotations. Use middle lines religiously.
Section 2: Seeing the Planes – The Secret to 3D Perception
The reference emphasizes:
“Basic shapes also makes it easier to see the planes.”
Planes = flat surfaces on a 3D form. They tell you:
- Where light hits (bright)
- Where it glances (mid-tone)
- Where it’s blocked (shadow)
Key Example from Reference:
- A tilted cube with a red arrow showing plane orientation
- A transparent box revealing internal structure
Step-by-Step Plane Analysis:
- Draw object in box (imaginary bounding box)
- Identify major planes (top, side, front)
- Draw middle lines on each plane
- Determine tilt relative to light source
- Shade accordingly:
- Top plane = brightest
- Side planes = mid-tone
- Bottom/under planes = darkest
Common Mistake Alert (from reference):
“Barky bone box makes things just worse!” → Avoid overcomplicating with skeletal details too early. Volume first, bones later.
Exercise: Take any household object (mug, phone, shoe). Draw it inside a transparent box. Label 6 planes. Shade using dawn light (top-left).
Section 3: Constructing the Human Figure from Basic Shapes
The reference shows two full figures built entirely from simplified volumes—no anatomy yet, just pure construction.
| Step | Action | Visual Cue from Reference |
|---|---|---|
| 1 | Head = Sphere + minor cylinder (neck) | Red oval with middle lines |
| 2 | Ribcage = Flattened cube or wide cylinder | Wider than head |
| 3 | Pelvis = Trapezoid or narrow box | Tilted opposite ribcage |
| 4 | Spine = Curved center line connecting midpoints | S-curve for contrapposto |
| 5 | Limbs = Cylinders (tapered) | Shoulders = small spheres |
| 6 | Hands/Feet = Wedge shapes | Simplified for now |
Proportions (8-Head Canon):
- Head = 1 unit
- Shoulders = ~2 heads wide
- Pelvis = ~1.5 heads wide
- Total height = 8 heads
Critical Note from Reference:
“Drawing a human figure in 3D requires general understanding about perspective. However, it’s not always necessary to actually construct the perspective.”
Translation: Use implied perspective via plane tilt and overlap—no need for full vanishing points unless in extreme foreshortening.
Digital Workflow (Recommended):
- Layer 1: Guidelines (light blue, 10% opacity)
- Layer 2: Volumes (purple cubes/cylinders)
- Layer 3: Contour Cleanup (black ink)
- Layer 4: Planes & Shading (soft airbrush)
Section 4: Finalizing Contours, Idealization, and 3D Perception
Now we transition from blocky robot to organic human.
Step-by-Step Refinement:
- Idealize Contours
- Soften sharp edges where volumes meet
- Use S-curves for muscle flow (e.g., deltoid to bicep)
- Reference: Female figure shows smooth transitions vs. male’s angularity
- Add Landmarks (lightly)
- Clavicle notch
- ASIS (pelvic points)
- Naval (slightly above midpoint)
- Knee caps
- Apply Cross-Contours
- Draw 2–3 elliptical lines across torso, thighs, arms
- These show surface direction and foreshortening
- Shade Using Planes
Light Source: Top-left, 45° Highlight: Top planes (shoulders, chest, thighs) Mid-tone: Side planes (ribs, outer arms) Core Shadow: Under planes (under breasts, groin, calves) Cast Shadow: On ground plane - Final Check: The “Warp Grid” Test (from reference)
- Imagine a 3D grid wrapping the body
- If contours follow grid curvature → correct volume
- If flat or broken → revise
Professional Tips for Mastery
| Category | Recommendation |
|---|---|
| Tools | Traditional: Staedtler Mars Lumograph (H–4B), kneaded eraser Digital: Procreate “Technical Pencil” + “Soft Airbrush” |
| Daily Practice | 10 minutes: 5 primitives in rotation 15 minutes: 1 figure from blocks → contours |
| Common Errors to Avoid | • Drawing bones before volume • Ignoring middle lines • Flat shading (no plane logic) |
| Advanced Challenge | Draw the same pose in 5 angles using only volumes—then connect with contours |
| Recommended Reading | Figure Drawing for All It’s Worth – Andrew Loomis Constructive Anatomy – George Bridgman |
Bonus: Digital Layer Template (Downloadable)
Layer Stack (Top to Bottom):
5. Final Render (Ink + Color)
4. Shading (Multiply)
3. Contours (Normal)
2. Volumes (Purple, 40% opacity)
1. Guidelines (Light Blue, 20% opacity)
Background: White or light gray
Final Result: A figure that reads solid in space, with correct proportions, believable weight, and natural flow—all built from the humble cube, cylinder, and sphere.
This tutorial transforms the reference sheet into a complete, actionable curriculum. Practice daily, internalize the planes, and soon you’ll see the human body as architecture—not mystery.
Explore our related guides:
- “Foreshortening Mastery with Cylinders”
- “Dynamic Poses: Gesture to Volume in 5 Steps”
- “Anatomy Without Overwhelm: The 8-Head Method”
Start drawing today—your future figures will thank you.