Mastering the Pool and Billiards Shooting Routine: A Comprehensive Step-by-Step Tutorial

In the world of pool and billiards, precision, consistency, and control are the hallmarks of a skilled player. Whether you’re a beginner looking to build a solid foundation or an experienced enthusiast aiming to refine your technique, mastering a structured shooting routine can dramatically improve your accuracy, confidence, and overall performance at the table. This tutorial breaks down the essential “Set-See-Prime-Pause-Stroke-Stop” routine, inspired by proven methodologies from experts at Bullseye Billiards. By following these steps meticulously, you’ll develop a rhythmic, pendulum-like stroke that minimizes errors and maximizes shot success.
This routine emphasizes stability, focus, and fluid motion, drawing from biomechanical principles to ensure your body remains still while your arm swings freely like a pendulum. We’ll explore each phase in detail, including key techniques, common pitfalls to avoid, and tips for practice. At the end, we’ll discuss the accompanying motion graph to visualize how your eyes and cue interact throughout the process. Remember, consistency comes from repetition—practice this routine on every shot to ingrain it into muscle memory.
Step 1: Set – Establishing a Rock-Solid Foundation
The “Set” phase is all about creating a stable platform for your shot. Think of this as the blueprint for success; a poor setup can lead to misalignment and inconsistent results. Approach the table with purpose, aligning your body to the shot line.
- Stable Stance: Position your feet shoulder-width apart, with your dominant foot slightly forward if you’re right-handed (or vice versa for left-handers). Distribute your weight evenly, bending slightly at the knees for balance. Your stance should feel grounded, like a tripod, preventing any sway during the stroke.
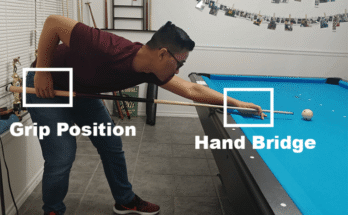
- Stable Bridge Near the Cue Ball: Form a firm bridge hand on the table, close to the cue ball (ideally 6-8 inches away). Use an open bridge for most shots or a closed bridge for added control on power shots. Ensure your bridge is steady and doesn’t shift under pressure.
- Low Head Position: Lower your head so your chin is nearly touching the cue stick. This promotes a level line of sight and helps maintain a straight cue path. Avoid raising your head prematurely, as this can cause aiming errors.
- Shooting Arm Straight Down: Hang your shooting arm vertically from the shoulder, elbow aligned with your body. This pendulum-like positioning allows for natural swing without unnecessary tension.
- Level Cue Stick: Keep the cue as horizontal as possible, parallel to the table surface. Tilting it upward can introduce unwanted spin or deflection.
- Cue Tip Near Contact Point: Position the cue tip just a chalk’s width away from the intended contact point on the cue ball. This proximity ensures precision and reduces the chance of miscues.
Pro Tip: Take a deep breath and visualize the entire shot path before proceeding. Common mistake: Rushing this step—spend at least 5-10 seconds aligning everything perfectly. Practice drill: Set up straight-in shots and focus solely on setup without stroking.
Step 2: See – Locking in Your Target with Focused Vision
Once set, shift your attention to visualization. The “See” phase is crucial for mental preparation, allowing your brain to process the shot trajectory.
- Move Eyes to the Target: Shift your gaze from the cue ball to the object ball (or pocket, depending on the shot). Trace the imaginary line from cue ball to target, confirming your aim point.
- Wait 1-2 Seconds for a Steady Gaze: Hold this focus without blinking or shifting. This brief pause calms your mind and stabilizes your visual perception, reducing the impact of optical illusions common in billiards.
Pro Tip: Use “quiet eye” technique—professional players often fixate on the target longer to enhance accuracy. Avoid: Darting eyes back and forth excessively, which can disrupt alignment. Practice drill: On an empty table, practice aiming at spots and holding your gaze to build endurance.
Step 3: Prime – Preparing the Backswing with Controlled Motion
Now, initiate the mechanical preparation. The “Prime” phase sets up the backswing, emphasizing smoothness to avoid jerky movements.
- Slow Backswing and Straight Back, Like a Pendulum: Draw the cue back slowly (about 6-12 inches, depending on shot power), keeping the path straight and aligned with your arm’s natural arc. Mimic a pendulum’s swing for fluidity—no abrupt stops or accelerations here.
- Keep Body Extremely Still: Freeze all non-essential body parts. Your head, torso, and bridge hand should remain immobile to prevent introducing variables like sway or twist.
Pro Tip: Grip the cue lightly during this phase to maintain feel. Common mistake: Over-tightening muscles, which leads to tension buildup. Practice drill: Perform backswings in front of a mirror to ensure straightness and stillness.
Step 4: Pause – Ensuring a Smooth Transition
The “Pause” is a brief but vital interlude that bridges preparation and execution. It allows for a mental checkpoint.
- Smooth Transition: Hold at the end of the backswing for a split second (0.5-1 second). This pause resets any minor deviations and builds anticipation for the forward stroke.
Pro Tip: Use this moment to reaffirm your aim—quickly glance back if needed, but return to the target. Avoid: Eliminating the pause entirely, as it can result in rushed, inaccurate strokes. Practice drill: Count “one-Mississippi” aloud during pauses to develop timing.
Step 5: Stroke – Executing with Acceleration and Precision
This is the action phase where power meets control. The “Stroke” delivers the energy to the cue ball.
- Loose Wrist: Keep your wrist flexible to allow natural snap, enhancing cue speed without force.
- Light Grip: Hold the cue with just enough pressure to control it—think of gripping a delicate egg. This prevents steering the cue off-line.
- Swing Arm Like a Pendulum: Propel the arm forward in a straight, accelerating arc, mirroring the backswing’s path.
- Accelerate Stroke Straight Through the Cue Ball: Build speed gradually, peaking at impact. Follow through fully, driving the cue tip through the ball’s position.
- Keep Body Extremely Still: Maintain immobility to ensure the stroke’s energy transfers purely to the ball.
Pro Tip: Focus on follow-through— the cue should extend 4-6 inches past the cue ball’s original spot. Common mistake: Decelerating before impact, which reduces power and spin control. Practice drill: Use stop-shot drills to perfect acceleration.
Step 6: Stop – Completing the Shot with Discipline
Finish strong in the “Stop” phase to analyze results and avoid bad habits.
- Complete Stroke with Cue Tip Pointing Down: Allow the cue to naturally come to rest, tip angled slightly downward after follow-through.
- Stay Down Until the Shot is Complete: Remain in your stance until all balls stop moving. This reinforces stillness and lets you observe outcomes for adjustments.
Pro Tip: Resist the urge to stand up immediately—use this time for self-critique. Avoid: “Jumping up” on tough shots, which can indicate tension. Practice drill: Film yourself and review posture maintenance.
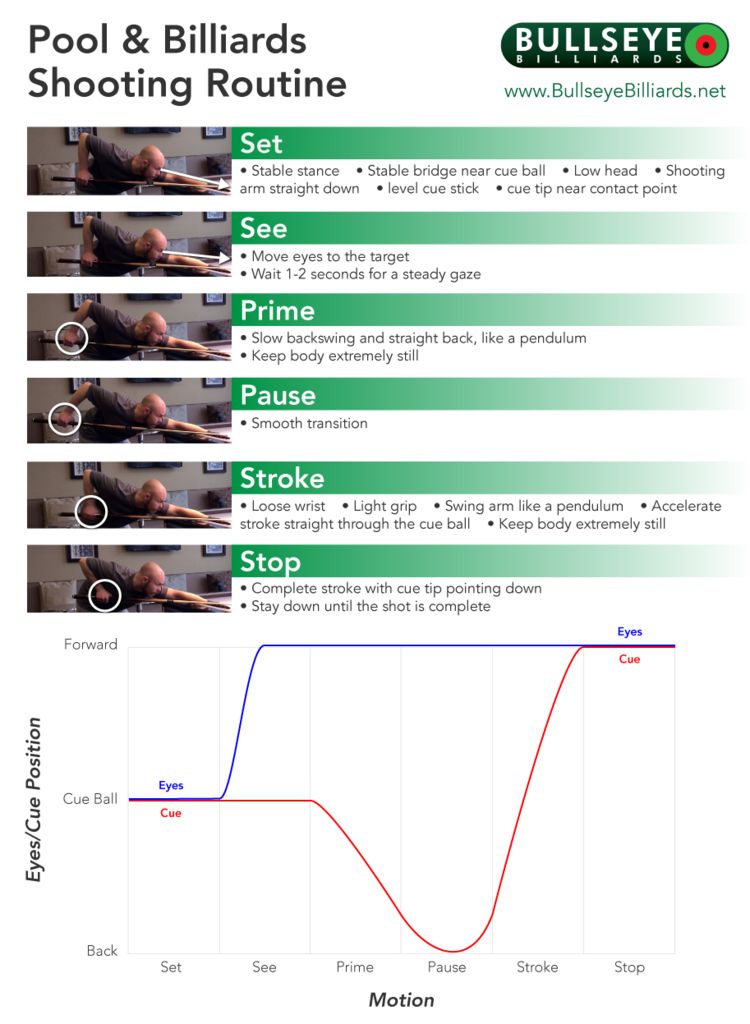
Understanding the Motion Graph: Visualizing Eyes and Cue Dynamics
To tie it all together, consider the motion graph that illustrates the interplay between your eyes (blue line) and cue (red line) across the routine phases (Set, See, Prime, Pause, Stroke, Stop).
- Horizontal Axis (Motion Phases): Progresses from backswing to forward motion, labeled “Back” to “Forward.”
- Vertical Axis (Position): Tracks “Eyes/Cue Ball” positioning, showing relative heights or focuses.
The graph depicts:
- Eyes starting focused on the cue ball, maintaining a steady level through Set and See, then dipping slightly during Prime and Pause for target lock-in, before rising smoothly in Stroke and stabilizing in Stop.
- Cue beginning low, rising gradually in Prime (backswing), pausing, then accelerating forward in Stroke with a sharp upward curve, ending high in Stop.
This visualization highlights synchronization: Your eyes lead the cue initially for aiming, then the cue catches up during execution. Misalignments here often cause misses—use it as a mental model during practice.
Final Thoughts and Practice Recommendations
Adopting this shooting routine transforms haphazard play into a deliberate, professional process. Start slow, breaking it into isolated steps, then integrate them fluidly. Aim for 100-200 repetitions per session on various shots (straight, cut, bank) to build proficiency. Tools like video analysis or a coach can accelerate improvement. Remember, billiards is as mental as it is physical—stay patient and focused.
For more resources, visit BullseyeBilliards.net. If you’re ready to elevate your game, incorporate this routine today and watch your consistency soar!