Advanced Sphere-Based Head Drawing Tutorial: Slicing and Refining Spheres for Realistic Proportions and Angles in Portrait Art

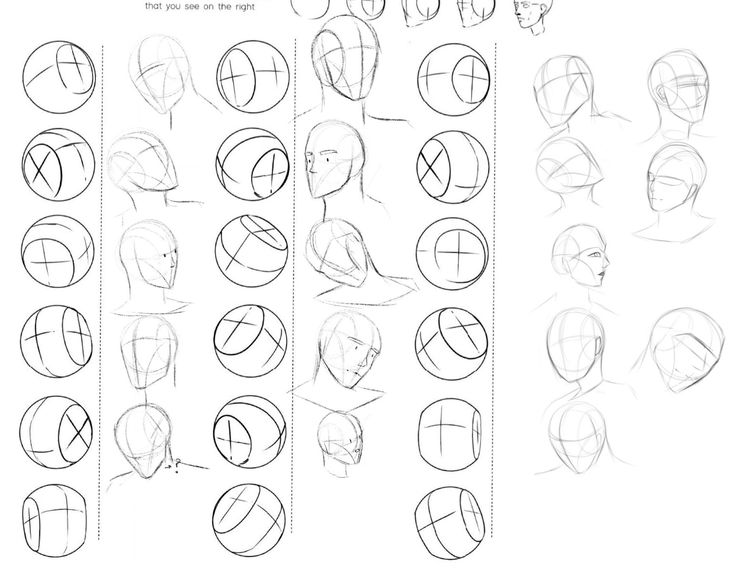
In the pursuit of mastering portrait and figure drawing, simplifying the human head into basic geometric forms is a proven technique that bridges beginner sketches to professional-level renderings. This in-depth tutorial draws inspiration from the instructional diagram “How to Draw Heads by JayRam: Spheres 2,” which builds on foundational sphere drawing by introducing side cuts to approximate the head’s natural contours. The reference image presents a step-by-step progression of spheres in various orientations—front, side, three-quarter, and tilted views—demonstrating how to “slice” the sides for a more accurate cranial shape. Accompanied by explanatory text, it emphasizes gradual skill-building: starting with comfortable sphere construction and evolving toward complex head forms visible in the example on the right. The sketches are arranged in rows, showing initial crosses for axes, progressive cuts, and refined ovals, all in clean black linework on a white background.
This guide is designed for artists of intermediate skill levels, whether using traditional graphite pencils on sketchpad paper or digital brushes in programs like Procreate, Photoshop, or Krita. We’ll dissect the reference into structured sections, providing detailed steps, anatomical insights, and practical applications to help you create heads that maintain proportion across angles. Key principles include treating the head as a modified sphere (cranium) with flattened sides for the temporal regions, using axis lines for orientation, and building iteratively to avoid overwhelming complexity. With practice, this method—rooted in techniques popularized by artists like Andrew Loomis—will enable you to draw dynamic, realistic heads suitable for character design, animation, or fine art portraits. Always begin with light guidelines (e.g., 2H pencil or 20% opacity digitally) to allow easy erasure, and reference live models or mirrors to validate your constructions.
Section 1: Understanding the Sphere as a Head Foundation (Introductory Text and Basic Setup)
The reference’s opening text sets the stage: “Now that we are more comfortable with spheres, lets cut the sides of the spheres so they become a closer to the shape of the head. Building up our skills like this while make it much easier to draw the head that you see on the right on stage 2 in the process.” This assumes prior familiarity with drawing perfect spheres; if not, review basic circle construction first.
- Initial Sphere Drawing: Start by sketching a simple circle in your chosen view (e.g., front, side, or angled). Add cross axes: a vertical line for the centerline (symmetry) and a horizontal for the eye level or equator. The image shows this in the top row, with spheres oriented in multiple directions—e.g., a front view with a plus sign (+), a side view with an X, and tilted versions combining both. These axes help maintain perspective: in a three-quarter view, the horizontal axis curves slightly due to foreshortening.
- Why Spheres?: The human cranium is roughly spherical, occupying about two-thirds of the head’s volume. Cutting the sides flattens the temples, mimicking the zygomatic bones and creating a more oval, head-like profile. This step refines the basic form without jumping to details like eyes or hair.
- Practical Setup Tips: Use a compass or freehand for circles—aim for consistency in size (e.g., 2-3 inches diameter). Digitally, employ shape tools for perfect spheres, then distort for angles. Common error: Uneven axes—measure from the center to ensure balance. Exercise: Draw a grid of 9 spheres in different rotations, adding axes to each. This warms up your hand and reinforces 3D thinking.
By establishing this base, you’ll transition smoothly to modifications, preventing distorted heads in later stages.
Section 2: Slicing the Sides – Refining the Sphere into a Head Shape (Middle Rows)
The core of the reference lies in the progressive slicing, shown in sequential rows where spheres evolve from round to truncated forms. This “cutting” simulates the head’s flatter sides, improving proportionality for realistic rendering.
- Basic Side Cuts (Second Row): From your axised sphere, draw vertical lines parallel to the centerline, slicing off equal portions on both sides (about 10-15% of the diameter each). The image illustrates this with dashed lines indicating cuts, resulting in a narrower, oval-like shape. For front views, cuts are symmetrical; in side views, one side compresses due to perspective. Annotations imply building “stage 2” toward the finished head on the right—a profiled face with hair and features.
- Angled and Tilted Variations (Third Row): Apply cuts to rotated spheres: for a downward tilt, the bottom becomes fuller; upward tilts compress the top. The reference shows X-marked spheres with curved cuts following the axis—e.g., a three-quarter view where the far side cut foreshortens. This teaches volume: imagine slicing a 3D ball, then projecting it 2D.
- Refinement and Contouring (Bottom Row): Smooth the cut edges into gentle curves, blending with the sphere’s arc. The final sketches in the image depict ovoid forms with retained axes, ready for facial features. Add subtle shading along cuts to suggest depth, using hatching for shadows on the flattened planes.
- Anatomical Correlation: These cuts align with real anatomy—the parietal bones curve gently, while the temporal lines flatten. Tip: For female heads, soften cuts for rounder shapes; for males, keep sharper for angularity. Avoid mistake: Asymmetrical cuts in neutral views—use guidelines to mirror. Exercise: Slice 5 spheres in dynamic poses (e.g., head thrown back), then overlay a traced photo head to compare accuracy.
This section transforms abstract geometry into applicable art, fostering an intuitive grasp of head structure.
Section 3: Building Toward Finished Heads – Integration and Advanced Applications (Right-Side Example)
The reference culminates in a “stage 2” head on the right—a profiled sketch with basic features—illustrating how sliced spheres lead to complete drawings.
- Adding Facial Planes: Using your sliced sphere, divide the front into thirds: top for forehead (from crown to brows), middle for eyes/nose, bottom for mouth/chin. The image hints at this progression, showing how cuts create space for ears (aligned with the axis) and jawline.
- Multi-Angle Practice: Replicate the rows: start with front/side basics, advance to tilts. For example, a downward-facing sphere’s cut emphasizes the chin’s protrusion, ideal for expressive portraits.
- Shading and Volume Enhancement: Though not shaded in the reference, apply form shadows: darker on cut sides for recession, highlights on the sphere’s curve. Use value scales (1-10) for gradual transitions.
- Stylistic Variations: Adapt for genres—exaggerate cuts for cartoon heads, minimize for hyper-realism. Integrate with full figures: heads are 1/7-1/8 of body height.
Additional Professional Tips for Skill Development
- Tools and Materials: HB pencils for construction, 2B for contours; erasers for cleanups. Digitally, use layers: one for spheres, one for cuts.
- Common Challenges and Solutions: If heads look “balloon-like,” measure cuts precisely (use calipers). For perspective issues, study vanishing points in angled views.
- Daily Exercises: Spend 20 minutes slicing spheres from imagination, then add features. Critique by rotating your paper to spot imbalances.
- Resources for Further Study: Explore “Drawing the Head and Hands” by Andrew Loomis or online courses on platforms like Skillshare. The “JayRam” style suggests manga/anime influence—cross-reference with “How to Draw Anime Heads” tutorials.
This tutorial empowers you to deconstruct complex heads into manageable steps, accelerating your artistic growth. With consistent application, you’ll draw versatile, proportional heads that captivate viewers. If you’d like expansions on adding features, expressions, or hair, let us know in the comments!