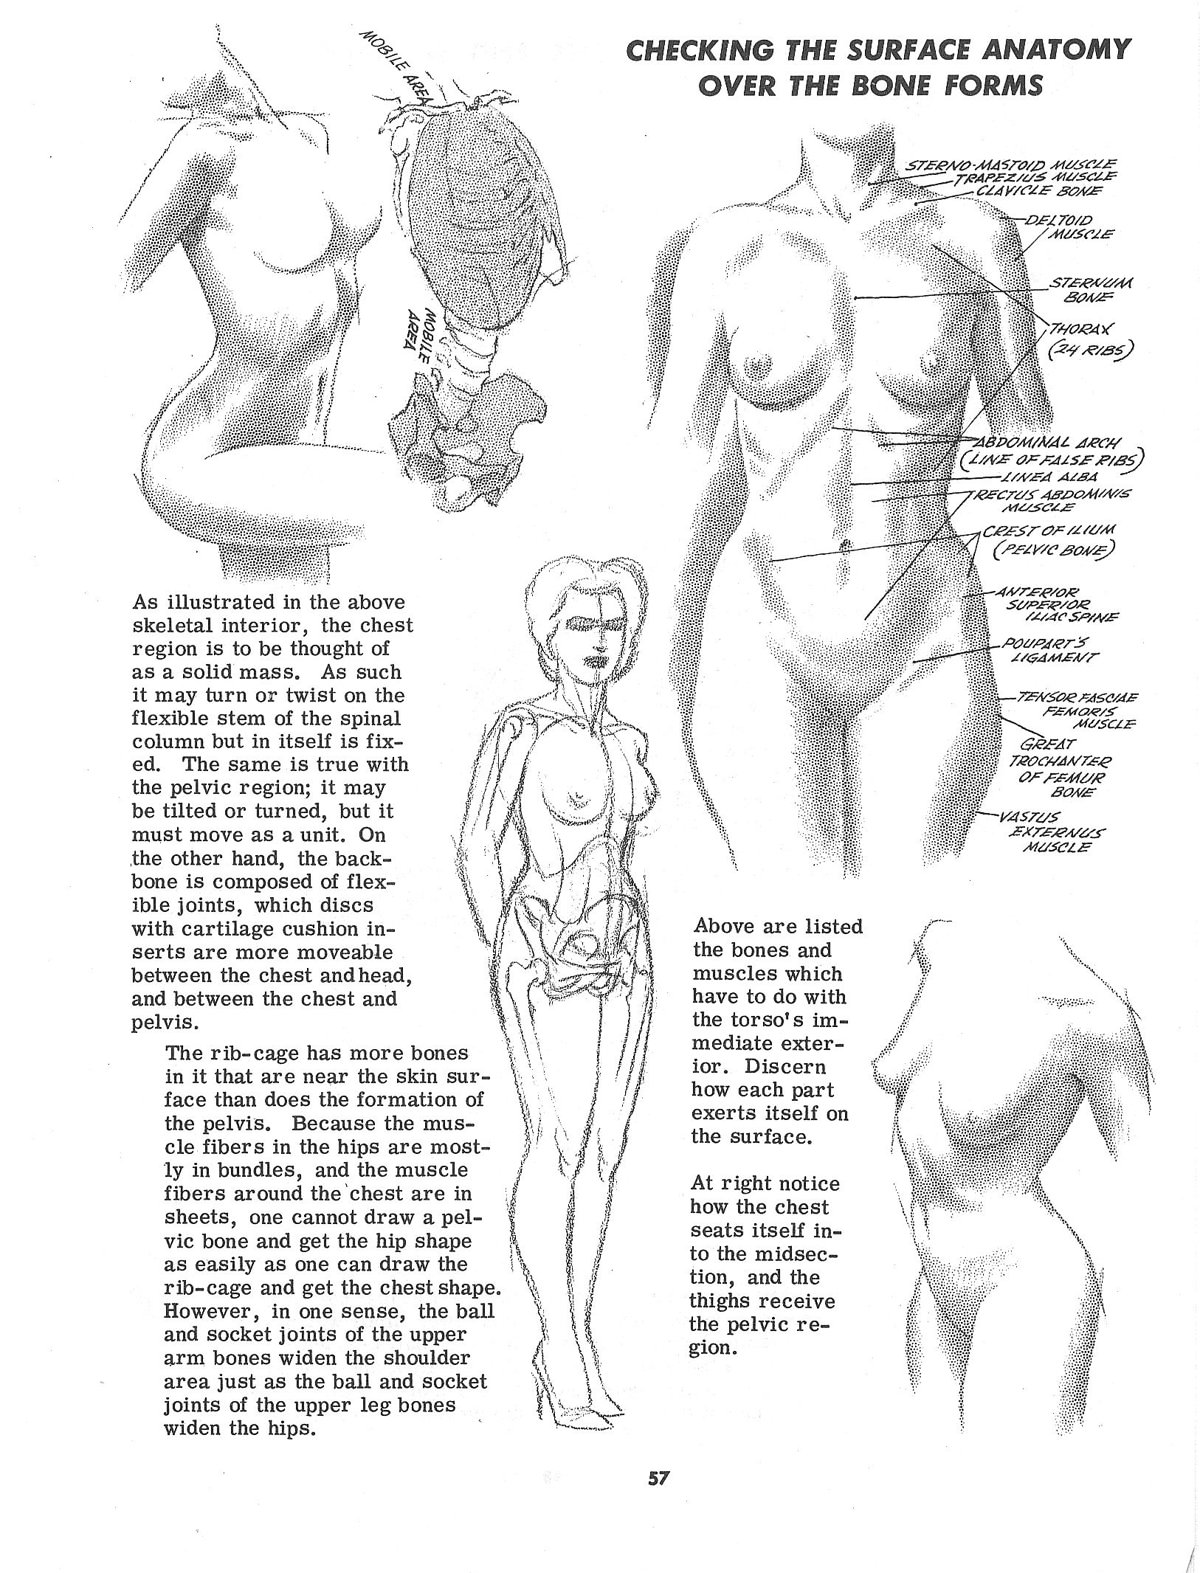
Mastering Surface Anatomy Over Bone Forms: A Comprehensive Tutorial on Torso Structure, Mobility, and Figure Drawing Techniques

In the discipline of figure drawing and anatomical studies, grasping how surface anatomy interacts with underlying bone forms is essential for creating realistic, dynamic human figures. This detailed tutorial is inspired by a classic reference page from an anatomy guide (likely from a book such as “Atlas of Human Anatomy for the Artist” or similar instructional material), titled “Checking the Surface Anatomy Over the Bone Forms.” The image features pencil illustrations of the female torso in side, front, and partial back views, with overlaid skeletal elements and labeled muscles and bones. It emphasizes the relationship between the rib cage, pelvis, spine, and surface contours, highlighting mobility areas and how bones influence visible forms. Text passages explain the fixed versus flexible regions, such as the spinal column’s twistability and the rib cage’s role in shaping the chest.
This guide is tailored for artists, illustrators, and anatomy enthusiasts at all levels, whether using traditional media like charcoal on newsprint or digital tools such as Autodesk SketchBook or ZBrush for 3D modeling. We’ll dissect the reference image into key sections: the skeletal foundation and mobility, bone-muscle interactions in the torso, labeled anatomical landmarks, and practical drawing applications. Each part includes step-by-step instructions, common errors to avoid, and exercises to reinforce learning. By integrating these concepts, you’ll learn to “check” surface anatomy—observing how bones protrude or recede under skin and muscle—to produce lifelike torsos that convey posture, movement, and volume. Focus on observation: use mirrors, live models, or photo references to verify how light reveals bone forms through subtle shadows and highlights.
Section 1: The Skeletal Interior and Torso Mobility (Left-Side Text and Illustration)
The left portion of the reference image introduces the torso’s skeletal core, illustrating a side view of the upper body with a superimposed skeleton to show how bones dictate surface shapes. The text describes the region as “thought of as a solid mass,” but notes its flexibility, particularly in the spinal stem and pelvic tilt.
- Identifying Fixed vs. Mobile Areas: Begin by sketching the torso as a basic bean shape or elongated oval for the rib cage and pelvis connected by the spine. The reference labels the “Mobile Area” at the waist, where the spine’s flexible stem (lumbar vertebrae) allows twisting and bending. Draw a vertical axis for the spine, curving it into an S-shape for natural posture—fixed at the thoracic (chest) and sacral (pelvic) ends, but mobile in between. Proportions: The rib cage spans about 2-3 head units in height, tapering downward, while the pelvis is roughly 1-1.5 head units wide.
- Understanding Bone Influence on Surface: Note how the rib cage forms a barrel-like structure under the chest, with cartilage discs providing cushioning for movement. In your drawing, lightly shade areas where bones are close to the surface, like the sternum (breastbone) protruding at the center. The text warns that the pelvis may tilt or turn independently, so practice foreshortening: in a side view, compress the far side of the pelvis using converging lines.
- Practical Tips and Exercises: Use gesture lines to capture mobility—quick, sweeping curves for the spine’s twist. Common mistake: Drawing the torso as rigid; instead, exaggerate bends in warm-up sketches. Exercise: Draw a torso in three poses (neutral, twisted left, bent forward), overlaying skeletal lines to check alignment. Reference the image’s side-view skeleton for accuracy, ensuring the hip bone (ilium) anchors the lower form.
This foundation helps artists avoid “floating” torsos by grounding them in skeletal logic.
Section 2: Rib Cage and Pelvic Structure – Bone Forms Shaping the Surface (Central Text and Illustrations)
The core text explains the rib cage’s density compared to the pelvis, noting how muscles bundle around hips while bones dominate chest contours. Illustrations show the rib cage as a cage-like form and the pelvis as a basin, with comparisons to ball-and-socket joints.
- Constructing the Rib Cage: Treat the rib cage as an egg-shaped volume with 12 pairs of ribs (24 total, as labeled). Start with a central sternum line, then arc ribs outward—more horizontal at the top (thoracic) and angled downward at the bottom (abdominal arch). The reference highlights that ribs have “more bones in it than are near the skin surface,” so focus on visible landmarks: the collarbone (clavicle) at the top and the lower ribs flaring at the sides. Add shading to suggest depth, with cross-contours wrapping around for roundness.
- Pelvic Basin and Hip Integration: The pelvis is depicted as a wide, bowl-shaped structure widening at the hips. Draw it as two fused halves (ilia) with a central sacrum; the text compares it to “ball and socket joints of the upper arm bones” for the shoulders and “upper leg bones” for the hips. Proportions: Hips are wider in females (as in the illustration), about 1.2 times shoulder width. Emphasize muscle fibers bundling here—light lines for the gluteus and tensor fasciae latae.
- Integration and Volume Building: Connect rib cage to pelvis with the abdominal region, using the spine as a bridge. Tip: Use negative space to refine shapes—e.g., the gap between arm and torso reveals rib curvature. Avoid error: Over-simplifying the pelvis as a flat triangle; add subtle curves for the iliac crest’s prominence. Exercise: Sculpt a quick clay model or digital 3D proxy of the torso skeleton, then draw over it to see surface effects.
These elements ensure your figures have structural integrity, preventing anatomical inaccuracies like mismatched proportions.
Section 3: Labeled Muscles and Bones – Surface Anatomy Checkpoints (Right-Side Illustrations)
The right side features front-view diagrams with detailed labels for muscles and bones, such as Sternomastoid Muscle, Trapezius, Deltoid, Sternum Bone, Thoracic (24 Ribs), Abdominal Arch, Rectus Abdominis, Pectoral Muscle, Pelvic Bone, Anterior Superior Iliac Spine, Poupart’s Ligament, Tensor Fasciae Femoris, Great Trochanter of Femur, Vastus Externus Muscle, and more. This serves as a “checklist” for surface visibility.
- Mapping Key Landmarks: Start with the sternum as a central anchor, drawing it as a vertical plate. Label and shade muscles: the trapezius forms a diamond across the upper back and shoulders, while the deltoid caps the shoulder like a pad. Lower down, the rectus abdominis (six-pack) divides the abdomen, with the pelvic bone’s crest visible as a horizontal ridge. The illustration shows how these “seat themselves” on bones—e.g., the vastus externus bulging over the femur.
- Assessing Visibility and Interaction: The text lists bones and muscles that “have to do with the torso’s immediate exterior.” For each, note prominence: ribs are subtle under skin but define the chest’s curve; the great trochanter protrudes at the hip. Use hatching for muscle definition—denser where tendons attach, like at Poupart’s ligament (inguinal ligament).
- Advanced Detailing: Incorporate gender variations—the female model shows softer contours over breasts and hips. Exercise: Create a front-view torso study, labeling 10-15 points from the reference. Common pitfall: Ignoring layering—muscles overlap bones, so draw in layers (bones first, then muscles). Tip: For dynamic poses, twist the torso to see how labels shift, like the sternomastoid stretching in a turn.
This section transforms abstract anatomy into tangible drawing aids, ideal for medical illustration or character design.
Section 4: Applying Surface Anatomy in Figure Drawing (Overall Synthesis and Practice)
Synthesize the reference by “checking” your drawings against bone forms—palpate models or yourself to feel landmarks.
- Full Torso Rendering Steps: Block in major forms (rib cage, pelvis), add spine mobility, overlay muscles, then refine surfaces with light/shadow. Use the image’s views: side for profile checks, front for symmetry.
- Common Challenges and Solutions: If forms look flat, add cross-sections (imaginary slices) to emphasize volume. For mobility, animate sequences showing twist/tilt.
- Exercises for Proficiency: Daily: 15-minute torso gestures from references. Weekly: Full figure with anatomical overlays. Resources: Books like “Anatomy for Sculptors” or online platforms like Proko for video breakdowns.
This tutorial equips you with professional tools to elevate your figure work, ensuring anatomical accuracy and expressive power. Experiment with poses, and share your progress for feedback—mastery comes from consistent “checking” against real forms. For extensions like limb integration or male variations, explore our companion guides!