Mastering Your Pool Game: Stance, Foot Position, and Cue Ball Control

Elevate your billiards skills with this comprehensive guide to proper stance, effective foot positioning, and advanced cue ball control techniques. Whether you’re a beginner looking to build a strong foundation or an experienced player aiming to refine your game, understanding these fundamentals is crucial for consistent performance and strategic play.
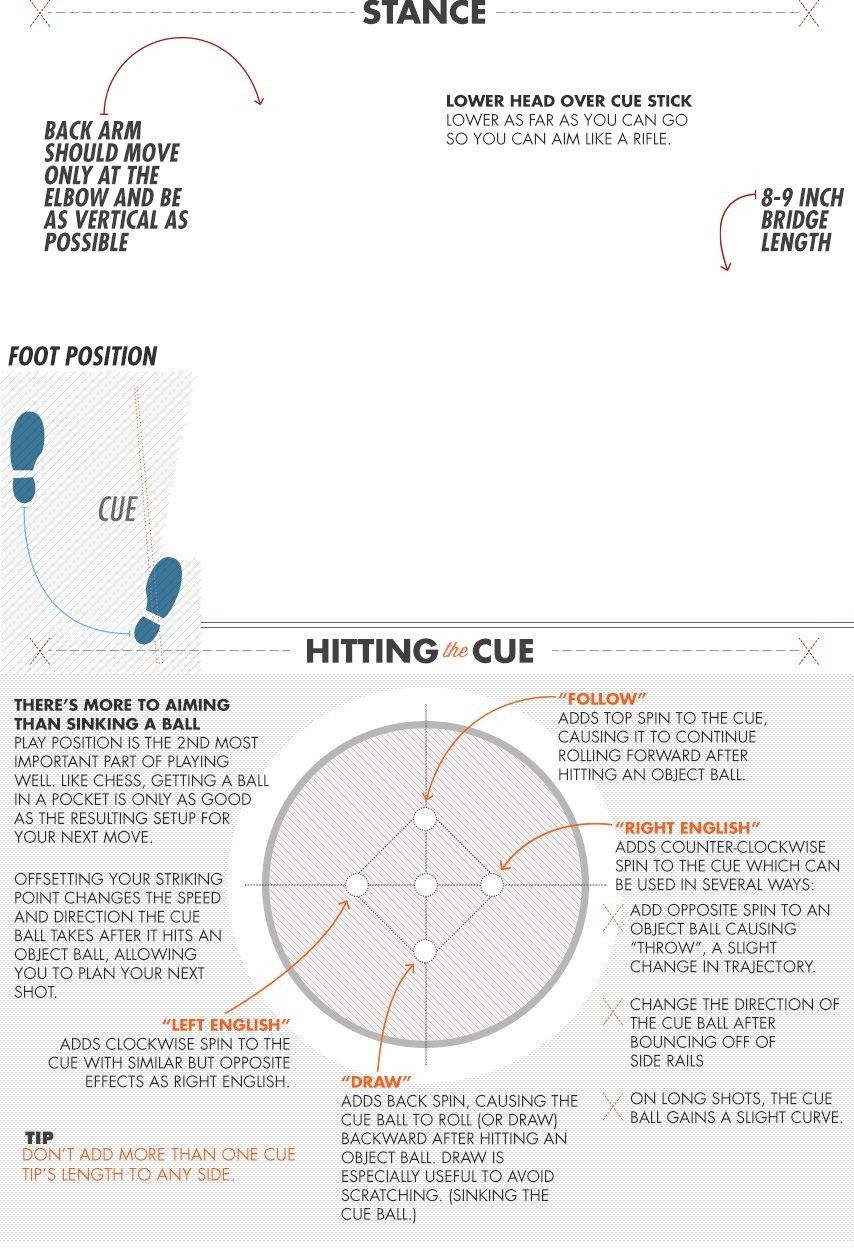
1. The Perfect Stance for Precision and Power
A solid stance is the bedrock of every successful shot in pool. This infographic emphasizes a few key elements to optimize your body mechanics:
- Lower Head Over Cue Stick: The goal is to get your head as low as comfortably possible over the cue stick, allowing you to aim like a rifle. This minimizes parallax error and provides a clear line of sight to the object ball.
- Back Arm Movement: Your back arm should primarily move only at the elbow. Keep your upper arm and shoulder as stable and vertical as possible throughout the shot. This creates a pendulum-like motion, ensuring a straight and consistent stroke.
- Bridge Length (8-9 Inches): Maintaining an optimal bridge length of 8 to 9 inches between your bridge hand and the cue ball provides a stable platform for your cue stick, allowing for precise aiming and a smooth stroke.
2. Foot Position for Stability and Balance
Your foot position contributes significantly to your overall stability and balance, enabling you to deliver a powerful and accurate stroke. While not explicitly detailed with specific angles in this visual, the illustration shows the general placement of the feet relative to the cue. Typically, one foot is positioned forward (on the same side as your dominant hand) and the other slightly back, with your weight distributed evenly to support your upper body’s movement.
3. Hitting the Cue: Beyond Just Aiming
While aiming is undoubtedly important, mastering cue ball control is what truly differentiates a good player from a great one. The infographic breaks down how different points of contact on the cue ball influence its movement and rotation:
- “Follow” (Top Spin): Hitting the cue ball above its center imparts top spin. This causes the cue ball to continue rolling forward after striking an object ball. “Follow” is essential for positioning the cue ball for your next shot, allowing you to get into a good setup for a pocketed ball.
- “Right English” (Clockwise Spin): Striking the cue ball on its right side imparts clockwise spin. This spin can affect the cue ball’s trajectory in several ways:
- It adds “throw,” a slight change in trajectory to the object ball.
- It changes the direction of the cue ball after it bounces off of side rails.
- On long shots, the cue ball gains a slight curve.
- “Left English” (Counter-Clockwise Spin): Conversely, hitting the cue ball on its left side imparts counter-clockwise spin. This produces similar but opposite effects to “Right English,” altering the object ball’s trajectory and the cue ball’s rail rebound and curve.
- “Draw” (Back Spin): Striking the cue ball below its center imparts back spin. This causes the cue ball to roll (or “draw”) backward after hitting an object ball. “Draw” is particularly useful for avoiding scratching (sinking the cue ball into a pocket) or for positioning the cue ball for a strategic subsequent shot.
Tip for Success:
- Don’t Add More Than One Cue Tip’s Length to Any Side: This general guideline suggests that extreme english (spin) might be less predictable or harder to control. Focus on subtle adjustments to get the desired effect.
By meticulously practicing these elements of stance, foot position, and cue ball manipulation, you’ll gain greater control over your game and elevate your performance on the pool table.