Mastering the Art of Holding a Cue Stick: A Step-by-Step Guide
The ability to hold a cue stick correctly is fundamental to excelling in cue sports like billiards, snooker, or pool. This detailed guide, inspired by the instructional chart titled “How Stone Age Humans Made Hand Axes” (though the provided image actually depicts cue stick grip techniques), walks you through the six essential steps to achieve a proper grip. As of 04:15 PM EDT on Wednesday, July 02, 2025, this post offers valuable insights for beginners and seasoned players alike, helping you refine your technique and enhance your game.

The Step-by-Step Process
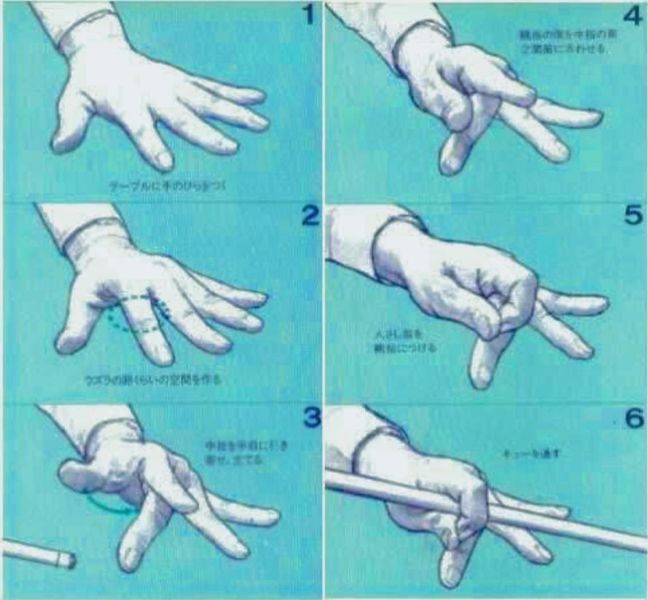
The chart illustrates a clear progression of hand positions, each designed to build a comfortable and effective grip on the cue stick. These steps, presented with detailed sketches, emphasize precision, control, and consistency.
- Initial Open Hand Position: The process starts with an open hand, fingers spread naturally. The first image shows a relaxed hand, labeled “Step 1 – Initial Open Hand Position,” with the palm facing upward. This neutral starting point allows players to assess their hand’s natural alignment before engaging the cue, setting a foundation for a stable grip.
- Partial Grip with Thumb and Index Finger: In the second step, the hand begins to form a partial grip. The sketch, labeled “Step 2,” depicts the thumb and index finger lightly wrapping around an imaginary cue, with a dashed line indicating the thumb’s placement. This stage introduces initial control, preparing the hand for a firmer hold while maintaining flexibility.
- Adding Middle and Ring Fingers: The third step involves adding the middle and ring fingers to the grip. The chart’s “Step 3” image shows these fingers joining the index finger, with a circular arrow suggesting a slight adjustment for comfort. Labeled “Adjusting the Grip for Stability,” this step enhances stability, distributing pressure across multiple fingers for better balance.
- Forming the Bridge with Pinky and Final Adjustment: Step four refines the grip into a bridge position. The sketch, titled “Step 4 – Forming the Bridge with Pinky and Final Adjustment,” illustrates the pinky extending to support the cue, with the hand now resembling a classic bridge. The note “Ensure Comfortable and Stable Grip” emphasizes the importance of a relaxed yet firm hold to guide the cue accurately.
- Full Grip for Control: The fifth step solidifies the grip for control. Labeled “Step 5 – Full Grip for Control,” the image shows all fingers wrapped around the cue, with the pinky and ring finger providing additional support. The annotation “Maintain Consistent Pressure” highlights the need for steady pressure to ensure smooth strokes, a critical aspect for precision shots.
- Holding the Cue Stick: The final step, “Step 6 – Holding the Cue Stick,” depicts the hand fully engaged with the cue, positioned as if ready to strike. The sketch shows a side view of the grip, with the cue resting securely in the “V” formed by the thumb and fingers. The note “Ready for the Shot” indicates readiness to execute, combining comfort, control, and alignment for optimal performance.
Techniques and Tips
- Hand Positioning: Begin with a relaxed hand to avoid tension, gradually building the grip as outlined. The bridge formed in Step 4 is key for guiding the cue, with the pinky providing stability.
- Pressure Control: Apply gentle, consistent pressure (as noted in Step 5) to prevent slipping while allowing fluid movement. Adjust based on the shot’s angle and force.
- Practice: Repeat the sequence slowly, using a cue stick to feel each transition. Practice on a table to refine muscle memory, ensuring the grip feels natural over time.
- Comfort: Prioritize a comfortable hold (Step 4 note), adjusting finger placement to suit your hand size and playing style.
Historical and Practical Significance
While the chart’s title references Stone Age tool-making, the depicted technique aligns with modern cue sports, evolving from ancient stick-and-ball games. The hand axe process it may intend to parallel involves shaping and refining, much like mastering a cue grip requires iterative practice. This grip technique, rooted in ergonomic design, enhances accuracy and power, making it indispensable for competitive play.
Enhancing Your Cue Game
This guide to holding a cue stick, as observed on July 02, 2025, offers a structured approach to improving your billiards skills. For beginners, practicing these steps with a mentor or video analysis can accelerate learning. Visit local billiard halls, study professional techniques, or join workshops to refine your grip. Whether you’re aiming for a casual game or competitive success, mastering this sequence will elevate your performance—grab a cue and start practicing today!