Have you ever looked at a painting and wondered how artists create depth and realism?
The secret lies in mastering light and shadow. Without it, paintings can look flat and lifeless.
When I first started painting, I struggled with this too. But over time, I learned how to simplify light and shadow into easy steps.
Today, I’ll share everything I know to help you understand and apply these techniques in watercolor painting.
If you want to improve your painting skills and make your artwork more realistic, keep reading!
Understanding Light and Shadow in Painting
What is Light and Shadow in Art?
Light and shadow refer to how light interacts with an object, creating different tones that define its shape. Without proper shading, objects in a painting can look flat.
But when you correctly capture highlights, mid-tones, and shadows, your artwork will gain dimension and realism.

- Pin
Why is Light and Shadow Important in Painting?
Mastering light and shadow allows you to:
- Create a sense of depth in your paintings
- Make objects appear three-dimensional
- Control the mood and atmosphere of your artwork
- Improve the overall composition of your painting
Even the most straightforward paintings can look more dynamic by applying the proper shading techniques.

- Pin
The Three Main Tones of Light and Shadow
To simplify shading, I always break it down into three main tones. Understanding these will help you paint objects that look more natural.
#1. Highlights (Brightest Areas)
Highlights are where the light directly hits the object. These are the brightest parts of your painting.
I usually leave these areas white or use a very light wash of color in watercolor.

- Pin
#2. Mid-tones (Transition Areas)
Midtones sit between highlights and shadows. They help create a smooth transition from light to dark.
I mix a slightly darker shade of my base color and apply it carefully.

- Pin
#3. Shadows (Darkest Areas)
Shadows are the darkest areas of an object, where little or no light reaches. The placement of shadows depends on the light source.
I often layer darker washes and blend them smoothly into the mid-tones when painting shadows.

- Pin
Simplifying Light and Shadow for Beginners
Why Start with Basic Techniques?
Light and shadow can seem complex, but breaking it down into simple steps makes it easier to understand.
If you’re new to watercolor, focusing on basic techniques will help you build confidence before moving on to advanced shading methods.

- Pin
How to Break Down Complex Light and Shadow into Simple Steps
Instead of trying to capture every tiny detail, start with the three main tones:
- Identify the light source.
- Block in highlights, mid-tones, and shadows.
- Blend them smoothly to create a realistic effect.

- Pin
Step-by-Step Guide to Painting Light and Shadow with Watercolors
Now that you understand the basics, let’s put theory into practice! Follow these steps to create realistic light and shadow in your watercolor paintings.
Step 1: Sketching the Object and Defining the Light Source
Start by sketching a simple object, like a sphere or cube. Then, decide where the light is coming from—this will determine where your highlights and shadows will be.

- Pin
Step 2: Applying the First Layer – Highlights
Begin with the lightest areas. Since watercolor is a transparent medium, you’ll want to start with a very diluted wash of color.
I usually leave some areas completely white to preserve the highlights.

- Pin
Step 3: Adding the Mid-tones for Depth
Once the first layer is dry, add a slightly darker wash to create mid-tones. Blend it gently so there are no harsh lines between the light and mid-tone areas.

- Pin
Step 4: Painting Shadows for Contrast
Now, add the darkest tones where the shadow falls. Remember, the shadow should be darkest at the point closest to the object and gradually fade out.

- Pin
Step 5: Blending and Refining for a Natural Look
To make your painting look seamless, soften the edges between light, mid-tone, and shadow. A damp brush can help blend the colors smoothly.

- Pin
With these five steps, you can create depth and realism in your watercolor paintings. But be careful—some common mistakes can make your work look unnatural.
Let’s talk about them next.
Common Mistakes When Painting Light and Shadow
Even after understanding the basics, many beginners make common mistakes. Here are a few to avoid:
Overusing or Underusing Dark Tones
If shadows are too light, the painting looks flat. If they’re too dark, the painting can feel too heavy. Try to find the right balance.

- Pin
Incorrect Placement of Shadows
Shadows should always be consistent with the light source. If they’re placed randomly, the object will look unnatural.

- Pin
Harsh or Unnatural Transitions Between Tones
The shading should be smooth. The object will look unrealistic if the transition between light and dark is too sudden.
Using wet-on-wet techniques in watercolor can help soften these transitions.
Enhancing Depth and Realism with Proper Composition
Understanding light and shadow is only one part of creating a stunning painting. The composition also plays a crucial role.
The Role of Light and Shadow in Creating Depth
Proper use of light and shadow can guide the viewer’s eye and enhance the depth of your painting.
Think about how light interacts with each element in your composition.

- Pin
Arranging Objects for Better Contrast and Balance
When setting up a still-life painting, place objects at different distances and angles to create more interesting contrasts between light and shadow.

- Pin
Practical Exercises to Improve Your Skills
Practice is the key to mastering light and shadow. Here are some simple exercises to help you develop your skills.
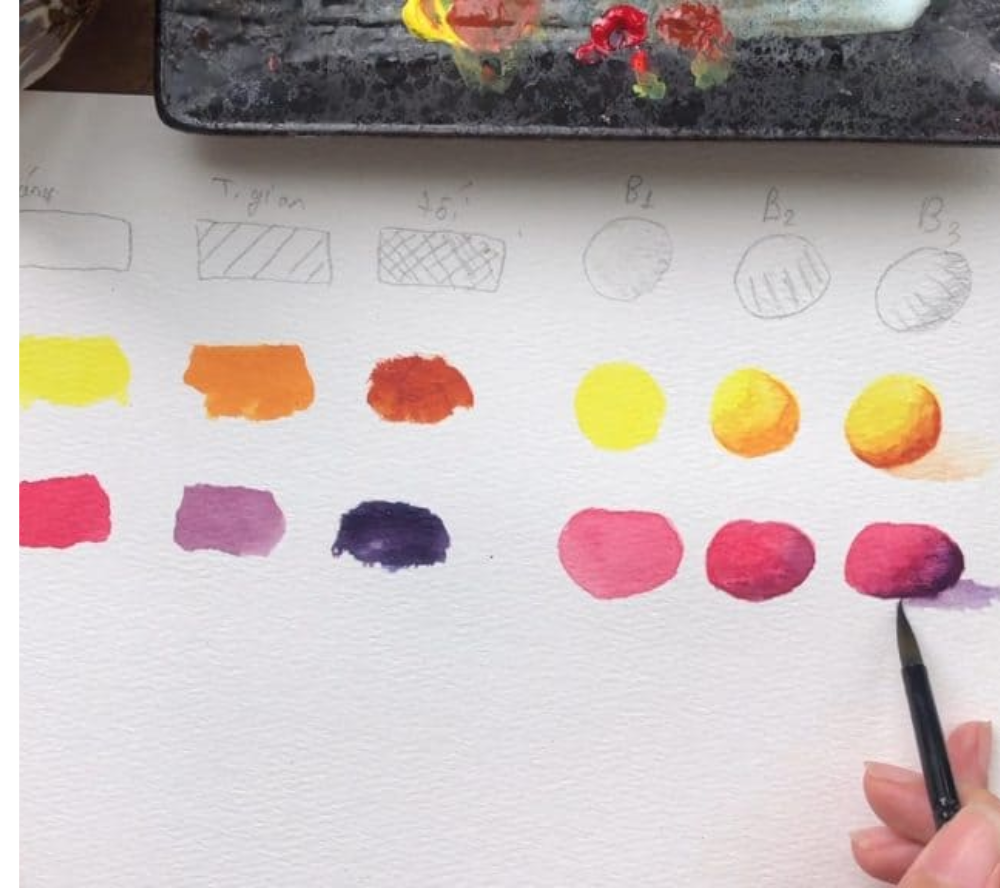
Simple Circle Exercise for Practicing Light and Shadow
Draw a few circles and practice shading them using highlights, midtones, and shadows. This will help you understand how light wraps around an object.

- Pin
Painting a Still Life with Light and Shadow
Choose a simple object like a fruit or a vase. Place a single light source to create strong shadows, then paint it using the techniques you’ve learned.

- Pin
In A Nutshell
Mastering light and shadow is essential for creating depth and realism in watercolor paintings. By understanding highlights, mid-tones, and shadows, you can transform flat artwork into dynamic, three-dimensional pieces.
Remember to start with simple shapes, gradually build up tones, and refine your blending for smooth transitions.
Ready to take your watercolor skills to the next level? Practice these techniques, experiment with light sources, and keep painting!
Have any questions or tips to share? Drop a comment—I’d love to hear from you!