How to Use Inkonik Pens: A Detailed Guide
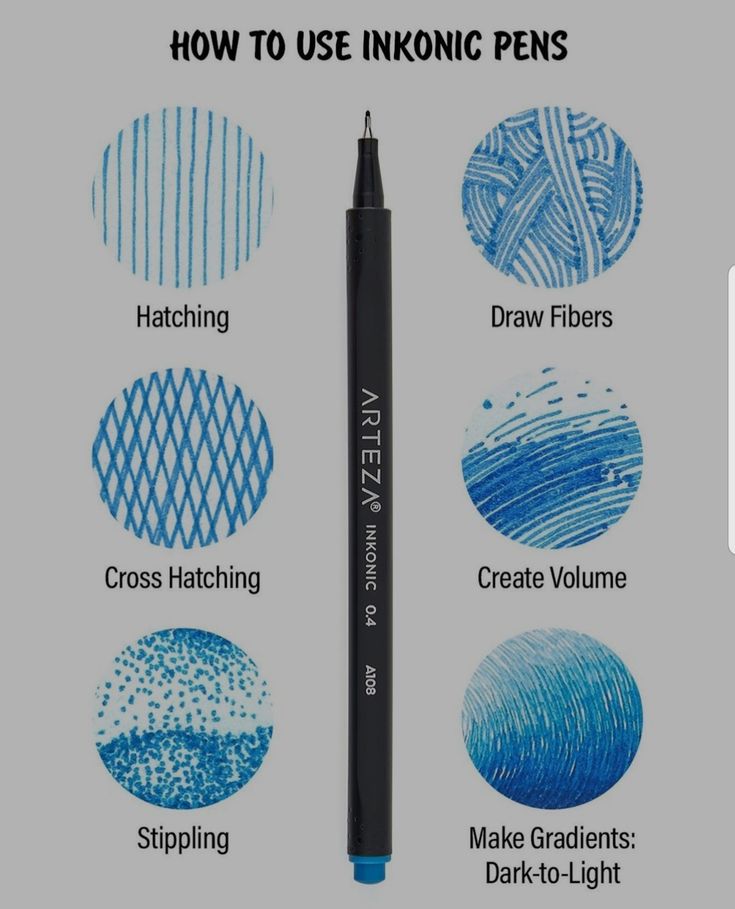
Discover the versatility of Inkonik pens with this comprehensive tutorial, featuring a range of techniques to elevate your drawing and illustration skills. Brought to you by Arteza, this guide showcases five essential methods—hatching, cross hatching, stippling, drawing fibers, and creating volume with gradients—illustrated with vibrant blue ink examples. Whether you’re a beginner exploring pen techniques or an experienced artist looking to refine your style, this step-by-step resource offers practical tips and creative inspiration for your next project.

Techniques and Applications
Explore these five techniques, each demonstrated with clear circular patterns:
- Hatching: Use parallel lines to create texture and shading, as shown in the first circle. Vary the spacing and direction to build light and shadow, perfect for adding depth to landscapes or portraits.
- Cross Hatching: Layer intersecting lines to enhance shading, depicted in the second circle. Adjust the density and angle for richer tones, ideal for detailed sketches or intricate designs.
- Stippling: Apply a series of dots to form texture and gradients, illustrated in the third circle. Control the dot density for subtle shading, great for organic forms or textured surfaces.
- Draw Fibers: Create fibrous, woven patterns with overlapping strokes, as seen in the fourth circle. This technique adds a sense of movement, suitable for hair, fabric, or natural elements.
- Create Volume: Use curved, parallel lines to suggest three-dimensionality, shown in the fifth circle. Vary line thickness to enhance depth, perfect for rendering objects with form.
- Make Gradients: Dark-to-Light: Blend strokes from dense to sparse to achieve a smooth gradient, depicted in the sixth circle. This method is excellent for creating realistic light transitions in your artwork.
Practical Tips for Success
Start with the 0.4mm Inkonik pen (A08) for a balanced line width, ideal for most techniques. Hold the pen at a consistent angle and apply even pressure for uniform lines in hatching and cross hatching. For stippling, use a light touch and vary dot proximity to control shading intensity. Draw fibers with a fluid motion, overlapping strokes for a natural effect. To create volume, follow the object’s contours with curved lines, adjusting thickness for depth. For gradients, begin with dense strokes and gradually lighten your hand as you move outward.
Application and Practice
Gather your Inkonik pen, paper, and a steady hand to practice these techniques. Begin with hatching to master parallel lines, then layer with cross hatching for added dimension. Experiment with stippling for textured effects, draw fibers for organic patterns, and use volume techniques for three-dimensional forms. Practice gradients by transitioning from dark to light across a single shape. Repeat each method to refine your control and explore creative variations.
Posted on July 06, 2025, at 11:15 AM EDT, this guide invites you to unleash your creativity with Inkonik pens. Whether you’re sketching detailed illustrations or adding texture to your designs, these techniques will help you achieve professional results with ease!