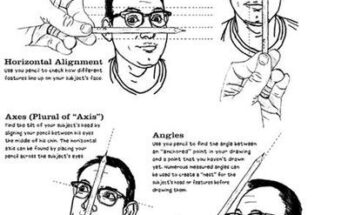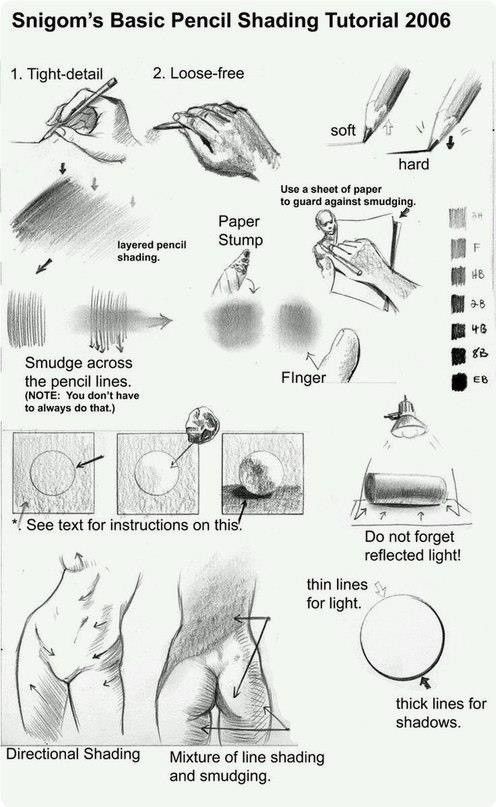
Snigom’s Basic Pencil Shading Tutorial 2006: A Comprehensive Guide
Step into the world of pencil shading with this detailed tutorial from 2006 by Snigom, designed to help artists of all levels master the art of creating depth and texture. Featuring a rich array of illustrations and practical techniques, this guide covers everything from tool selection to advanced shading methods. Whether you’re a beginner looking to refine your skills or an experienced artist seeking to enhance your shading techniques, this step-by-step resource offers valuable insights and inspiration for your next drawing project.

Tools and Techniques Overview
The tutorial begins with an introduction to essential tools and methods, each illustrated with clear examples:
- Tight-Detail: Use a sharp pencil held close to the tip for precise, fine lines, ideal for intricate areas as shown in the hand holding a pencil sketch.
- Loose-Free: Hold the pencil loosely with a soft, hard lead to create broader, more relaxed strokes, demonstrated by the hand using a paper stump.
- Paper Stump: Employ a paper stump to blend layered pencil shading, as illustrated with a hand smudging a shaded area, offering a smooth gradient effect.
- Smudge Across Pencil Lines: Smudge pencil lines with your finger if you don’t have a stump, shown with a hand blending lines across a shaded section.
- Finger: Use your finger for a softer smudge, depicted in the blending of a circular shaded area, perfect for subtle transitions.
- Pencil Grades: Reference the pencil hardness scale (F, H, 2B, 4B, 6B, 8B) to choose the right lead for your shading intensity.
Lighting and Line Work
The guide emphasizes the importance of light and line thickness:
- Do Not Forget Reflected Light: Incorporate thin lines to suggest reflected light, as shown in the shaded sphere, adding realism to your drawings.
- Thin Lines for Light: Use delicate lines for lighter areas, illustrated with a lightly shaded circle.
- Thick Lines for Shadows: Apply thicker lines for darker shadows, depicted in a contrasting shaded circle, enhancing depth.
Shading Styles
Explore various shading techniques with detailed examples:
- Directional Shading: Apply strokes in a consistent direction, as seen in the figure’s legs, to create a structured, flowing texture.
- Mixture of Line Shading and Smudging: Combine line work with smudging, shown on the figure’s torso, for a blended, three-dimensional effect.
Practical Tips for Success
This tutorial encourages a hands-on approach. Start with a sharp pencil for tight details, then switch to a softer lead and paper stump for broader shading. Use a sheet of paper as a guard against smudging to keep your work clean. Pay attention to light sources—add thin lines for reflected light and thicker lines for shadows to create contrast. Practice directional shading for consistency and mix with smudging for a polished finish.
Application and Practice
Gather your pencils (ranging from F to 8B), a paper stump, and paper to follow along. Begin with a simple outline, then apply the shading techniques as shown, adjusting pressure and tool use based on the desired effect. Experiment with blending methods—finger for soft areas, stump for smooth gradients—to see how they transform your drawing.
Posted on July 05, 2025, at 04:52 AM EDT, this tutorial invites you to revisit Snigom’s classic 2006 guide and start shading your own masterpieces. Whether you’re sketching portraits, still life, or abstract forms, these techniques will add depth and realism to your artwork!