How to Shade a Planar Face Portrait: Step-by-Step Tutorial Using Faceted Construction for Realistic Depth

Description:
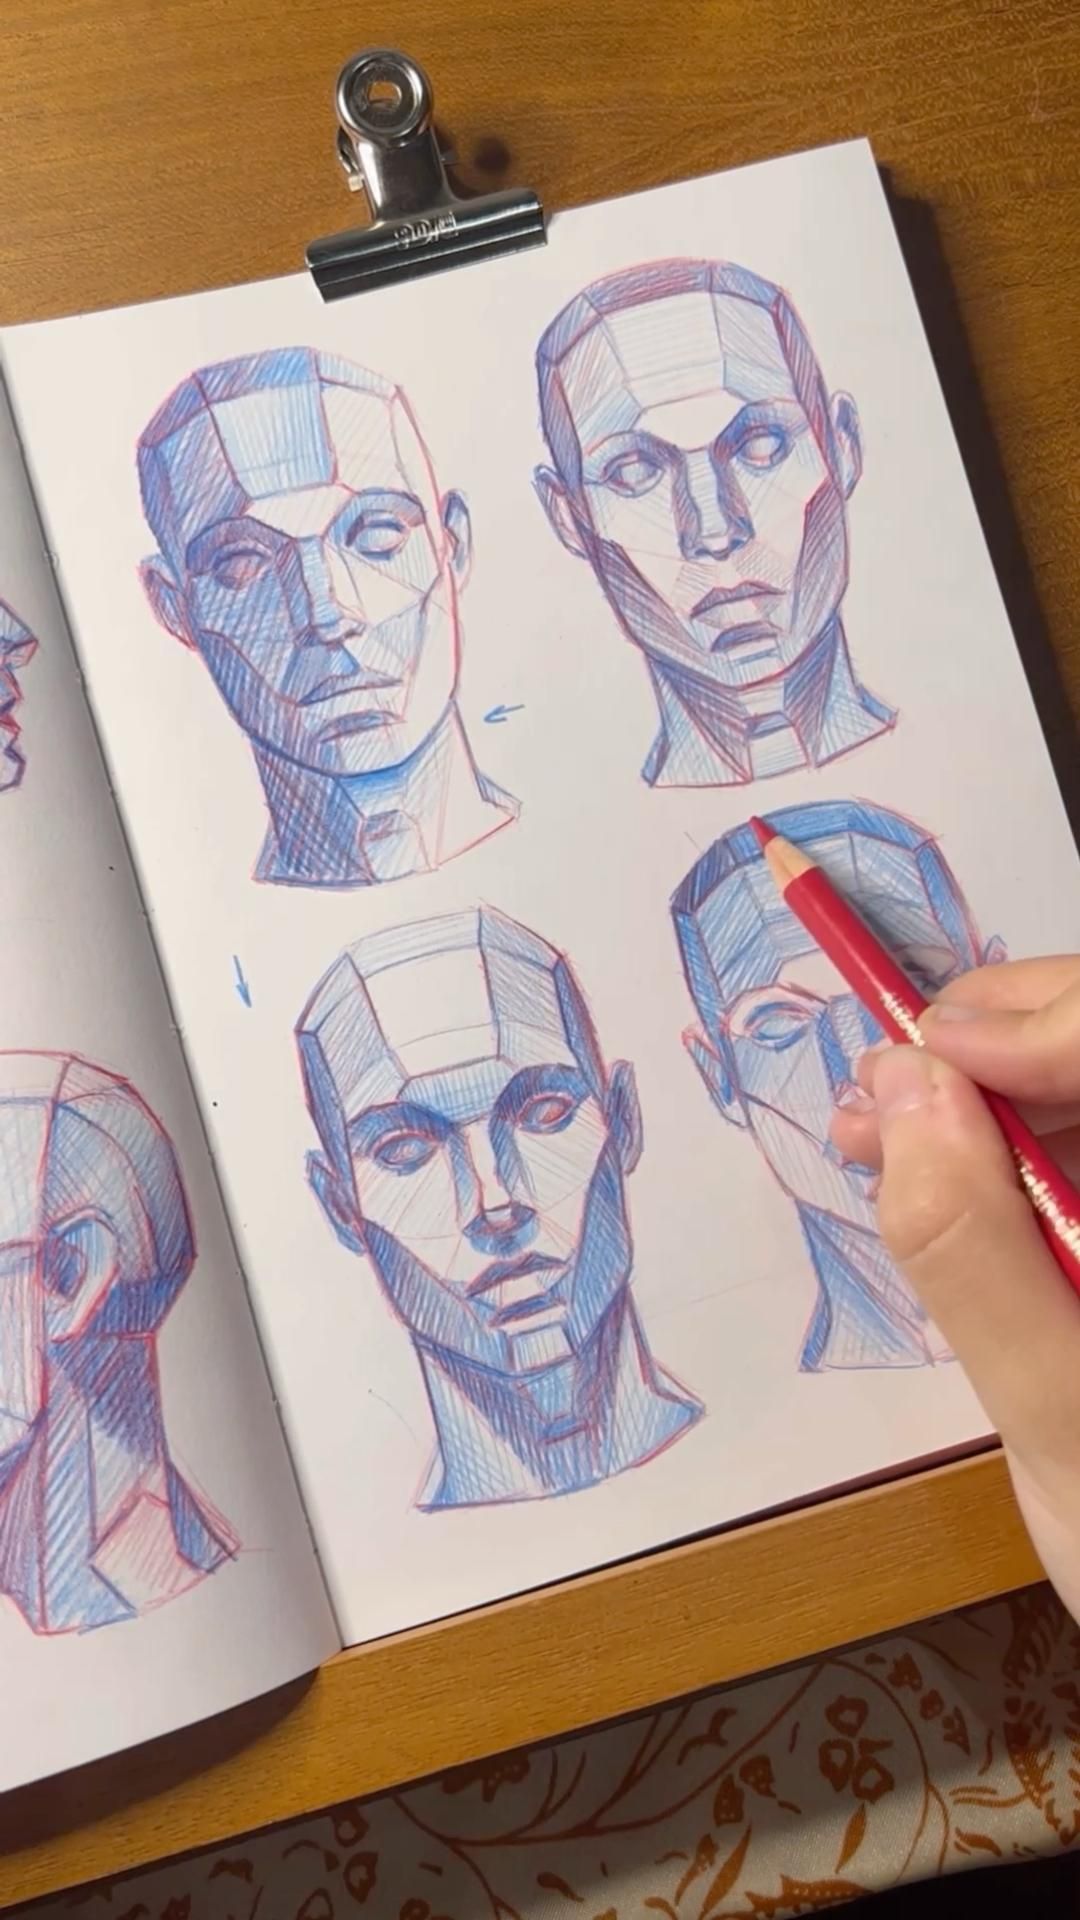
Shading a portrait brings your drawing to life by transforming flat lines into believable three-dimensional form. The sketches in this image show an excellent foundation: a planar (faceted) head construction, often inspired by methods like Andrew Loomis combined with John Asaro’s planes of the head. This approach breaks the complex curves of the human face into simplified geometric planes, making it much easier to understand light, shadow, and value transitions.
This detailed tutorial guides you through shading a face portrait starting from the kind of blue/red construction lines seen in the image (blue for major planes, red for refinements or light direction). It’s perfect for beginners to intermediate artists working in pencil (graphite or colored) on paper. The goal is to achieve realistic volume, form, and lighting without guessing—relying instead on structured planes.
Why Use Planar Construction for Shading?
- The human head isn’t smooth like a sphere—it’s made of angular planes (forehead, cheekbones, jaw facets, nasal bridge, etc.).
- By shading each plane individually, you control how light hits flat surfaces, creating clear light, halftone, core shadow, reflected light, and cast shadow areas.
- This method prevents muddy or flat shading and helps maintain consistent light direction across the face.
Materials Needed
- Pencil (start with HB or 2B for construction, then 2B–6B for shading; a red pencil for accents if desired).
- Eraser (kneaded for lifting highlights, vinyl for clean corrections).
- Blending tools (tissue, tortillon, or finger for soft gradients).
- Reference photo or live model with strong side lighting to emphasize planes.
Step-by-Step Shading Tutorial
- Review and Refine Your Construction (Foundation Check) Your drawing should already have the major planes mapped out, as in the image:
- Forehead divided into top, front, and side planes.
- Cheekbones as prominent angled facets.
- Nose as a central wedge with side planes.
- Jaw and chin as lower facets.
- Eyes, mouth, and ears placed within the structure. Tip: Use light hatching (parallel lines) in blue or light graphite to indicate plane directions. Ensure the light source is consistent (e.g., coming from upper left, as suggested by the shadows in most of these sketches). If needed, lightly erase or darken lines for clarity before shading.
- Establish the Light Source and Value Scale Identify where the light hits strongest (highlight areas) and darkest (core shadows). Create a simple 5–7 value scale on scrap paper:
- 1: White/paper (brightest highlight)
- 2–3: Light halftones
- 4: Midtone (general face value)
- 5–6: Dark halftones and core shadows
- 7: Black (deepest shadows, like nostrils, pupils, hair). Pro tip: Squint at your reference to simplify values into big light and shadow masses. Ignore fine details at first.
- Block In the Major Shadow Shapes (Mass Shading) Lightly fill the largest shadow areas first (core shadows under brow ridge, side of nose, under cheekbones, under chin, neck shadow).
- Use broad, light strokes (side of pencil lead or hatching) with a 2B–4B.
- Keep pressure even—build darkness gradually.
- Follow plane edges: Shadows stop abruptly where planes turn away from light (hard edges) or blend softly where planes curve gently. Example from image: Notice how shadows wrap around the cheek and jaw planes, creating clear separation between lit and unlit sides.
- Add Halftones and Form Modeling This is where the planar method shines—shade each individual plane according to its angle to the light.
- Planes facing the light → lightest values (leave mostly paper white or light hatch).
- Planes turning away → progressively darker halftones.
- Planes in full shadow → darkest core shadows with reflected light at the bottom (cooler, lighter tone from bounce light).
- Use hatching or cross-hatching following the plane’s direction (e.g., vertical on forehead, angled on cheeks).
- Blend lightly for smooth transitions between planes, but keep some faceted edges visible for structure. Common mistake to avoid: Over-blending too early—preserve hard plane edges for form clarity.
- Refine Features Within Planes Now add details while respecting the planes:
- Eyes: Shade the iris darkest at the top (pupil black), add catchlight (white highlight), shade eyelid planes separately.
- Nose: Bridge and tip catch light; sides and underside in shadow.
- Mouth: Upper lip darker (turns away), lower lip catches light; corners in shadow.
- Cheeks & Jaw: Model subtle curves with halftone gradients, but keep angular feel. Use a kneaded eraser to pull out highlights on forehead, nose bridge, cheekbones, chin, and lower lip.
- Add Reflected Light and Final Details Introduce subtle reflected light in shadows (e.g., under chin from neck/chest bounce).
- Soften edges where needed (e.g., soft transition on forehead).
- Darken cast shadows (e.g., under nose, under chin) slightly darker than core shadows.
- Add hair shading last—follow hair planes over the skull, treating it as grouped masses rather than individual strands at first.
- Step back frequently and compare to reference—adjust overall contrast if the face looks flat.
- Final Polish and Evaluation
- Check for lost-and-found edges (some edges blend into background, others sharp).
- Ensure the face reads as 3D from a distance—strong light/shadow separation.
- Sign your work!
Advanced Tips for Planar Shading
- Practice the Asaro head (planar model) separately to master light on facets before applying to realistic portraits.
- Use Loomis method for initial proportions, then overlay planes for shading accuracy.
- Experiment with lighting: side light emphasizes planes best; front light flattens them.
- For colored pencil (as in the red/blue image), layer blue for cool shadows, red for warm halftones to mimic skin undertones.
This planar approach, as demonstrated in your sketches, builds confidence in shading because you’re not guessing values—you’re logically assigning them to each plane. Practice on multiple angles (front, 3/4, profile) to see how planes shift.
Ready to try it? Share your shaded version or questions below—what lighting setup are you using? Let’s build on this strong construction!