Comprehensive Tutorial: Drawing Realistic Shadows – Understanding Light Direction, Length, and Environmental Effects

Shadows are a fundamental element in visual art, adding depth, dimension, and realism to drawings by simulating how light interacts with objects and surfaces. Mastering shadows requires an understanding of light sources—primarily the sun—and how factors like time of day, angle, and environment influence their appearance. This tutorial, based on classical drawing principles akin to those taught in foundational art courses (e.g., similar to methods in “The Natural Way to Draw” by Kimon Nicolaides or modern digital art workflows), breaks down the process of drawing shadows step by step. We’ll explore sunlight as the primary source, covering direction, length variations, and special cases like shadows under eaves or on buildings. Ideal for beginners in pencil sketching, ink illustration, or digital painting (using tools like Photoshop or Clip Studio Paint), this guide emphasizes observation and practice to avoid common errors such as inconsistent lighting or flat, unconvincing forms.
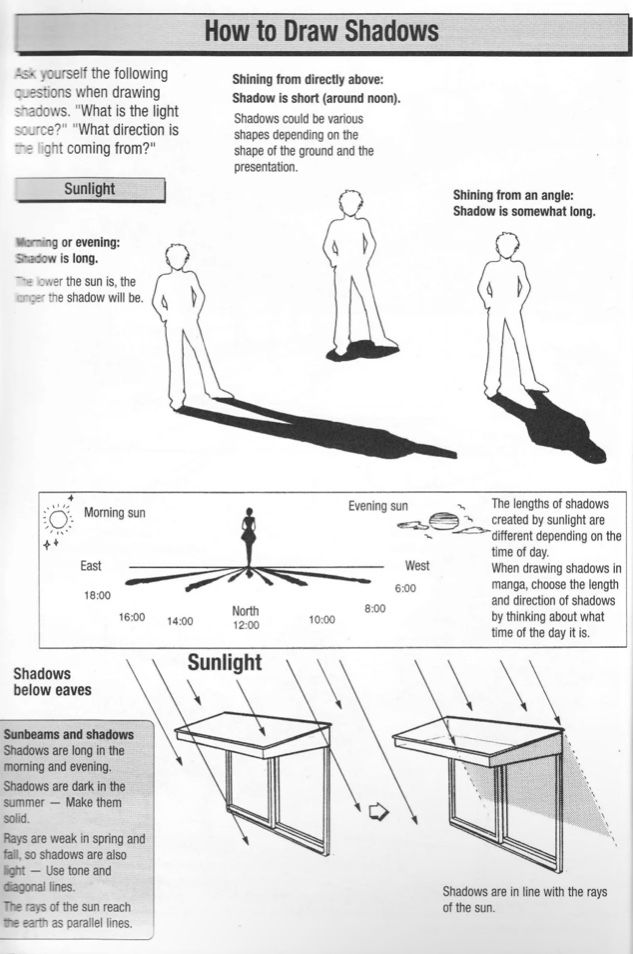
The tutorial encourages self-questioning, as highlighted in the guide: Ask yourself, “What is the light source?” “What direction is the light coming from?” This introspective approach builds intuition. Key principles include: Shadows are opposites of light (dark where light is blocked), they elongate based on light angle (low sun = long shadows), and they conform to surfaces (e.g., wrapping around curves or projecting onto walls). Always start with a defined light source to maintain consistency. Tools recommended: Graphite pencils (HB for light outlines, 4B-6B for dark shadows), eraser for highlights, blending stump for soft edges, and a reference lamp for indoor practice. Work in grayscale first to focus on values before adding color (e.g., cooler blues for distant shadows, warmer grays for proximity). Common mistakes to avoid: Ignoring cast vs. form shadows (cast are projected, form are inherent to the object’s shape), mismatched lengths (all shadows in a scene must align with one light), or hard edges everywhere (real shadows soften with distance due to diffusion).
Core Principles of Shadow Drawing
Before diving into specifics, grasp these essentials:
- Light Direction and Angle: Sunlight shifts throughout the day—from east (morning) to west (evening), with overhead at noon. Low angles create dramatic, elongated shadows; high angles produce short, compact ones.
- Shadow Length and Shape: Determined by the sun’s height; use trigonometry basics (e.g., tangent of angle = opposite/adjacent) for precision, but visually estimate via object height vs. shadow projection.
- Cast vs. Form Shadows: Cast shadows are sharp projections on surfaces; form shadows are gradual darkenings on the object itself.
- Environmental Factors: Surfaces like ground or walls distort shadows; under structures, shadows interact with artificial edges.
- Value and Edge Quality: Shadows aren’t uniform black—use gradients (core dark, edges lighter) and vary hardness (crisp near object, soft farther away).
- Observation Tips: Study real-life shadows at different times; photograph them for reference. In art, exaggerate for mood (e.g., long shadows for mystery).
- Artistic References: Draw from masters like Rembrandt for dramatic chiaroscuro or contemporary artists like James Gurney for scientific accuracy in fantasy scenes.
Practice exercises: Set up a still life with a single light; sketch shadows hourly to note changes. Let’s proceed to the breakdown, mirroring the guide’s sections.
Section 1: Sunlight as the Primary Light Source – Direction and Basic Shadows
Understand how sunlight dictates shadow direction, starting with human figures as relatable subjects.
- Visual Breakdown: Illustrations show a standing person with shadows at morning/evening (long, angled) vs. noon (short, directly below). Morning sun from east casts shadows westward; evening from west casts eastward. At noon, shadows are minimal and underfoot.
- Technique: Identify the sun’s position (e.g., low east for morning). Draw a line from the light source through the object’s top to the ground—this projects the shadow’s end. For figures, start with a simple silhouette, then extend the shadow based on height (e.g., twice the height for low sun). Use light hatching for initial placement, building to solid fill.
- Key Focus: Direction is key—shadows always point away from the light. Shapes vary: Compact at high sun, stretched at low.
- Tutorial Tip: Use a compass rose (North labeled) for orientation. Practice with stick figures: Draw 3 poses at different times, ensuring shadows align (e.g., all westward in morning). For angled light, tilt the projection line. This builds consistency in multi-object scenes.
Section 2: Shadow Length Variations Throughout the Day
Explore how time affects shadow elongation, using diagrams for precise calculation.
- Visual Breakdown: A timeline from morning (18:00? Wait, likely a typo for times like 6:00 AM) to evening shows rays from sun positions (east to west). Shadows lengthen as the sun lowers: Short at noon (12:00), long at dawn/dusk. A figure demonstrates projection rays determining length.
- Technique: Measure object height, then use sun angle to scale shadow (e.g., 45° angle = shadow equals height; 30° = longer). Draw parallel rays from the sun, intersecting the object and extending to ground. Choose length based on narrative—long for dramatic effect.
- Key Focus: Lengths differ by time: Morning/evening (extended), midday (compressed). Factors like latitude affect extremes (longer in winter).
- Tutorial Tip: Create a “shadow clock”: Sketch a pole at hourly intervals, noting lengths. In digital, use perspective tools for rays. Experiment: Draw a landscape at sunrise vs. sunset, adjusting shadows to match mood. Remember, shadows created by sunlight are different depending on the time of day—choose angle and length by thinking about what time it is.
Section 3: Special Cases – Shadows Below Eaves and Architectural Elements
Address how structures modify shadows, adding complexity for realistic environments.
- Visual Breakdown: Diagrams depict sunbeams under eaves: Morning/evening rays angle in, casting long interior shadows; summer rays are high (dark under), winter low (light penetrates). Additional views show rays parallel to earth, creating diagonal lines on walls/floors.
- Technique: For under eaves, draw rays at sun angle, clipping where blocked by the structure. Shadows on walls are vertical projections; on floors, horizontal. Use solid darks for umbra (core shadow), lighter for penumbra (diffuse edge). For buildings, note seasonal changes: Spring/summer (high sun = solid darks), fall/winter (low = raking light).
- Key Focus: Rays are parallel (sun is distant), so shadows maintain consistent direction. Under structures, shadows are darker due to less ambient light.
- Tutorial Tip: Set up a model: Use a box for eaves, shine a light at angles. Sketch variations: Indoor scene with window light (diagonal shadows), outdoor with overhang (truncated). Blend edges softly for realism. Advanced: Add multiple sources (e.g., reflected light softening shadows).
Section 4: Advanced Considerations – Shadows in Line with Sun Rays
Incorporate how shadows align with direct sunlight for cohesive drawings.
- Visual Breakdown: Final diagrams emphasize shadows as inverses of rays—straight lines projecting from objects in the sun’s direction.
- Technique: Always trace back to the source: Draw rays first, then fill opposites as shadows. Vary intensity: Harsh in direct sun, soft in overcast.
- Key Focus: Alignment prevents inconsistencies; think of shadows as “negative space” of light.
- Tutorial Tip: Critique your work: Overlay rays to check. Practice full scenes: A street at noon (short shadows) vs. evening (long, overlapping).
Conclusion: Integrating Shadows into Your Artwork for Depth and Storytelling
By applying these principles—direction from light source, length by time/angle, and environmental adaptations—you’ll draw shadows that enhance realism and narrative. Shadows aren’t just dark areas; they tell stories of time, mood, and space. Practice consistently: Daily shadow studies from life or photos. Challenge: Create a time-lapse series of one scene at different hours. For more, explore related tutorials on light sources or value scales. Share your shadow drawings in our community—feedback awaits! Keep observing the world, and your art will shine.