Crafting a Prehistoric Marvel: The Life-Size Southern Mammoth Sculpture by Jim van Dijk Creations

Description: A Step-by-Step Guide to Creating a Realistic Life-Size Mammoth Reconstruction
In the world of paleoart and museum exhibits, few creations capture the imagination quite like a life-size reconstruction of an extinct megafauna species. This detailed guide explores the intricate process behind the creation of a stunning Southern Mammoth (Mammuthus meridionalis) sculpture, as crafted by renowned Dutch artist Jim van Dijk of Jim van Dijk Creations. Drawing from paleontological accuracy and artistic expertise, this project was commissioned for Historyland Museum in Hellevoetsluis, Netherlands, under the supervision of esteemed paleontologist Dick Mol and expert Frans Roescher. The result is a breathtaking, hyper-realistic model that stands as a testament to the blend of science, sculpture, and storytelling. Whether you’re an aspiring sculptor, a museum curator, or simply a enthusiast of prehistoric life, this tutorial-style breakdown will walk you through the professional techniques used to bring this ancient giant back to life. We’ll cover research, materials, step-by-step construction, and finishing touches, providing insights that can be adapted for similar large-scale animal reconstructions.
Step 1: Research and Conceptual Design (Planning Phase)
The foundation of any accurate paleoart piece begins with thorough research to ensure scientific fidelity. For the Southern Mammoth—a prehistoric elephant ancestor that roamed Europe during the Early Pleistocene (approximately 2.5 million to 700,000 years ago)—Jim van Dijk collaborated closely with paleontologist Dick Mol, a world expert on mammoths, and Frans Roescher for anatomical guidance. Start by gathering reference materials:
- Fossil Analysis: Study skeletal remains, such as those from Mammuthus meridionalis fossils discovered in sites like Italy and Spain. Key features include a shoulder height of up to 4 meters (13 feet), long curving tusks up to 3-4 meters, and a more elephant-like body compared to the woolly mammoth, with less fur and adapted for warmer climates.
- Anatomical References: Use comparative anatomy from modern African and Asian elephants, adjusting for the Southern Mammoth’s straighter back, larger molars, and robust limbs. Incorporate 3D scans or diagrams of fossils to map out proportions.
- Artistic Vision: Sketch initial concepts, focusing on pose (e.g., a standing, alert stance to convey majesty) and scale. For life-size models, calculate dimensions precisely— this sculpture measures approximately 4 meters at the shoulder, with tusks extending dramatically outward.
- Tools and Software: Employ digital tools like Blender or ZBrush for 3D modeling previews, or traditional sketching on paper. Allocate 1-2 weeks for this phase to refine the design and get expert approval, ensuring the model educates as much as it impresses.
Step 2: Building the Armature (Structural Framework)
Once the design is approved, construct the internal skeleton or armature to support the massive structure. This is crucial for stability, especially for a sculpture weighing several hundred kilograms.
- Materials: Use steel rebar (reinforcing bars) for the primary frame—typically 10-20mm diameter rods welded into a skeletal form. For this mammoth, estimates suggest miles of rebar (inspired by similar projects) to mimic the bone structure, supplemented by metal pipes for limbs and spine.
- Techniques: Weld the rebar into a poseable frame, starting with the spine as the central axis. Attach cross-braces for the ribcage, pelvis, and skull. For the tusks, create curved supports from bent steel to handle their length and weight.
- Safety Considerations: Work in a spacious workshop (as seen in the image, with high ceilings and industrial flooring) using protective gear like welding masks, gloves, and boots. Test for balance by adding temporary weights to simulate the final mass.
- Time Estimate: 2-4 weeks, depending on scale. In Jim’s case, this phase involved precise measurements to ensure the armature aligns with fossil proportions, avoiding distortions that could make the model look unnatural.
Step 3: Modeling the Form (Sculpting the Body)
With the armature in place, layer on the exterior to build volume and detail.
- Materials: Apply foam or clay over the frame. For large-scale work, use expandable polyurethane foam for bulk, then sculpt with oil-based clay or epoxy putty for finer details. Skin texture is achieved with silicone or rubber molds for wrinkling effects.
- Techniques:
- Bulk up the body starting from the legs upward, ensuring even distribution for realism.
- Sculpt muscular contours, fat deposits, and skin folds—Southern Mammoths had thick, wrinkled hides similar to modern elephants, so use tools like rakes and loops to create authentic textures.
- For the head and trunk: Mold the trunk flexibly, incorporating internal wiring for posing. The tusks are sculpted separately, often from lightweight composites like fiberglass-reinforced resin, painted to resemble ivory.
- Expert Input: Under Dick Mol’s guidance, adjust features like tusk curvature (more spiral than woolly mammoths) and ear size for species accuracy.
- Pro Tip: Work in sections to manage drying times, and use reference photos of elephants in motion to capture dynamic elements, even in a static pose.
- Time Estimate: 4-6 weeks, with daily sessions to refine details iteratively.
Step 4: Molding and Casting (Replication for Durability)
To make the sculpture museum-ready and weather-resistant, create molds and cast the final pieces.
- Materials: Silicone rubber for molds (flexible and detailed), fiberglass resin for casting (lightweight yet strong), and gelcoat for surface protection.
- Techniques:
- Apply mold release agent to the clay model, then brush on silicone in layers, building thickness for large areas.
- Create a mother mold (rigid shell) from fiberglass to support the silicone.
- Cast sections separately (e.g., body, head, legs) by pouring resin into the molds, reinforcing with glass fibers.
- Assemble the cast pieces onto the armature, using bolts or adhesives for seamless joins.
- Challenges Addressed: For tusks, use hollow casting to reduce weight while maintaining strength. Ensure seams are hidden under textured skin.
- Time Estimate: 3-5 weeks, including curing time for resins (typically 24-48 hours per layer).
Step 5: Painting and Finishing (Bringing It to Life)
The final phase transforms the raw cast into a lifelike exhibit.
- Materials: Acrylic paints, airbrush kits, and sealants. For realism, use earth tones—grays and browns for skin, with subtle variations for aging and dirt.
- Techniques:
- Base coat the entire model, then layer details: airbrush wrinkles, add highlights to tusks for a polished ivory look, and dry-brush for hair remnants (Southern Mammoths had sparse fur).
- Add eyes using glass or resin inserts for a realistic gaze, as evident in the sculpture’s expressive face.
- Final seal with UV-resistant varnish to protect against fading in museum lighting.
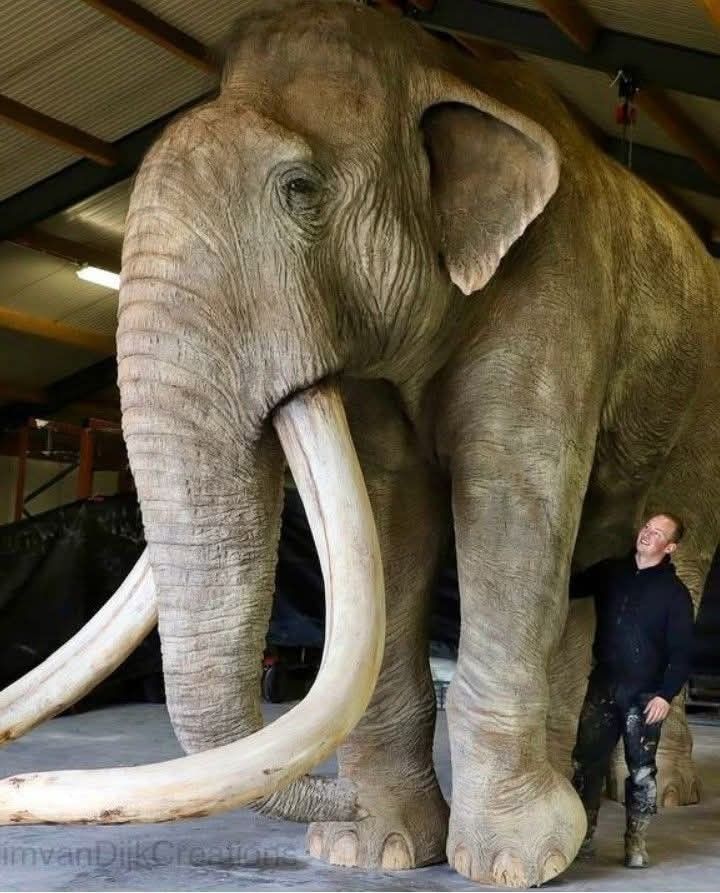
- Installation: Position in the exhibit space, as shown in the workshop photo where Jim van Dijk stands proudly beside his creation, emphasizing the scale (the artist appears dwarfed by the mammoth’s leg).
- Expert Review: Final approvals from Mol and Roescher ensure paleontological accuracy, such as correct tusk asymmetry often seen in fossils.
- Time Estimate: 2-3 weeks, with touch-ups based on lighting tests.
Final Thoughts and Applications
This life-size Southern Mammoth sculpture not only revives a forgotten giant but also serves as an educational tool at Historyland Museum, inspiring visitors about Earth’s prehistoric past. Total project timeline: 3-6 months, with costs varying based on materials (estimated €10,000-€50,000 for similar commissions). If you’re replicating this at a smaller scale, start with foam carving kits available online. For professional inquiries, visit Jim van Dijk Creations’ website or follow his YouTube channel for more behind-the-scenes videos. This process highlights the artistry in paleo-reconstructions, bridging science and creativity to make history tangible. If you’d like to adapt this tutorial for other animals, such as a woolly mammoth or saber-toothed tiger, the principles remain the same—research rigorously, build methodically, and detail obsessively.