
How to Draw Facial Proportions
Creating a portrait from imagination is possible, with knowledge of facial proportions and anatomy. Understanding these proportions allows artists to produce realistic faces, even without a model or reference. The head has universal ratios that are consistent across most people’s faces, so you can map out the size and placement of the face with knowledge of these proportions.
This guide will take you step-by-step through the process of constructing a portrait from scratch using these facial proportions.
Watch the Video: How to Draw Facial Proportions
Watch step by step how to create the outline of a person’s head, with accurate feature placement with this video guide. This method is similar to the Loomis Method of constructing a head, which also takes into account the proportions of the face to constructing it from scratch.
By the way, I have a course that will train you on the fundamentals of drawing! In the Drawing Fundamentals course, I provide a structured learning path to guide you through mastering each of these concepts, along with practical exercises to help you apply them in your drawings. By the end of the course, you’ll have a solid foundation in these fundamentals, setting you up to create intermediate and advanced portrait drawings. Sign up now and start elevating your drawing skills!
Building the Foundation with a Circle

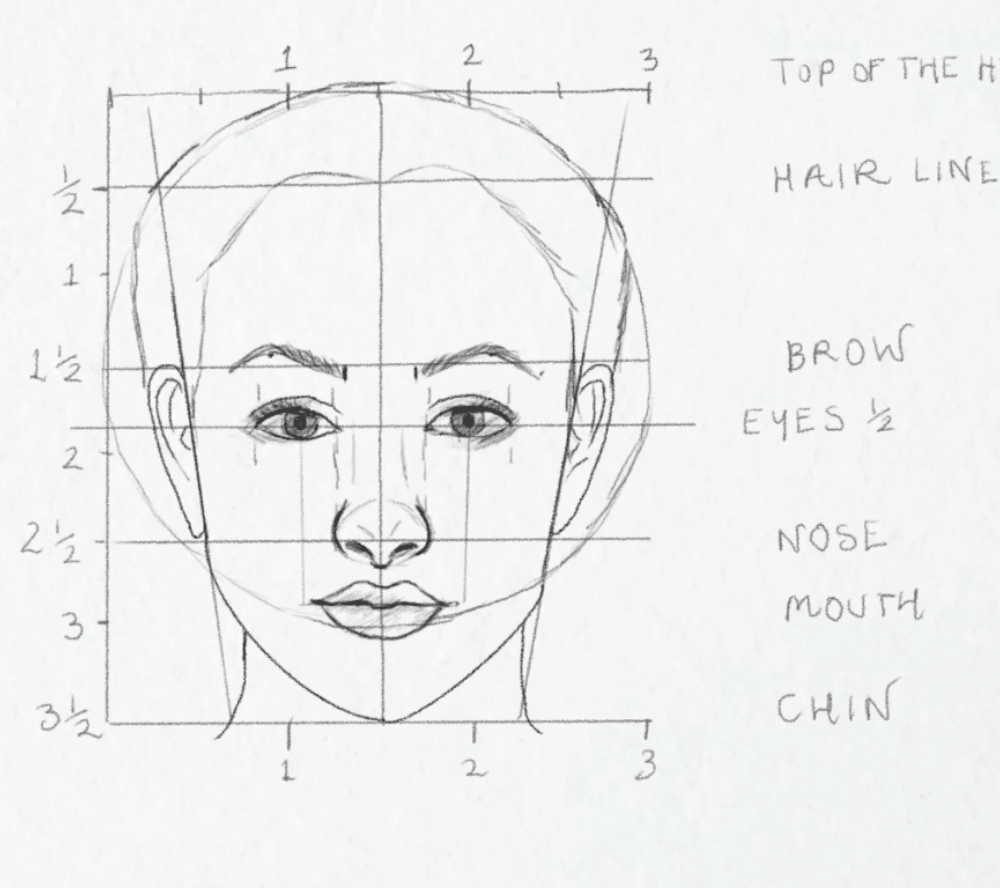
Start by sketching a circle to represent the cranium. This circle serves as the foundation for the rest of the head’s proportions. Precision matters here, so aim for a shape that is perfectly round rather than oval. Use a tool like a compass if needed, but free-handing works too. This initial step establishes the boundaries for the face and helps maintain symmetry as you draw.

To map out the head, draw a horizontal line along the top of the circle, dividing the circle’s width into three equal parts. Add vertical and horizontal lines to split the circle into halves, creating a grid-like structure. This grid helps guide the placement of facial features accurately. Extend a vertical line below the circle by half a unit to establish the length of the face. With these measurements, the basic framework for the head, which follows a 3:3.5 ratio, is ready.
Mapping Key Facial Lines

Facial features can be placed using horizontal guide lines. First, draw a line across the ½ marker to indicate the hairline; this is where the cranium curves into the face. Divide the section from hairline to the chin into three equal parts. These sections represent the brow, the nose, and the chin. The chin extends half a unit below the bottom of the cranium, completing the facial length.
For the eyes, draw a new line slightly below the brow, at the 1.75 marker. This ensures the eyes are centred along the length of the head. The mouth placement can vary, but it generally sits one-third of the distance between the nose and the chin. Adding these lines transforms the grid into a clear roadmap for anchoring facial features.
Outlining the Face

The face’s outer contour comes next. Vertical lines, slanting slightly inward, begin at the top of the circle and taper down and inwards to the chin. This creates the upper contour and the jawline. Below the circle, the chin is outlined by connecting the jawline with smooth, inward-slanting lines, from the mouth line down.
Placing the Features

Ears are positioned first, aligning the tops with the brow line and the bottoms with the nose line. Their shapes can be simplified into “C-like” curves. For the eyes, divide the eye line into five equal sections, ensuring the eyes occupy the second and fourth intervals. Include the irises and eyelids, giving attention to their curves and proportions. Add unique details such as the tilt of the eyes or lid thickness to personalise your portrait.
Eyebrows follow, stretching slightly beyond the outer corners of the eyes. Highlight key points like the inner edge, the arch, and the tail.
Shaping the Nose and Mouth

The width of the nose is determined by lines dropped from the inner corners of the eyes. Start with the tip and outline the nostrils and bridge. For the mouth, align its corners with the pupils, creating a proportionally accurate placement. Draw the lips using soft, rounded curves and emphasise the unique lip structure for added realism.
Bringing It All Together
