Mastering One-Point Perspective in Manga Illustration: Drawing a Dynamic Classroom Scene

Introduction to One-Point Perspective in Manga
In the world of manga and anime illustration, capturing realistic depth and spatial relationships is essential for creating immersive environments that draw readers into the story. One-point perspective is a fundamental technique that allows artists to depict scenes with a single vanishing point, ideal for symmetrical or frontal views like hallways, rooms, or, as in this example, a school classroom. This tutorial draws inspiration from a classic manga panel—likely from Hidamari Sketch by Ume Aoki, featuring the character Yuno enthusiastically sketching her surroundings. The image showcases a young art student applying perspective principles to render a classroom, complete with overlaid guidelines for eye level, vanishing points, and curved distortions at the edges.
Whether you’re a beginner aspiring to create your own manga pages or an experienced artist refining your environmental drawings, this step-by-step guide will walk you through the process of recreating and understanding this scene. We’ll break it down into conceptual explanations, practical steps, and tips for achieving professional results. By the end, you’ll be equipped to incorporate one-point perspective into your own artwork, adding depth and realism to everyday settings like schoolrooms.
Why One-Point Perspective Matters in Manga
One-point perspective simulates how the human eye perceives parallel lines converging toward a single point on the horizon, creating an illusion of depth on a flat surface. In manga, this technique is particularly useful for:
- Interior Scenes: Classrooms, corridors, or streets where lines recede into the distance.
- Character Integration: Placing figures within the environment to enhance storytelling, such as showing a student’s viewpoint during a lesson.
- Dynamic Composition: Adding energy to static panels by guiding the viewer’s eye toward the focal point.
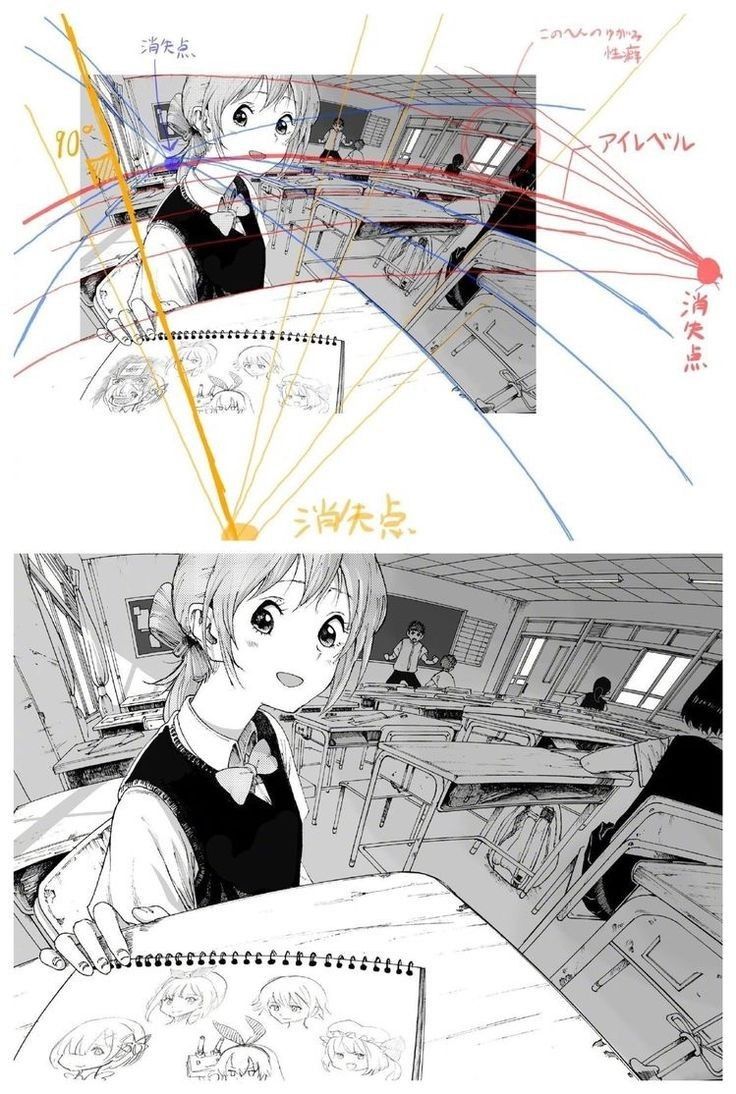
In the referenced image, the top panel illustrates the artist’s viewpoint with radiating lines from the character’s eye to the vanishing point, labeled with a 90° angle to denote the eye-level horizon. Japanese annotations like “アイレベル” (eye level), “消失点” (vanishing point), and “このへんはカーブ” (this area curves) highlight practical applications. The bottom panel shifts to a close-up of the character, Yuno, gazing excitedly at her notebook sketches, blending technical precision with emotional expression—a hallmark of slice-of-life manga.
Materials You’ll Need
Before diving in, gather these essentials for a smooth drawing process:
- Paper or Digital Canvas: Use smooth Bristol board for traditional drawing or a digital tablet with software like Clip Studio Paint or Photoshop.
- Pencils and Erasers: HB or 2B pencils for light sketching; a kneaded eraser for clean corrections.
- Rulers and Perspective Tools: A straightedge ruler; digital artists can use built-in perspective rulers.
- Inking Tools: Fine-liners (0.3mm–0.8mm) or brushes for final outlines.
- Reference Images: Photos of real classrooms or manga panels for inspiration.
Step-by-Step Tutorial: Drawing the Classroom Scene
Follow these detailed steps to recreate the perspective-driven classroom from the image. We’ll start with the foundational grid and build up to character integration and final details.
Step 1: Establish the Horizon Line and Vanishing Point
- Concept: The horizon line represents the viewer’s eye level, and all parallel lines converge at the vanishing point (VP) on this line. In one-point perspective, the VP is typically centered for a frontal view.
- Execution:
- Draw a horizontal line across your page about one-third from the top—this is your eye level (“アイレベル”).
- Mark a single point in the center of this line as your VP (“消失点”).
- From the VP, lightly draw radiating lines outward to represent the edges of desks, walls, and ceilings. In the image, these lines fan out from the character’s eye position, creating a cone of vision.
- Tip: For a low-angle view like in the bottom panel, place the horizon lower on the page to emphasize upward recession. Label your 90° angle where the eye level intersects vertical elements, as shown in the manga, to remind yourself of perpendicular alignments.
- Common Mistake to Avoid: Don’t make the VP too far off-center unless intending an asymmetrical composition; this can distort the scene unnaturally.
Step 2: Sketch the Basic Room Structure
- Concept: Use the perspective lines to define the room’s boundaries, ensuring all horizontal elements align with the VP.
- Execution:
- Draw the back wall as a rectangle centered on the VP— this is the only surface parallel to the viewer and unaffected by perspective.
- Extend vertical lines downward from the back wall corners to form the side walls. Connect these to the VP with diagonal lines for the floor and ceiling.
- Add windows, blackboards, or doors on the back wall. In the image, the classroom features large windows on the right, receding desks, and a teacher at the front.
- Introduce curvature for wide-angle effects: As noted in the annotation “このへんはカーブ,” bend outer lines slightly to mimic fish-eye distortion, enhancing the sense of space.
- Tip: Measure proportions carefully—desks should get smaller as they approach the VP. Use a grid overlay if digital to snap lines precisely.
- Pro Insight: In manga like Hidamari Sketch, artists often exaggerate perspective for dramatic effect, making foreground elements larger to focus on the character’s immediate environment.
Step 3: Add Furniture and Environmental Details
- Concept: Populate the space with objects that follow the perspective rules, creating a lived-in atmosphere.
- Execution:
- Sketch rows of desks using horizontal lines converging to the VP. Start with the closest desk oversized, then scale down subsequent ones.
- Add chairs, backpacks, and students: Vertical elements (like chair legs) remain straight, while horizontals taper toward the VP.
- Incorporate lighting and shadows: In the image, light streams from windows, casting subtle gradients on desks. Use hatching or cross-hatching for depth.
- Draw the notebook or sketchpad in the foreground, as seen in the bottom panel, with chibi-style doodles to add whimsy.
- Tip: Reference real Japanese classrooms—desks are often wooden with metal frames, arranged in neat rows facing a chalkboard.
- Common Mistake to Avoid: Overcrowding; start sparse and build details gradually to maintain clarity.
Step 4: Integrate the Character
- Concept: The focal character grounds the scene emotionally, turning a technical exercise into a narrative panel.
- Execution:
- Position the character (like Yuno) in the foreground, seated at a desk. Use the perspective lines to scale her proportions—her head aligns near the eye level.
- Draw her in a cute, expressive style: Ponytail with bow, school vest, and wide-eyed excitement. Her hand points to the notebook, connecting her to the sketched chibis.
- Overlay perspective guidelines if creating a tutorial-style panel, as in the top image: Yellow for eye level, red for radiating lines, and a dot for the VP.
- Add Japanese onomatopoeia or labels for authenticity, e.g., “うわあ きれい” (wow, beautiful) to convey her awe.
- Tip: For manga flair, exaggerate facial expressions—large eyes and subtle blush for enthusiasm. Ensure the character’s line of sight aligns with the VP for immersion.
- Pro Insight: Blend panels like in the image: Use the top for technical breakdown and the bottom for emotional payoff, guiding readers through the artist’s process.
Step 5: Ink, Shade, and Refine
- Concept: Finalize the drawing to achieve a polished, professional look suitable for manga publication.
- Execution:
- Trace over pencil lines with ink, varying thickness—thicker for foreground, thinner for distant elements.
- Apply shading: Use screen tones or digital brushes for gradients, emphasizing depth from the VP.
- Erase guidelines and add textures: Wood grain on desks, fabric folds on uniforms.
- Color if desired: Keep it monochromatic for classic manga, or add soft pastels for a Hidamari Sketch-style warmth.
- Tip: Scan or export at high resolution (300 DPI) for website posting.
- Common Mistake to Avoid: Inconsistent line weights; practice for smooth, confident strokes.
Advanced Tips for Manga Artists
- Experiment with Angles: Try two-point perspective for corner views or three-point for dramatic high/low angles.
- Digital Enhancements: In tools like Clip Studio, use the “Perspective Ruler” to automate line snapping, mirroring the manga’s overlaid guides.
- Storytelling Integration: Use this technique in sequences—start with a wide perspective panel, then zoom in on the character for emotional beats.
- Practice Exercises: Draw your own classroom from life, then stylize it manga-style. Compare to references from series like Hidamari Sketch or Blue Period.
Conclusion
By mastering one-point perspective as demonstrated in this iconic manga panel, you’ll elevate your illustrations from flat sketches to captivating scenes that breathe life into your stories. This technique not only enhances technical accuracy but also allows for creative expression, much like Yuno’s joyful discovery in the image. Practice consistently, and soon you’ll be creating professional-grade manga pages ready for your website or portfolio. If you’re sharing this on a blog, consider adding your own variations or reader challenges to engage your audience further.
For more tutorials, explore resources like AnimeOutline or Clip Studio Tips. Happy drawing!