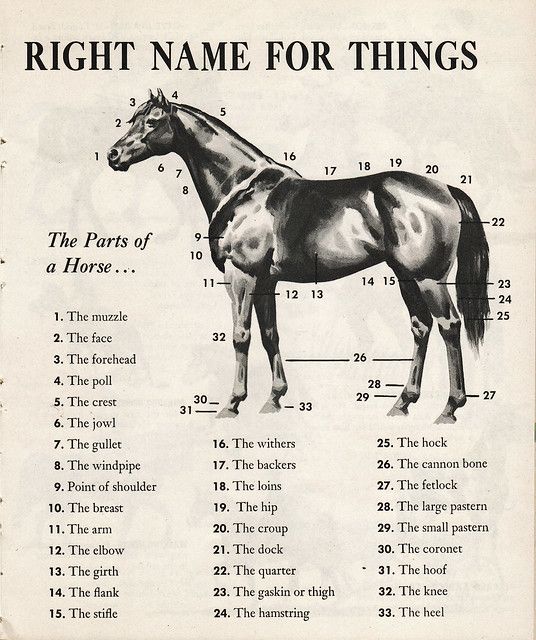
The Parts of a Horse: A Comprehensive Anatomical Tutorial

Understanding the external anatomy of a horse is fundamental for anyone involved in equine care, training, riding, or veterinary practices. This detailed guide serves as a tutorial, breaking down the key external body parts of a horse based on a classic labeled diagram. Each part is numbered to correspond with the illustration, providing not only the name but also an in-depth explanation of its location, structure, function, and significance. Whether you’re a beginner learning horse terminology or an experienced equestrian refining your knowledge, this resource will help you visualize and appreciate how these parts contribute to the horse’s overall movement, health, and performance.
We’ll start from the head and work our way back and down the body, explaining the role of each component in equine physiology. Proper identification of these parts can aid in assessing conformation, detecting injuries, fitting tack correctly, and improving communication in horse-related discussions. Note that horse anatomy can vary slightly by breed, age, and condition, but the descriptions here focus on general standards for a typical equine.
- The Muzzle: The muzzle encompasses the horse’s mouth, nostrils, lips, chin, and the front of the nose. It is highly mobile and sensitive, with whiskers (vibrissae) that help the horse sense objects close to its face, especially useful during grazing due to the horse’s limited close-range vision. The skin here is nearly hairless and supported by underlying cartilage, allowing for flexibility in eating, drinking, and breathing—horses breathe exclusively through their noses. A healthy muzzle appears soft and velvety; issues like dryness or swelling can indicate dehydration or allergies. In veterinary care, the muzzle’s color (pinkish in healthy horses) is checked for signs of anemia or shock.
- The Face: Referring to the broader facial area, including the cheeks and the flat region below the forehead, the face is characterized by wide, flat cheeks formed by the jawbones. This area houses muscles for chewing and expression, with the rim of the bone curving along the bottom for a defined structure. The face aids in communication through subtle muscle movements and is sensitive to touch, making it important for bridle fitting. Conformation faults here, like a narrow or overly convex face, can affect breathing or bit placement.
- The Forehead: Located between and just above the eyes, extending up to the ears, the forehead can be concave (dished, as in Arabians), flat, or convex (Roman nose). It often features unique markings like stars or blazes and includes the sub-orbital depression (hollow above the eyes), which deepens with age or poor health. This area protects the frontal bone of the skull and supports muscles for ear and eye movement, playing a role in the horse’s alert expressions.
- The Poll: Situated immediately behind the ears at the top of the skull, where it meets the first cervical vertebra, the poll is a bony protrusion rich in nerve endings and acupressure points. It’s where the bridle begins and is crucial for head flexion and neck mobility. Tension here can restrict movement, often requiring massage; a prominent poll may vary by breed but should be handled gently to avoid discomfort.
- The Crest: The top line of the neck, forming a gentle convex curve from the poll to the withers, the crest is where the mane grows and supports neck muscles. In fit horses, it’s muscular but not overly fatty; stallions or overfed horses may develop a thicker crest. It aids in balance, head carriage, and power transfer during movement, with conformation issues like a “ewe neck” (concave crest) affecting performance.
- The Jowl: Also known as the cheek or jaw area, the jowl includes the wide, flat sides of the face with underlying jawbones and muscles for mastication. It’s sensitive and helps in bit response; a well-defined jowl indicates good muscle tone. In some breeds, prominent jowls contribute to a refined head appearance, but swelling here can signal dental issues or infections.
- The Gullet: The throat area where the windpipe and esophagus meet the jaw, often called the throat latch. It’s flexible for swallowing and breathing, with muscles that can tighten in stressed horses, leading to a “high-headed” posture. Proper bridle fit avoids pressure here to prevent restriction; a lean gullet enhances neck mobility.
- The Windpipe: The visible trachea running along the underside of the neck, protected by cartilage rings, it conducts air to the lungs. This area is vulnerable to pressure from ill-fitting tack, potentially causing coughing or resistance. In anatomy, it’s part of the respiratory system, and a clean, unobstructed windpipe is vital for athletic performance.
- Point of Shoulder: The forwardmost tip of the shoulder blade (scapula), connecting to the humerus. It influences stride length; a well-angled point allows for better reach and shock absorption. Injuries here are rare but can stem from trauma, affecting front limb movement.
- The Breast: Commonly the chest or breast area between the forelegs, housing the pectoral muscles, heart, and lungs. A broad, deep breast provides ample space for vital organs, enhancing endurance; narrow chests may indicate poor development and limit stamina.
- The Arm: The upper arm (humerus bone) from the shoulder to the elbow, short but powerful for weight support and shock absorption. It enables forward leg extension; a strong arm is key for jumping and galloping, with muscle development reflecting fitness.
- The Elbow: The joint connecting the upper arm to the forearm, allowing flexion for limb movement. It’s crucial for stride and balance; elbows too close to the body can cause “paddling” gaits, while proper alignment ensures smooth motion.
- The Girth: The area behind the front legs encircling the ribcage, where the saddle girth secures. A deep girth allows for lung expansion during exertion; it’s measured for tack fit, and a pinched girth can cause discomfort or behavioral issues.
- The Flank: The indented area between the barrel and hindquarters, sensitive due to underlying kidneys. It should be smooth, not overly concave (indicating poor condition); flanks aid in flexibility and are monitored for signs of colic or dehydration.
- The Stifle: The hind leg’s knee joint (equivalent to a human knee, with patella), located where the leg meets the body. It provides propulsion for jumping and speed; stifles are prone to locking or injuries, requiring strong muscles for stability.
- The Withers: The highest point at the base of the neck, formed by thoracic vertebrae spines. Used for height measurement (in hands), it anchors the saddle; high withers improve saddle fit but can make bareback riding tricky, while low withers may cause slippage.
- The Back: Extending from the withers to the loins, covering the thoracic vertebrae. A strong, straight back supports rider weight and enables flexion; swaybacks (concave) or roach backs (arched) are faults that can lead to pain or reduced performance.
- The Loins: The muscular area between the back and croup, behind the saddle. Broad loins indicate strength for power transfer; weak loins can cause back issues, making this region critical for athletic horses.
- The Hip: The bony protrusions (iliac crests) on the sides of the croup, part of the pelvis. They support hindquarter muscles for propulsion; well-defined hips contribute to agility, but prominence can vary by breed.
- The Croup: The rump area from the loins to the tail base, ideally gently sloping and oval-shaped. It generates forward power; a flat croup suits speed breeds, while a steep one may unbalance the horse.
- The Dock: The bony base of the tail, an extension of the spine with muscles for tail movement. It aids in balance, communication, and insect repulsion; a flexible dock enhances swishing ability.
- The Quarter: The hindquarter sides between the toe and heel of the hoof, or more broadly, the muscular rear region. Well-rounded quarters provide power for propulsion; they protect internal structures and contribute to overall strength.
- The Gaskin or Thigh: The muscular upper hind leg above the hock and below the stifle, equivalent to a human calf. It powers gaits and jumps; strong gaskins enhance dynamics, but faults like straightness can lead to strain.
- The Hamstring: The tendons and muscles at the back of the thigh, aiding in hind leg extension and flexion. They are crucial for speed and stopping; overexertion can cause pulls, requiring warm-ups and conditioning.
- The Hock: The large joint on the hind leg below the gaskin, analogous to a human ankle but bending backward. It absorbs shock and provides leverage; common issues include spavin or bog spavin, which can cause lameness if untreated.
- The Cannon Bone: The long, slender bone between the knee/hock and fetlock, with splint bones alongside. It supports weight; a circumference over 8 inches indicates durability, equivalent to human metacarpals.
- The Fetlock: The joint between the cannon and pastern, often called the “ankle,” with sesamoid bones for support. Prone to strain, it acts like the ball of a human foot; ergots (calluses) may appear here as vestigial remnants.
- The Large Pastern: The longer upper pastern bone from the fetlock downward, providing shock absorption. A balanced length ensures smooth gaits; too long may weaken under heavy work, analogous to human finger bones.
- The Small Pastern: The shorter lower pastern bone extending into the hoof, joining the pedal bone. It contributes to flexibility; short pasterns offer strength but may result in a rougher ride.
- The Coronet: The coronary band, a ring of soft tissue where the hoof wall grows from, crucial for hoof health and mobility. Damage here can lead to lameness; it’s the transition from skin to hoof keratin.
- The Hoof: The foot’s hard exterior (wall, sole, frog) enclosing sensitive structures, made of keratin for protection. It bears weight, provides traction, and absorbs shock; regular farrier care prevents cracks or imbalances.
- The Knee: The front leg’s carpal joint, bending forward like a wrist, composed of small bones, tendons, and ligaments. It flexes for stride; injuries are common in performance horses, requiring supportive wrapping.
- The Heel: The back of the hoof, including the heel bulbs and part of the frog, enclosing the digital cushion for shock absorption. It aids in traction and expansion during movement; contracted heels can cause pain and lameness.
By mastering these parts, you can better evaluate a horse’s conformation, health, and suitability for various activities. For hands-on learning, refer to diagrams or consult a veterinarian. This knowledge enhances safety and enjoyment in all equine endeavors.