Mastering Rock Drawing: A Guide to Edges, Planes, and Solidity

This guide breaks down the fundamentals of drawing rocks, emphasizing edges, planes, and texture to create a sense of solidity and realism. Whether you’re sketching mountain boulders or river stones, these techniques will help you capture their natural essence.
Key Principles
-
Edges Define Form – Hard edges create structure; soft edges suggest weathering.
-
Planes Create Volume – Flat surfaces interact with light to show depth.
-
Value Contrast = Solidity – Dark shadows and bright highlights make rocks feel heavy and real.
Step-by-Step Rock Construction
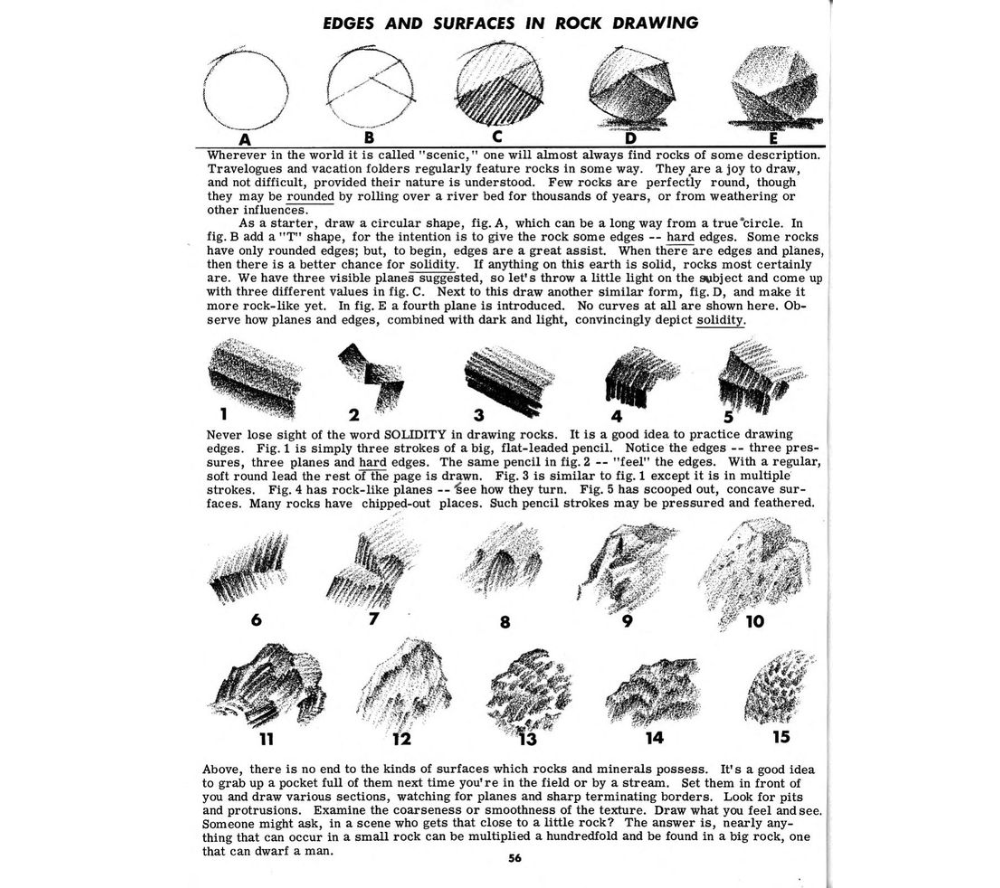
1. Start with a Basic Shape (Fig. A–E)
-
Fig. A: Sketch a rough circle or oval (no need for perfection).
-
Fig. B: Add a “T” shape to break the curve into hard edges and planes.
-
Fig. C: Apply three distinct values (light, mid-tone, shadow) to the planes.
-
Fig. D & E: Refine with more angular planes (no curves) to enhance realism.
Why it works: Even a simple shape gains 3D weight when divided into planes with contrasting values.
2. Practice Edge Control (Fig. 1–5)
-
Fig. 1: Three bold strokes with a flat-lead pencil to create sharp edges.
-
Fig. 2: Vary pressure—hard strokes for ridges, soft for transitions.
-
Fig. 3: Multi-stroke technique for textured surfaces.
-
Fig. 4: Angular planes that “turn” like real rock faces.
-
Fig. 5: Concave (scooped-out) surfaces for weathered effects.
Pro Tip: Use a chisel-tip pencil for flat strokes that mimic stone fractures.
3. Study Real Rocks (Fig. 6–15 & Beyond)
-
Collect reference: Pick up small rocks and observe:
-
Pits & protrusions (from erosion or fractures).
-
Texture (smooth vs. coarse, layered vs. crystalline).
-
-
Scale matters: A tiny pebble’s details can inspire a massive cliff’s texture.
Exercise: Draw 10 different rocks using only planes and edges—no shading yet!
Advanced Techniques
-
Light Direction: Decide early where light hits to place shadows logically.
-
Weathering Effects:
-
Rounded edges = water-worn (use softer strokes).
-
Jagged edges = fractured (use abrupt, angular lines).
-
-
Layering: For sedimentary rocks, use horizontal striations.
Common Mistakes to Avoid
❌ Too symmetrical – Nature is irregular; vary plane sizes and angles.
❌ Weak edges – Hard lines prevent rocks from looking like blobs.
❌ Overblending – Keep shadows and highlights distinct for solidity.
Final Thought
Rocks are perfect for practicing structure and texture. Start simple (Fig. A–E), then advance to complex formations. The more you study real rocks, the more convincing your drawings become.
Try This Now: Grab a pencil and sketch three rocks—one rounded, one jagged, one layered. Label their light/shadow planes!
Need feedback on your rock studies? Share your sketches—I’d love to help! 🪨✏️