“Painting” with a Pencil: Expressive Foliage Techniques

This guide teaches how to sketch trees and foliage using bold, painterly pencil strokes—perfect for creating lively, impressionistic landscapes without getting bogged down in detail.
Core Principles
-
Think Like a Painter – Use pencil strokes as brushstrokes for loose, dynamic marks.
-
Suggest, Don’t Detail – Let texture and value imply leaves instead of drawing each one.
-
Work Fast & Instinctively – Avoid over-rendering to keep sketches fresh.
Tools & Setup
-
Pencils:
-
Flat-lead layout pencil (~1/4″ thick) for broad strokes.
-
Soft 6B round pencil for finer branches.
-
-
Paper: Rough or medium-grain sketchpad to enhance texture.
-
Grip: Hold the pencil sideways for wider, more fluid strokes.
Step-by-Step Techniques
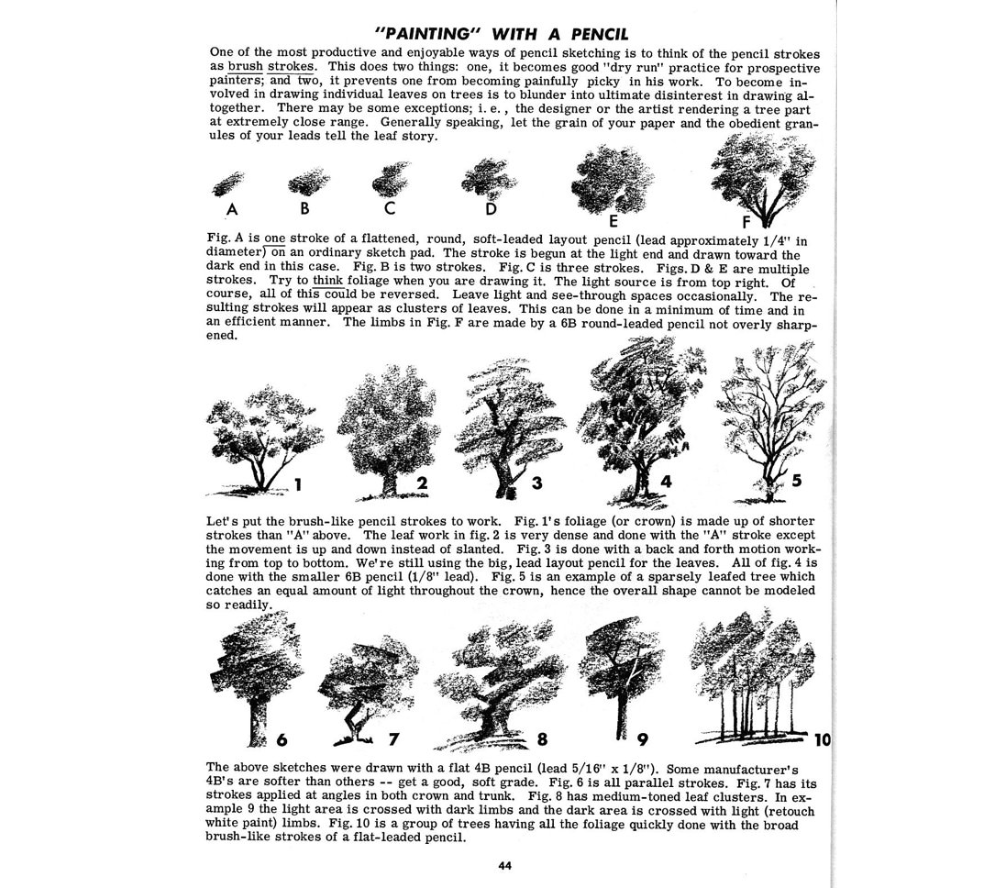
1. Basic Foliage Strokes (Fig. A–E)
-
Single Stroke (Fig. A): Drag the flat lead from light to dark (like a gradient).
-
Layered Strokes (Fig. B–E): Build clusters with slanted, overlapping marks.
-
Key Tip: Leave gaps for “see-through” light—this mimics natural leaf density.
2. Tree Crown Variations (Fig. 1–5)
-
Dense Foliage (Fig. 2): Vertical up/down strokes with tight spacing.
-
Sparse Leaves (Fig. 5): Scattered strokes with even lighting (no heavy shadows).
-
Backlit Effect (Fig. 9): Cross dark branches over light areas (or use white paint for highlights).
3. Advanced Applications (Fig. 6–10)
-
Parallel Strokes (Fig. 6): Uniform marks for stylized trees (e.g., cypress).
-
Angled Clusters (Fig. 7): Mix directions for windblown or irregular foliage.
-
Grouped Trees (Fig. 10): Block in entire groves with rapid, broad strokes.
Pro Tips for Realism
-
Light Direction: Keep consistent (e.g., top-right) for cohesive shadows.
-
Edge Variety:
-
Soft edges = distant trees.
-
Hard edges = foreground details.
-
-
Negative Space: Let paper show through for sunlight filtering through leaves.
Common Mistakes to Avoid
❌ Overworking – Stop before it looks “finished” to retain energy.
❌ Uniform Strokes – Vary pressure and angle for organic texture.
❌ Ignoring the Big Shape – Sketch the tree’s silhouette first, then add strokes.
Why This Method Works
-
Saves Time: Achieves convincing foliage in minutes.
-
Builds Confidence: Frees you from perfectionism.
-
Versatile: Adaptable to ink, charcoal, or digital mediums.
Try It Now: Grab a soft pencil and sketch three trees—one dense, one sparse, one backlit—using only 10 strokes each!
Need feedback or a visual demo? Share your sketches—I’d love to see your progress! 🌳✏️