Step-by-Step Guide to Drawing Realistic Cast Shadows: Techniques for Light Source Placement, Ray Tracing, and Object Variations in Illustration

Mastering the art of drawing shadows is a cornerstone of realistic illustration, adding depth, dimension, and drama to your artwork by simulating how light interacts with objects in a three-dimensional space. This comprehensive tutorial is inspired by a simple yet effective reference diagram titled “How to Draw Shadows,” which uses a cartoonish, step-by-step approach to teach cast shadow construction. The image features a sequence of sketches starting with a basic cube under a point light source (depicted as a hanging bulb), progressing through ray-tracing lines, intersection points, and final shadow shapes. It also includes variations for other forms like cylinders and spheres, demonstrating adaptability across different objects. Rendered in light purple for objects and pink for light rays, the diagram emphasizes geometric precision and visual clarity, making it accessible for beginners while offering insights for advanced artists.
Whether you’re an aspiring illustrator working with pencil and paper, or a digital artist using software like Adobe Illustrator, Krita, or Blender for 3D previews, this guide will walk you through the process in detail. We’ll break it down into the reference’s numbered steps, explain the underlying principles of light behavior (e.g., point sources vs. diffuse lighting), discuss common errors, and provide exercises for practice. Key concepts include understanding cast shadows (projections on a surface) versus form shadows (shading on the object itself), assuming a single point light source for simplicity, and considering ground plane perspective. By the end, you’ll be able to apply these techniques to complex scenes, enhancing your still life drawings, character illustrations, or architectural sketches. Start with basic tools: a ruler for straight rays, an eraser for adjustments, and varying pencil grades (HB for lines, 2B-4B for shading) on smooth sketch paper. For digital users, employ line tools and layers for non-destructive editing.
Section 1: Preparing the Basic Setup – Object, Light Source, and Initial Guidelines (Steps 1-3)
The reference begins with foundational elements, treating the scene as a 2D projection of 3D space where light rays travel in straight lines from the source, blocked by the object to form shadows.
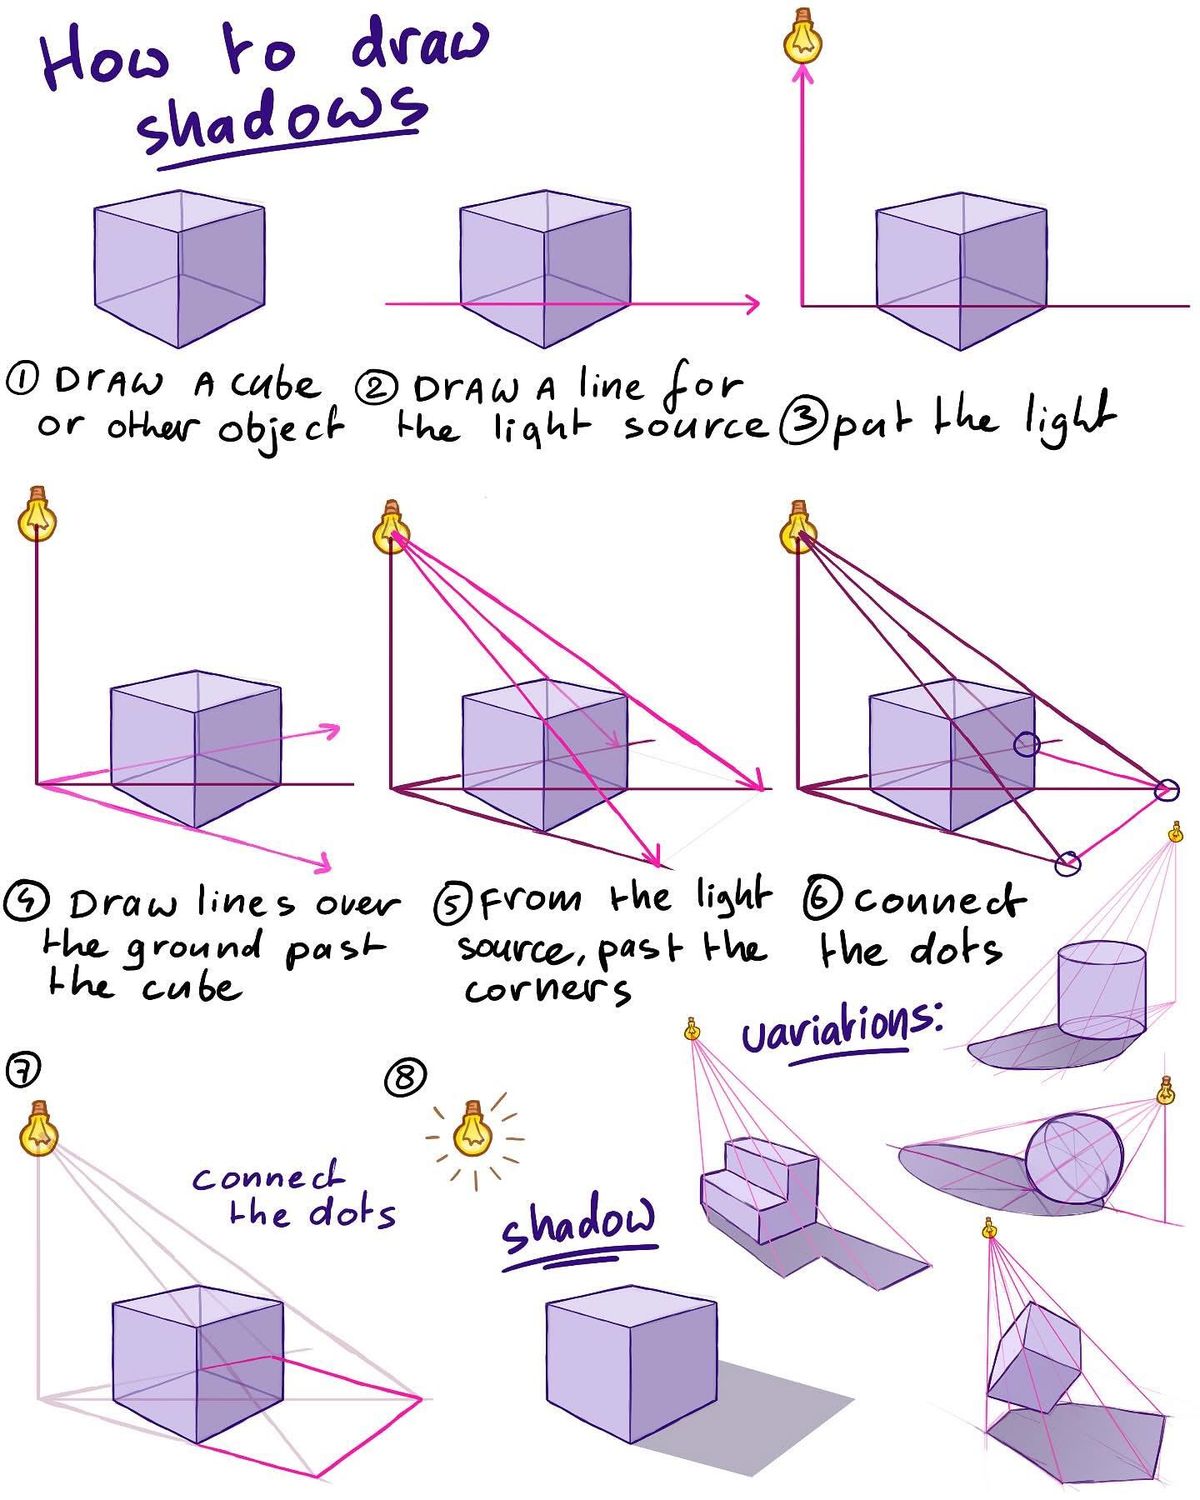
- Draw a Cube or Other Object (Step 1): Start by sketching your primary subject on a flat ground plane (represented as a horizontal line). The diagram uses a simple cube in isometric view for clarity, but this works for any opaque object. Draw the cube with light outlines: three visible faces, ensuring parallel edges for perspective consistency. Proportions: Keep the cube 1:1:1 ratio initially, about 2-3 inches on paper for manageability. If using a different object (e.g., a sphere or irregular form), focus on its silhouette and key vertices or edges that will cast the shadow.
- Draw a Line for the Light Source (Step 2): Extend a vertical or angled line upward from the ground plane to indicate the light’s position. In the image, it’s a straight pink line ending in a bulb icon, positioned off to the side and above the object. This represents a point light source (like a lamp), which creates sharp, defined shadows. Tip: The height and angle of this line determine shadow length—higher lights produce shorter shadows; angled lights create elongated, dramatic ones. Place the light source 2-4 times the object’s height for balanced results.
- Put the Light (Step 3): Mark the light source with a simple icon (e.g., a bulb) at the line’s end. This visual cue helps track ray origins. Annotations remind you to “pat the light,” emphasizing gentle placement to avoid overpowering the composition.
Practical Tips and Common Errors: Always assume a flat, horizontal ground for beginners—tilted planes add complexity later. Error to avoid: Inconsistent perspective; ensure the object’s base aligns with the ground line. Exercise: Sketch three setups with varying light heights (low, medium, high) on the same object to observe shadow changes. This builds intuition for real-world lighting, like sunlight (distant source for parallel rays) versus indoor lamps.
These initial steps establish the scene’s geometry, setting the stage for accurate shadow projection.
Section 2: Tracing Light Rays and Finding Intersection Points (Steps 4-5)
Here, the tutorial introduces ray tracing—a technique borrowed from physics and computer graphics—to determine where shadows fall by simulating light paths.
- Draw Lines Over the Ground Past the Cube (Step 4): From the object’s base points (e.g., the cube’s bottom corners), draw straight pink lines across the ground plane, extending beyond the object in the direction away from the light. These represent potential shadow edges on the surface. For the cube, use 2-4 lines from visible base vertices. Annotations note “Draw lines over the ground past the cube,” ensuring they radiate outward logically.
- From the Light Source, Past the Corners (Step 5): Now, draw rays from the light bulb directly through the object’s key points (top corners or edges) and continue them to intersect the ground lines from Step 4. The diagram shows 3-4 pink rays fanning out, passing over the cube’s silhouette. Mark the intersection points (dots) where these rays hit the ground extensions. This mimics how light is occluded, with dots defining the shadow’s boundary.
Underlying Principles: This method assumes perspective projection, where rays converge at the light source (vanishing point for shadows). For distant lights (e.g., sun), rays would be parallel. Tip: Use a ruler for precision; digitally, snap lines to guides. Common mistake: Missing key points—always include all occluding edges (e.g., cube’s top front corner casts the farthest shadow). Exercise: Apply to a cylinder (as in variations): Draw base ellipse lines, then rays through top rim points for an oval shadow.
This phase calculates the shadow’s outline geometrically, turning abstract light into tangible forms.
Section 3: Connecting the Dots and Finalizing the Shadow (Steps 6-8)
The reference culminates in forming the shadow shape, with additional notes on variations for versatility.
- Connect the Dots (Step 6): Link the intersection dots from Step 5 with straight or curved lines to outline the shadow. For the cube, this creates a distorted quadrilateral projecting away from the light. The image labels “Connect the dots,” showing a shaded purple area for the final shadow.
- Connect the Dots (Step 7): A repeated emphasis on connection, with an example of a shorter shadow under a closer light. Fill the shape with even shading, darker near the object (umbra) and lighter outward (penumbra) for softness.
- Shadow (Step 8): The final label points to a completed shadow, with rays converging for emphasis. Add subtle gradients: use cross-hatching or blending for realistic falloff.
Variations and Adaptations: The bottom section shows applications to other shapes—a cylinder casting an elongated oval, a sphere producing a teardrop shadow, and tilted cubes


