Comprehensive Guide to Drawing Human Heads and Necks: Proportions, Angles, and Anatomical Construction for Artists

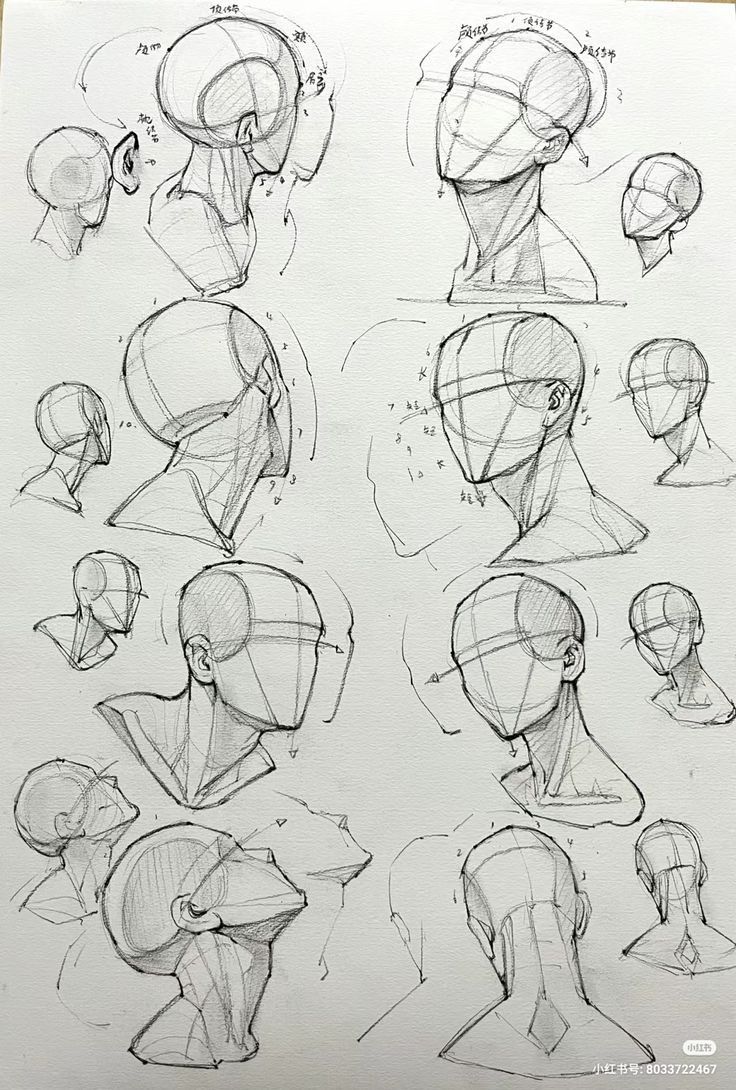
In the world of figure drawing and character illustration, mastering the human head and neck is a foundational skill that elevates your artwork from amateur to professional. This detailed tutorial, inspired by a meticulously sketched reference sheet, provides a step-by-step breakdown of constructing heads from various angles, incorporating precise proportions, guidelines, and anatomical insights. The reference image features a collection of pencil drawings on a single page, showcasing multiple views of bald human heads with overlaid construction lines, angle measurements, and annotations—likely from an art study or manga/anime-style tutorial. These sketches emphasize the dynamic relationship between the skull, face, and neck, helping artists avoid common distortions in perspective and form.
Whether you’re working in traditional pencil on paper or digital tools like Photoshop or Procreate, this guide will walk you through replicating and applying these techniques. We’ll divide the tutorial into sections based on the layout of the reference sheet: upper row for basic tilts and rotations, middle row for side profiles and planar constructions, and lower row for extreme upward and downward angles. Each step includes practical tips, potential errors to watch for, and exercises to build muscle memory. By the end, you’ll be equipped to draw expressive, anatomically sound heads suitable for portraits, concept art, or animation.
Section 1: Foundational Proportions and Front-to-Side Transitions (Upper Row Sketches)
The top section of the reference sheet introduces basic head constructions with subtle tilts, using numbered guidelines and arrows to denote rotation and alignment. Start here to establish core proportions before tackling complex poses.
- Basic Head Shape and Divisions: Begin with a circle or oval for the cranium, which occupies about 2/3 of the total head height. Draw a vertical centerline for symmetry and horizontal lines to divide the face: the top third for the forehead (from hairline to brows), middle third for eyes to nose base, and bottom third for nose to chin. In the leftmost sketch, a small side view shows the ear positioned just behind the centerline, with an arrow labeling “0°” for neutral alignment.
- Incorporating Tilt and Rotation: For a slight backward tilt (as in the central upper sketch), curve the centerline upward and adjust the jawline to angle back. Annotations like “12°-14°” indicate the degree of tilt—use a protractor for accuracy or estimate visually. The neck emerges as a tapered cylinder from the base of the skull, with light lines suggesting muscle tension.
- Practical Application: Sketch a grid of 3-4 heads, rotating each by 10°-20°. Common mistake: Forgetting to adjust the ear’s position, which should align with the jaw hinge in side views. Tip: Use erasable guidelines in light blue pencil or a separate layer digitally to iterate without committing.
This foundation ensures your heads maintain realistic scale, preventing “egghead” or “pinhead” distortions often seen in beginner work.
Section 2: Planar Facets and Three-Quarter Views (Middle Row Sketches)
The middle sketches shift to more angular constructions, treating the head as a series of planes (inspired by methods like the Loomis or Reilly techniques). This is ideal for understanding volume and shading.
- Planar Breakdown: In the left-middle sketch, the head is divided into facets with lines numbered “1-10,” representing planes like the frontal forehead (1), temporal sides (2-3), cheekbones (4), and jaw (5-6). Draw these as flat polygons first, then round them for organic form. An arrow shows rotation, compressing one side in perspective.
- Side Profile with Neck Integration: The right-middle views highlight the profile, with cross-contours wrapping around the form. The neck is depicted as a wedge-shaped structure, connecting at the mastoid process behind the ear. Measurements like “A-B” lines emphasize the angle between skull and spine—typically 15°-30° for natural poses.
- Shading and Volume: Apply cross-hatching as shown to indicate light falloff. For a three-quarter view, foreshorten the far side: eyes appear narrower, and the nose bridges the planes. Exercise: Draw a self-portrait in mirror, overlaying planes to match the reference. Avoid error: Over-emphasizing symmetry in turned heads, which ignores natural asymmetry.
These techniques are particularly useful for stylized art, such as anime, where exaggerated angles add drama without losing believability.
Section 3: Extreme Angles – Upward and Downward Tilts (Lower Row Sketches)
The bottom sketches tackle challenging perspectives where foreshortening alters proportions dramatically, a key skill for dynamic compositions like action scenes or emotional expressions.
- Upward Tilt Construction: In the lower-left drawings, the head tilts back, making the chin and neck prominent while compressing the upper face. Start with the cranium sphere, then attach the face at a steep angle (noted as “20°+”). The neck stretches, revealing the hyoid bone and tendons—draw these as triangular shapes for structure.
- Downward Tilt and Foreshortening: Opposite sketches show forward bends, elongating the crown and shortening the face. Guidelines curve dramatically, with ears shifting upward relative to the eyes. Annotations like “7-8-9” segment the profile for precision: 7 for brow ridge, 8 for nasal curve, 9 for chin recession.
- Advanced Integration: Combine with rotation for compound poses, ensuring the neck’s trapezius muscles bulge appropriately. Tip: Use thumbnail sketches to test angles before full rendering. Common pitfall: Ignoring gravity’s effect on skin and muscles, leading to unnatural stiffness. Practice by photographing your own head in mirrors at various tilts and tracing over them.
Additional Tips for Professional Results
- Tools and Materials: For traditional drawing, use HB-2B pencils for lines and 4B-6B for shading on smooth Bristol paper. Digitally, employ brushes mimicking pencil texture and layer masks for non-destructive edits.
- Anatomical References: Cross-reference with resources like “Figure Drawing: Design and Invention” by Michael Hampton or online anatomy apps. The reference sheet’s style suggests influence from East Asian art tutorials (note the Chinese annotations and watermark “小红书号: 8033722467,” possibly from Xiaohongshu platform).
- Exercises for Mastery: Dedicate 30 minutes daily to gesture sketches from the reference, timing yourself for speed. Vary lighting to practice value studies, and critique your work by flipping the image horizontally to spot imbalances.
- Common Challenges and Solutions: If proportions feel off, measure with your thumb or calipers. For necks, remember they’re not rigid—add subtle curves for life. Scale up to full figures by ensuring head height fits 7-8 times into body length for adults.
This tutorial transforms the static reference sheet into an actionable learning tool, empowering you to create compelling portraits and characters. With consistent practice, you’ll develop an intuitive sense for head anatomy, opening doors to more advanced topics like facial expressions or hair integration. Share your creations in art communities for feedback, and remember: every great artist started with basic constructions like these. If you’d like variations or expansions (e.g., adding features or color), let me know!


