Crying Face Drawing: Why Most Artists Get Tears Wrong (And How to Fix It)
A single tear can tell an entire story. But here’s what I’ve noticed after years of drawing emotional faces: most artists treat tears like an afterthought—little droplets floating on top of a face like stickers. That’s not how crying works. That’s not how emotion reads.
Real crying transforms the entire face. The muscles pull inward. The skin bunches and reddens. Eyes squeeze shut or stay painfully open. And tears? They don’t just appear—they well up, spill over, and follow the contours of the face like rivers finding their path.
The difference between a crying face that makes viewers feel something and one that looks like a sad emoji? Anatomy. Understanding which muscles fire when someone cries—and what that does to the surface features we draw—separates amateur work from art that actually moves people.
This guide breaks down the anatomy behind crying faces, shows you how tears actually behave (hint: they’re not shaped like raindrops), and walks through drawing different intensities of crying. Because there’s a massive difference between “eyes welling up” and “full-blown sobbing”—and your drawings should show that.
Essentials of Crying Face Drawing
A crying face shows strong emotions through specific shapes and details. Important parts include the shape of the face, the eyes, eyebrows, and mouth. The right tools and basic knowledge of facial features help bring these feelings to life on paper.
Fundamental Facial Anatomy


The foundation of a crying face starts with the face’s basic shape, usually a rounded or slightly “U” shaped outline. Eyes are key and are often drawn larger than normal to show tears and sadness clearly.
Eyebrows play a big role. They usually angle inward and down, like sad or worried shapes. The mouth often curves down or opens slightly, showing sadness or sobbing.
Other details like teardrops can be drawn under the eyes, with soft lines to keep a gentle look. Adding small curves for wrinkles or puffiness can make the expression more real.
Key Emotional Expressions


Crying faces mostly show sadness, pain, or upset feelings. The eyes get watery and may have tears running down. Eyebrows push together, like “shoulders” that slump, showing defeat or sorrow.
The mouth’s shape changes. It might be a small frown or a trembling lip. Sometimes the mouth opens slightly, as if someone is about to cry out or sob.
These changes work together to make the emotion clear. Accurate placement and soft curves help keep the expression gentle, not harsh or angry.
Materials for Crying Face Drawing


Traditional Media
For realistic work:
- Graphite pencils: 2H (light guidelines), HB (mid-tones), 2B-6B (darks, tear shadows)
- Kneaded eraser: Essential for lifting highlights in tears
- Blending stumps: Smooth gradations for skin and tear trails
- White gel pen or white colored pencil: Sharp highlights on tears
For stylized work:
- Mechanical pencil or fine liner for clean lines
- Limited pencil range (HB, 2B, 4B sufficient)
- Markers for color (Copic, Ohuhu, or similar)
Paper: Smooth paper for detailed tear work. Textured paper can work for looser styles.
Digital Media
Software: Procreate (iPad), Clip Studio Paint, Photoshop
Brushes:
- Soft round brush for base rendering
- Hard round brush for clean line work
- Textured brush for skin detail
- Gaussian blur tool for wet/glassy effects
Layer approach:
- Base skin tones
- Facial expression and shadows
- Tear shapes on separate layer
- Highlights on top layer (set to Add or Screen blend mode)
Tip: Use layer masks to refine tear edges without permanently altering your work.
Step-by-Step Guide to Drawing a Crying Face
Drawing a crying face means capturing sadness with clear shapes and details. The face shape sets the base, tears add realism, and eyes express deep emotion. Each part needs careful attention to make the drawing feel honest and natural.
Sketching the Basic Face Shape


Start by drawing a simple oval or circle for the head. Light lines work best so changes can be made easily. Sketch the jaw and cheeks softly to give the face its form without sharp edges.
Mark the center line vertically and horizontally. These lines help place the eyes, nose, and mouth in the right spots. The eyes usually sit on the horizontal line near the upper half of the face.
Add the neck and guide lines for where the eyebrows and lips will go. Keep the shapes soft and round to reflect a gentle, sad expression. Avoid making the face too sharp or harsh.
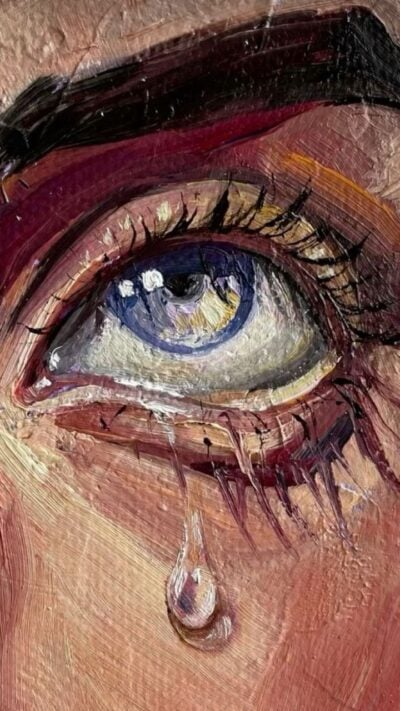
Drawing Realistic Tears


Tears are key to showing crying. Begin with small, round blobs at the corners of the eyes. Use curved lines that flow down the cheeks to make them look like they are falling.
Add highlights to the tears with tiny white spaces or lighter shading to show shine. This makes tears look wet and real.
Draw tears thick near the eyes and taper them as they move downward. Tear drops can collect at the bottom of the eyes or run in streaks down the face.
Avoid making the tears flat. Use a mix of light and shadow to give them volume.
Depicting Expressive Eyes


Eyes show sadness best. Start with the eye outlines, focusing on a slightly squinted shape. This shows tension from crying.
Draw the irises and pupils smaller to add to the feeling of discomfort or sadness. Add shine or reflections inside the eyes to make them look moist.
Brows play a big role here. Draw them slanting inwards or curved downward to suggest pain. Avoid stiff, straight lines for the eyebrows.
Finally, show small wrinkles or lines near the eyes. These lines help give the face emotion and a more natural look.
Techniques for Adding Depth and Emotion
Adding depth and emotion to a crying face drawing depends a lot on how light and shadow are used and how certain facial parts move. Small details in the eyes, mouth, and brows help make feelings clear. Paying attention to these areas can bring the drawing to life.
Shading for Intensity


Shading plays a key role in making a crying face look more real and emotional. Using soft shadows under the eyes can show puffiness or tears. Darker shading near the inner corners of the eyes adds depth and sadness.
Blending is important. Smooth shading on cheeks helps show wetness from tears or flushed skin. Light highlights can create a shiny tear effect. Using layers of light and dark tones makes the face feel three-dimensional and more believable.
Texture also helps. Adding fine lines around the eyes or on the skin suggests strain or stress from crying. Careful shading around the nose and under the mouth adds balance to the whole face.
Capturing Expressions in the Mouth and Brows


The mouth and eyebrows are key players in showing sadness. Eyebrows often pull together and angle up at the outer edges to show pain or sorrow. This shape signals distress clearly.


Mouth shapes vary. A small, trembling lower lip or a downturned mouth shows sadness. Sometimes the mouth is slightly open, which can show someone holding back sobs or gasping. Wide open mouths show intense crying or shouting.
Combining mouth and brow positions draws the viewer’s eye to the emotion. Small changes in these areas make a big difference in how strong the feeling appears. Practicing these details helps artists capture realistic crying expressions.
Common Mistakes in Crying Face Drawings (And Fixes)

Mistake 1: Symmetrical Tears
The problem: Both tear trails identical on each side of the face.
Why it’s wrong: Tears are liquid affected by gravity, facial contours, and how the person tilts their head. Perfect symmetry looks unnatural.
The fix: Vary the tear paths. One side might have more tears. One trail might be further along than the other. This asymmetry reads as natural.
Mistake 2: Happy Eyebrows with Sad Features
The problem: Eyebrow position that doesn’t match crying.
Why it’s wrong: Eyebrows angled down at the outer corners read as “angry.” Flat eyebrows read as “neutral.” Neither reads as “sad.”
The fix: Inner corners UP, outer corners neutral or slightly down. This is the universal distress signal. Get this wrong and nothing else you do will make the face read as crying.
Mistake 3: Too Many Tears at Once
The problem: Face covered in tears from the start.
Why it’s wrong: Even intense crying has a progression. A face immediately covered in tears suggests the person has been crying for a long time—which might be your intent, but often isn’t.
The fix: Match tear quantity to the moment in the emotional arc. Just starting to cry? One or two tears. Been crying for minutes? Multiple trails and wet face.
Mistake 4: Tears Without Face Changes
The problem: Neutral face with tears added.
Why it’s wrong: Crying involves muscle contraction throughout the face. Tears alone, on an otherwise unchanged face, look like a special effect pasted on top.
The fix: Draw the facial expression FIRST. Eyebrows, eyes, mouth, secondary changes. Then add tears as the final layer. The tears should complement an already-emotional face.
Mistake 5: Ignoring Light on Tears
The problem: Flat, matte-looking tears.
Why it’s wrong: Tears are liquid—they’re highly reflective. Without highlights, tears look painted on rather than wet.
The fix: Every tear needs at least one small, bright highlight. Position these consistently based on your light source. The highlight makes tears “pop” as three-dimensional liquid.


Style Variations for Crying Faces
Realistic Style
Focus on anatomical accuracy and subtle gradations.
Emphasis:
- Accurate muscle movement
- Subtle skin texture changes (pores, fine wrinkles)
- Realistic tear refraction and reflection
- Gradual color changes (redness, puffiness)
Tools: Graphite pencils (full range), blending stumps, kneaded eraser for highlights. Digital: soft brushes, layer blending modes.
Reference needed: Photo references essential. Study real crying faces, not just other drawings.
Semi-Realistic/Stylized
Balance between accuracy and artistic interpretation.
Emphasis:
- Key anatomical features simplified but present
- Tears more defined, less subtle
- Stronger contrast between light and shadow
- Slight exaggeration of expression
Tools: Medium-soft pencils or digital brushes with some texture. Limited color palette if coloring.
Anime/Manga Style
Exaggeration for emotional impact.
Emphasis:
- Simplified features with selective detail
- Large, expressive eyes (tears often multiple and prominent)
- Strong eyebrow expression
- Mouth shapes more graphic/symbolic
- Tears can be stylized (sparkles, multiple drops)
- Blush marks for emotional intensity
Common conventions:
- Streaming tears (parallel lines down cheeks)
- Chibi-style waterfall tears for comedy
- Single dramatic tear for subtle emotion
- Sparkle effects in watery eyes
Reference: Study manga artists like CLAMP, Naoko Takeuchi (Sailor Moon), or Ai Yazawa for different approaches to emotional expression.
Cartoon Style

Simplification for readability and impact.
Emphasis:
- Bold, clear shapes
- Exaggerated expressions
- Simple tear shapes (this is where teardrop shapes CAN work)
- Strong silhouette reading
- Minimal detail, maximum clarity
Tip: In cartoons, the eyebrow angle and mouth shape do most of the work. Tears become a supporting element rather than the focus.


Your Next Steps


You’ve got the anatomy, the tear physics, and the intensity scale. Now it’s practice time.
Start here:
- Study real crying. Watch movie scenes with genuine emotional performances. Pause and sketch the facial positions. Note where tears actually fall.
- Practice the eyebrows first. Seriously—get the distressed eyebrow position into muscle memory. Sketch 20 sets of eyebrows in the crying position. This single element will improve every crying face you draw.
- Draw the same face at all five intensities. Take one character and show them through the complete emotional arc: welling up → silent tears → open crying → sobbing → aftermath. This teaches you the progression.
- Focus on one tear. Before drawing multiple tears, master one. Get the shape right. Get the highlight right. Understand how it interacts with the cheek’s contour.
- Add tears last. When doing a complete crying face drawing, save the tears for the final step. Build the emotional expression in the face first. Tears are the finishing touch, not the foundation.
I’ve noticed that artists who struggle with crying faces usually skip the anatomy and go straight to tears. But tears on an emotionally neutral face just look like a wet face, not a crying one. The expression creates the emotion. The tears just prove it’s happening.
Draw the feeling first. Then let it spill over.