Essential Tutorial: Constructing Animals with Basic Geometric Shapes – Principles for Realistic and Imaginative Drawing

Drawing animals convincingly requires more than mere observation; it demands a structured approach to break down complex forms into manageable components. In “The Weatherly Guide to Drawing Animals,” the principles of construction emphasize using basic geometric shapes as building blocks to achieve solid, three-dimensional representations. This method not only enhances drawings from life but also empowers artists to create from imagination by fostering an intuitive understanding of anatomy and proportion. By conceiving animals in terms of spheres, cylinders, cubes, and ovoids, you can simplify the drawing process, ensuring accuracy in foreshortening, angles, and spatial relationships. This tutorial expands on these concepts, providing a step-by-step guide suitable for beginners in pencil sketching, intermediate illustrators, or digital artists using software like Procreate or Adobe Illustrator. We’ll explore how these shapes form the foundation for animals like horses, bears, and lions, as illustrated in the guide, and offer practical exercises to build your skills.
The core idea is that all organic forms can be deconstructed into primitives: Imagine drawing through the animal as if it were made of glass, revealing internal structures. This “constructive drawing” technique, popularized by artists like Glenn Vilppu or Burne Hogarth in animal anatomy studies, promotes automaticity—over time, you’ll instinctively draw any animal by starting with shapes. Benefits include improved volume (avoiding flat outlines), better gesture (capturing movement), and versatility across styles (realistic to stylized). Tools recommended: Sketchbook, HB-2B pencils for light construction lines, 4B for shading, eraser for refinements, and optionally a kneaded eraser for subtle lifts. Begin with loose gestures; refine iteratively. Common errors to avoid: Skipping construction (leads to disproportionate figures), rigid shapes (nature is fluid—soften edges), or ignoring perspective (always consider viewpoint).
Fundamental Geometric Shapes for Animal Construction
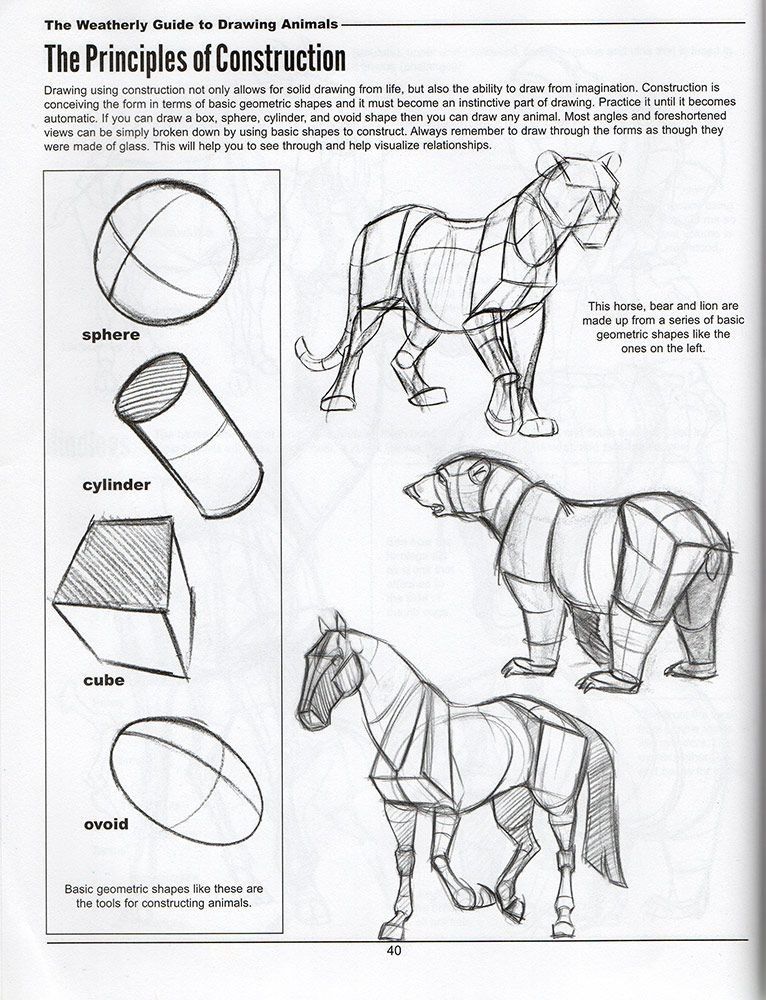
These basic forms serve as the “skeleton” for your drawings. Each shape contributes unique properties: Spheres for rounded masses, cylinders for limbs, cubes for blocky structures, and ovoids for tapered or egg-like volumes.
- Sphere: A perfect round form, ideal for heads, joints, or bulbous body parts. It represents volume in all directions, helping with shading and rotation. In the guide, it’s shown with cross-contours to indicate 3D.
- Cylinder: Elongated and tubular, perfect for legs, necks, or tails. It conveys directionality and can be tapered for realism. Illustrated tilted to show perspective.
- Cube: Angular and stable, used for torsos, muzzles, or hooves where flat planes dominate. It aids in defining hard edges and light planes.
- Ovoid: An egg-shaped variant of the sphere, asymmetrical for organic flow. Great for muscles or abdomens that swell and taper.
Tutorial Tip: Practice isolated shapes first—draw each in various perspectives (e.g., foreshortened cylinder from end-on). Use light guidelines (axes through centers) to maintain symmetry. Shade simply: One side light, opposite dark, for instant volume.
Step-by-Step Construction: Building Animals from Shapes
The guide demonstrates constructing a horse, bear, and lion from these primitives, starting simple and evolving to detailed forms. This “made up from a series of basic geometric shapes” approach ensures intuitive part-to-whole assembly. Follow these steps, referencing the illustrations.
Step 1: Gesture and Basic Massing (Establishing the Foundation)
Capture the animal’s overall pose and proportion before details.
- Visual Breakdown: For the horse, begin with an ovoid for the body, spheres for the head and joints, cylinders for legs. The bear uses cubes for the bulky torso and ovoids for the rounded haunches. The lion combines spheres (head) with tapered cylinders (limbs) for a powerful stance.
- Technique: Lightly sketch the “action line” (spine curve) to convey movement. Block in major masses: Torso as cube/ovoid hybrid, head as sphere, limbs as cylinders. Proportion check: Horse body ~2-3 head lengths; bear more compact.
- Key Focus: Simplicity—use 5-7 shapes max. Draw through overlaps to visualize 3D.
- Tutorial Tip: Time yourself (2-5 minutes) for loose gestures. Erase nothing yet; build over. Practice with references: Photo a real animal, overlay shapes mentally.
Step 2: Refining Connections and Proportions (Linking Shapes)
Connect shapes smoothly, adjusting for anatomy and perspective.
- Visual Breakdown: In the horse, cylinders attach to the ovoid body at angles for legs; spheres at joints allow rotation. The bear’s cube torso transitions to cylindrical limbs with ovoid shoulders for bulk. Lion’s form shows foreshortened cylinders in the forelegs, emphasizing power.
- Technique: Add “connectors”—taper cylinders where they meet spheres (e.g., knee joints). Use cross-contours (lines wrapping around forms) to indicate volume, as in the shaded examples. Foreshorten: Shorten shapes viewed end-on (e.g., front leg cylinder becomes oval).
- Key Focus: Proportions evolve here—ensure limbs align with gravity and pose. Always remember to “draw through” invisible parts.
- Tutorial Tip: Use a mirror or flip your drawing to spot imbalances. Digitally, use layers: One for shapes, another for refinements. Exercise: Construct a standing bear from 10 shapes, then reduce to 6 for efficiency.
Step 3: Adding Details and Shading (Evolving to Realism)
Layer anatomy, texture, and light to bring the construction to life.
- Visual Breakdown: The finished animals show hatched shading on cylinders (legs) for muscle definition, contoured spheres (heads) for fur direction. Horse tail as tapered ovoid, bear paws as cubed extensions.
- Technique: Outline refined contours over shapes, erasing guidelines. Shade based on light source: Highlights on top spheres, shadows under cubes. Add details sparingly—fur lines following form curves, eyes on head sphere.
- Key Focus: Maintain construction integrity—details should enhance, not obscure, shapes. Foreshortened areas get denser shading for depth.
- Tutorial Tip: Start shading in midtones, build darks/lights. For imagination drawing, vary poses: Twist the lion’s torso by rotating its cube. Challenge: Draw a running horse, exaggerating cylinder bends.
Advanced Applications: From Life to Imagination
Once mastered, apply to any animal: Birds (spheres for bodies, cylinders for wings), reptiles (ovoids for scales). For imaginative work, hybridize—e.g., a mythical griffin with lion cubes and eagle spheres. Combine with gesture drawing for dynamic poses or anatomy studies for muscle accuracy.
Exercises for Mastery:
- Daily Warm-Up: Construct 3 animals from photos using only 4 shapes each.
- Perspective Challenge: Draw a bear from below, foreshortening limbs.
- Imagination Drill: Invent a hybrid animal, documenting shape breakdown.
- Shading Series: Light the same horse construction from 3 angles (front, side, back).
Conclusion: Unlocking Intuitive Animal Drawing
By embracing these principles of construction, you’ll transition from rigid copies to fluid, imaginative creations. Basic shapes demystify complexity, allowing you to “see through” forms and visualize relationships effortlessly. As the guide notes, practice until it becomes automatic—then any animal, real or fantastical, is within reach. For deeper study, reference books like “Animal Drawing: Anatomy and Action for Artists” by Charles Knight. Share your shape-based sketches in our community forum, and tag them with #AnimalConstructionTutorial for feedback. Keep experimenting, and watch your drawings come alive!


