Mastering Perspective Drawing: A Guide to Placing People in Different Views for Architectural Sketches

Description:
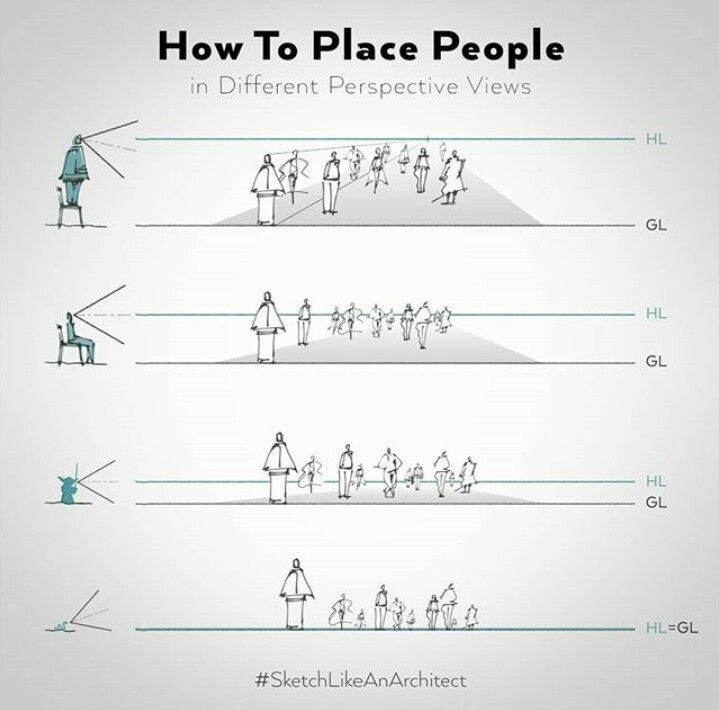
In the world of architectural sketching, understanding perspective is essential for creating realistic and immersive scenes. One of the most challenging aspects is accurately placing human figures within these perspectives to convey depth, scale, and spatial relationships. This tutorial, inspired by the principles of #SketchLikeAnArchitect, breaks down how to position people in various perspective views based on the viewer’s eye level relative to the horizon line (HL) and ground line (GL). Whether you’re an aspiring architect, illustrator, or hobbyist, this step-by-step guide will help you master the art of integrating figures into your drawings with precision and confidence.
We’ll explore four key scenarios illustrated in the diagram, each demonstrating how the placement and size of people change depending on the viewer’s position and the terrain. These examples assume a one-point or two-point perspective setup, where lines converge toward vanishing points on the horizon. Key concepts include:
- Horizon Line (HL): The imaginary line at the viewer’s eye level, where all parallel horizontal lines appear to meet at infinity. It determines the “height” from which the scene is viewed.
- Ground Line (GL): The base level of the scene, often representing the floor or terrain on which figures stand.
- Vanishing Points: Points on the HL where receding lines converge, creating the illusion of depth.
- Foreshortening: The visual effect where objects appear shorter or distorted as they recede into the distance.
- Scale and Proportion: Human figures (typically averaging 5-6 heads tall) must diminish in size as they move farther from the viewer to maintain realism.
By following these guidelines, you’ll learn to avoid common pitfalls like disproportionate figures or flat compositions. Let’s dive into each view, starting with the basics and building toward more complex applications.
1. High Viewer Position (Elevated Eye Level, Downward Slope)
In the first diagram, the viewer is positioned at a higher elevation, such as sitting on a chair or standing on a balcony, looking down at a group of people on a gently sloping ground. The HL is above the figures’ heads, while the GL is below, creating a pronounced downward angle.
- Key Observations: The viewer’s line of sight (indicated by the converging rays) starts from an elevated point and sweeps downward. Closer figures appear larger and more detailed, with their heads aligned near the HL. As figures recede, they shrink progressively, following the slope of the ground. The ground itself tapers toward the horizon, emphasizing depth.
- Step-by-Step Tutorial:
- Draw your HL across the page at the desired eye level (e.g., two-thirds up the composition for a dramatic overlook).
- Sketch the GL as a sloped line converging toward a vanishing point on the HL.
- Place the nearest figure: Use a standard human proportion (e.g., 1.7-1.8m tall in real scale, but scaled to your drawing). Their eye level should align roughly with the HL if they’re at a similar height to the viewer.
- For receding figures: Draw guidelines from the viewer’s eye point to the vanishing point. Reduce figure height by 50-70% for each doubling of distance (based on linear perspective rules).
- Add details: Foreshorten limbs and clothing on distant figures to avoid elongation. Use lighter lines or shading for depth.
- Pro Tip: This view is ideal for urban sketches of streets or plazas from a window. Experiment with varying slopes to simulate hills or stairs—steeper angles require more aggressive size reduction.
2. Mid-Level Viewer Position (Standard Eye Level, Moderate Slope)
The second diagram shows a viewer at a more neutral height, perhaps standing, observing people on a mildly inclined surface. The HL remains above most figures, but the angle is less steep than the first view, resulting in a balanced composition.
- Key Observations: The line of sight is straighter, with figures distributed along a subtle downward plane. Heads of standing people align closer to the HL, and the group clusters more horizontally. Distant figures are smaller but not as drastically diminished, maintaining a sense of continuity.
- Step-by-Step Tutorial:
- Establish the HL at eye level (typically 1.6-1.7m in scale for a standing viewer).
- Draw the GL with a gentle slope, ensuring it meets the HL at the vanishing point.
- Position the foreground figure: Anchor them firmly on the GL, with their head just below the HL for realism.
- Add mid-ground and background figures: Use perspective grids (imaginary lines dividing space equally) to plot positions. Scale figures using the “halving” method—each segment halves the height.
- Refine with overlaps: Have figures partially obscure each other to enhance depth; apply atmospheric perspective by desaturating colors in the distance.
- Pro Tip: Perfect for interior scenes like hallways or outdoor paths. If the slope is flat (HL parallel to GL), this becomes a classic eye-level perspective, great for crowd scenes.
3. Low Viewer Position (Seated or Kneeling, Shallow Slope)
Here, the viewer is lower to the ground, such as sitting on the floor or crouching, gazing at figures on a nearly flat but slightly descending plane. The HL is closer to the figures’ waists or lower, and the GL is more prominent.
- Key Observations: The perspective shifts upward slightly, making closer figures loom larger while distant ones appear tiny and clustered near the HL. The ground line curves subtly, and the overall view feels more intimate or dramatic, like looking up from below.
- Step-by-Step Tutorial:
- Set the HL lower on the page (e.g., one-third from the bottom) to simulate a low vantage point.
- Sketch the GL as a shallow incline, converging slowly to the HL.
- Draw the primary figure: Exaggerate their size in the foreground, with feet on the GL and head well above the HL to convey height.
- Place subsequent figures: Use converging rays to guide scaling—distant figures might be 20-30% of the foreground size. Adjust for foreshortening, making bases wider and tops narrower.
- Enhance realism: Incorporate shadows cast toward the viewer and add environmental elements like grass or pavement textures that follow perspective lines.
- Pro Tip: This angle works well for dynamic compositions, such as children playing or urban sketches from a park bench. Avoid overcrowding the foreground to prevent visual clutter.
4. Ground-Level Viewer Position (Lying Down or Extreme Low Angle, Flat Plane)
The final diagram depicts the viewer at ground level, where HL and GL coincide (HL=GL). This creates a worm’s-eye view, with figures receding sharply into the distance on a flat or minimally sloped surface.
- Key Observations: The line of sight is almost parallel to the ground, causing extreme foreshortening. Figures diminish rapidly, appearing as silhouettes or tiny specks far away. The unified HL/GL emphasizes infinity, ideal for vast landscapes.
- Step-by-Step Tutorial:
- Merge HL and GL into a single line at the bottom of your composition.
- Define the flat ground plane extending to the vanishing point.
- Illustrate the closest figure: Make them dominate the frame, with exaggerated vertical stretch and feet anchoring the GL.
- Scale distant figures aggressively: Use mathematical ratios (e.g., inverse proportionality to distance) for accuracy—figures at twice the distance are half the height.
- Final touches: Blur or simplify details in the background; use overlapping and diminishing line weights to reinforce depth.
- Pro Tip: Excellent for dramatic effects in sci-fi illustrations or beach scenes. In digital tools like Procreate or SketchUp, use perspective guides to automate scaling.
Advanced Tips for Professional Application
- Tools and Materials: Start with pencil and paper for quick studies, then transition to ink or digital software. Grids and rulers help beginners maintain accuracy.
- Common Mistakes to Avoid: Don’t place all figures at the same height—vary poses and groupings. Ignore real-world lighting, and your scene will feel flat.
- Practice Exercises: Redraw these diagrams with your own figures (e.g., add diversity in age, clothing). Apply to real scenarios: Sketch a coffee shop interior or a city street.
- Further Reading: Explore books like “Perspective Made Easy” by Ernest Norling or online resources from #SketchLikeAnArchitect communities for more examples.
By incorporating these techniques, your architectural sketches will gain lifelike depth and narrative power. Practice consistently, and soon placing people in perspective will become second nature. Share your progress in the comments below—what’s your favorite view to sketch?