The Perspective Plane Method: A Comprehensive Tutorial for Artists on Creating Depth and Dimension in Drawings

In the world of visual arts, mastering perspective is essential for creating realistic and immersive drawings that convey depth, space, and three-dimensionality on a two-dimensional surface. Traditional perspective techniques, such as one-point, two-point, or three-point perspective, often rely on vanishing points, horizon lines, and precise measurements. However, for artists seeking a more intuitive and flexible approach—especially beginners or those working freehand—the Perspective Plane Method offers a simplified yet powerful alternative. This method emphasizes starting with basic planes, eyeballing proportions, and gradually building complexity, allowing for organic distortions that can enhance creative expression.
Inspired by hand-sketched notes from an artist’s workbook, this tutorial breaks down the Perspective Plane Method into actionable steps. Whether you’re drawing landscapes, architectural elements, or abstract forms, this technique helps you avoid overly rigid structures while still achieving convincing depth. No advanced tools are required—just paper, pencil, and an understanding of basic shapes. By the end of this guide, you’ll be able to apply this method to your own artwork, experimenting with flat planes, curves, and multi-layered perspectives. Let’s dive in with professional tips, common pitfalls, and examples to make your learning process smooth and effective.
What is the Perspective Plane Method?
The Perspective Plane Method is a hands-on drawing strategy that treats perspective as a series of interconnected planes rather than strict linear projections. Unlike classical methods that demand precise vanishing points from the outset, this approach starts simple: you begin with a single angled plane (like a floor or wall) and iteratively add elements to build depth. It’s particularly useful for artists who prefer “eyeballing” over measuring, as it tolerates small inaccuracies that can even contribute to artistic style—think subtle distortions for a more dynamic feel.
Key principles include:
- Simplicity First: Prepare your “river” (a metaphorical flow of lines) but keep initial setups basic to avoid overwhelming complexity.
- Flexibility with Distortions: Minor imprecisions in early stages can lead to interesting effects, but larger ones may cause noticeable issues later—practice scaling up gradually.
- Plane-Based Construction: Planes are flat or curved surfaces that extend into space, defined by X, Y, or Z axes for orientation.
- Applications: Ideal for comics, concept art, illustrations, or even digital painting prep. It shines in scenarios where you need quick, intuitive depth without rulers.
This method encourages experimentation, such as incorporating fisheye lenses or spherical elements, making it versatile for both realistic and stylized art. Pro Tip: Always sketch lightly in the beginning to allow for adjustments, and use erasers sparingly to preserve your initial energy.
Step 1: Starting with a Basic Plane
Begin your drawing by establishing a foundational plane—this is the “ground” from which all depth will emerge. Think of it as the floor you’re standing on, viewed at an angle to imply perspective immediately.
- How to Do It:
- Draw a simple quadrilateral (four-sided shape) on your paper, tilted at an angle. Avoid making it a perfect rectangle; instead, taper the sides slightly to suggest recession into space.
- Ensure the plane has implied depth by making the far edges shorter or converging subtly—mimic how a real surface appears smaller as it recedes.
- Label it mentally as your starting point, like “the floor you start with.”
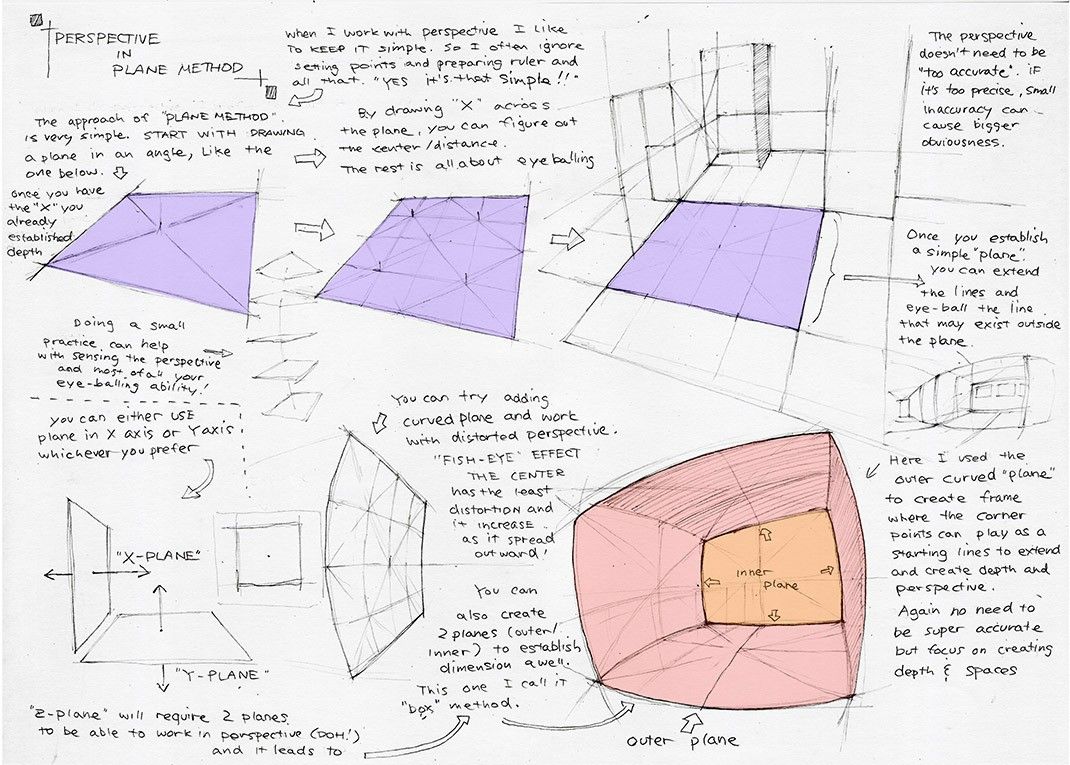
- Example from the Sketch: In the reference notes, this is shown as a purple-shaded irregular quadrilateral with lines indicating depth. The artist notes, “Start with Drawing a Plane. Like the one below, in an angle. Like the floor you start with.”
- Tips for Success: Use light strokes to outline. If you’re digital, lower opacity layers work well. Common Mistake: Making the plane too flat—add a slight “X” cross (detailed in the next step) to gauge center and avoid symmetry issues.
- Practice Exercise: Sketch a basic plane representing a tabletop viewed from above. Erase and redraw until it feels naturally angled.
This step sets the tone for the entire drawing, so take your time to get the angle right—it influences how “deep” your final piece feels.
Step 2: Finding the Center with the ‘X’ Technique
Once your basic plane is in place, locate its center to anchor further elements. This is where the method’s simplicity shines, using a quick “X” to divide the space intuitively.
- How to Do It:
- Draw diagonal lines from opposite corners of your plane, forming an “X.” Where they intersect is your center point.
- This center helps in “eyeballing” placements—it’s not about perfect math but visual balance.
- Extend the “X” lines beyond the plane if needed to guide future additions.
- Example from the Sketch: The notes illustrate this with arrows pointing to the “X” across the plane, stating, “By drawing ‘X’ across the plane, you can ‘Figure out the center’ also if absolute ‘eyeballing’.” It’s shown on a purple plane, emphasizing how it reveals the “nest if absolute eyeballing.”
- Tips for Success: If your plane is irregular, the “X” will still work but may create asymmetric centers—embrace this for organic looks. Pro Tip: In perspective, the center isn’t always the geometric middle; adjust based on your viewpoint (e.g., high or low angle).
- Common Pitfall: Over-relying on precision here can stiffen your drawing. Remember the advice: “The perspective doesn’t need to be its too precise, small inaccuracy can cause bigger distortions.”
- Practice Exercise: On your basic plane, add the “X” and mark objects at the center, like a simple cube, to see how it recedes.
This technique is a game-changer for quick setups, reducing the need for grids or rulers.
Step 3: Adding Depth and Extensions
With your plane and center established, extend lines to create depth, turning your flat shape into a spatial framework.
- How to Do It:
- From the edges or center, draw lines outward or inward to imply extension into the distance.
- Focus on the X or Y axis for horizontal/vertical depth—choose based on your composition (e.g., X for width, Y for height).
- These extensions can exist “outside” the visible plane, guiding off-page elements.
- Example from the Sketch: “Once you establish a simple ‘plane’ you can extend the lines and that may exist outside.” Illustrated with lines shooting off the purple shape.
- Tips for Success: Keep extensions converging subtly toward an implied horizon. Digital artists: Use infinite canvas tools for this.
- Common Pitfall: Overextending without purpose—tie them back to new planes or objects.
- Practice Exercise: Extend your plane’s lines to form a hallway or road, adding simple shapes along them.
Step 4: Working with Curved Planes and Fisheye Perspective
For more advanced effects, introduce curves to your planes, simulating wide-angle or distorted views like a fisheye lens.
- How to Do It:
- Start with a basic plane, then bend its edges into curves, centering the distortion.
- Mark a “fisheye center” where distortions are minimal, spreading outward.
- This creates a frame where points play as starting anchors for depth.
- Example from the Sketch: A curved purple oval with “FISHEYE CENTER” labeled, noting, “You can try adding curved plane work with distorted perspective. ‘FISHEYE’ have the least distortions and as it spread outward.”
- Tips for Success: Use this for panoramic scenes or exaggerated styles. Blend with straight planes for hybrid effects.
- Common Pitfall: Too much curvature can confuse the eye—start subtle.
- Practice Exercise: Draw a curved plane as a bubble or lens, placing objects inside to warp them.
Step 5: Creating Inner and Outer Planes
Build complexity by nesting planes within or around your base.
- How to Do It:
- Draw smaller “inner” planes inside the main one, rotated slightly for variety.
- Add larger “outer” planes encompassing the base for expansion.
- This “Tbp method” (as coined in the notes) layers perspectives.
- Example from the Sketch: “You can create inner planes (smaller) turned a bit. ‘Tbp’ method. I call it!” With nested shapes.
- Tips for Success: Rotate inner planes 10-20 degrees for subtle shifts.
- Practice Exercise: Nest three planes, shading to show recession.
Step 6: Introducing the Z-Plane for Full 3D
Elevate to three dimensions by adding a Z-plane, requiring multiple layers.
- How to Do It:
- Combine two planes (e.g., X and Y) to form a Z-axis for height/depth.
- This enables vertical elements like walls or spheres.
- Experiment with spheres or cool effects in perspective.
- Example from the Sketch: “‘Z-plane’ will require 2 planes and it leads to work in perspective (cool!)” With labels for X, Y, Z planes.
- Tips for Success: No need for super accuracy—focus on feel.
- Practice Exercise: Build a simple room using X/Y/Z planes.
Conclusion
The Perspective Plane Method empowers artists to create depth intuitively, bridging simplicity and sophistication. By starting basic and layering complexity, you’ll develop an eye for perspective that enhances all your work. Practice regularly, experiment with distortions, and remember: small inaccuracies add character. For more resources, explore books like “Perspective Made Easy” by Ernest Norling. Share your creations in the comments—happy drawing!


