How to Draw Convincing Clouds in Perspective: Essential Tips for Depth, Scale, and Realistic Shadows

Clouds are one of the most expressive and dynamic elements in landscape, cityscape, and atmospheric drawings—yet they’re also one of the most frequently misunderstood. The charming, flat, puffy cartoon clouds we all drew as children rarely survive the transition to serious observational art. This illustrated tutorial reveals key professional techniques for drawing believable, three-dimensional clouds that obey the laws of perspective, interact with light, and cast dramatic shadows—adding immense depth, scale, and mood to any large-scale composition.
Whether you’re painting vast skies over mountains, dramatic urban scenes, or epic fantasy landscapes, mastering these principles will transform flat backgrounds into powerful, immersive atmospheres.
Core Principles: Clouds Are Not Flat!
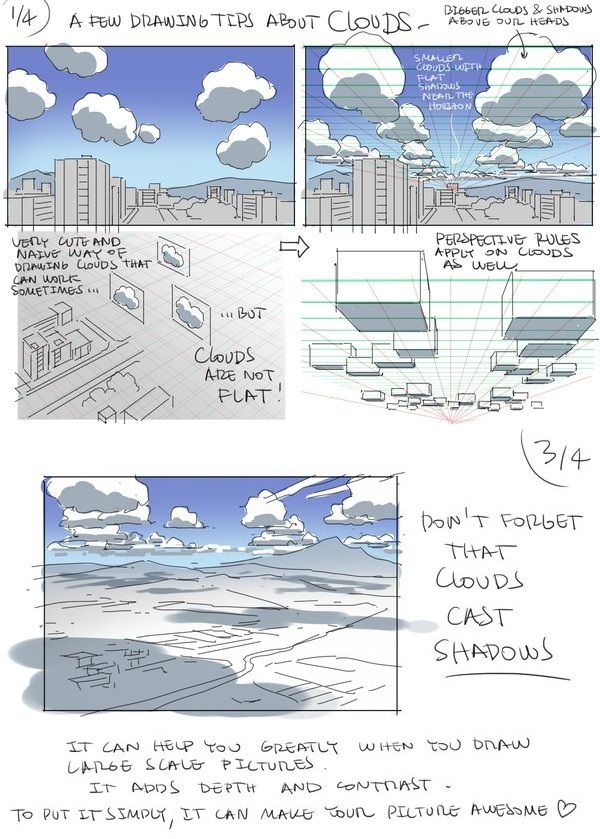
- Clouds Follow Perspective Rules Just Like Buildings Clouds are massive, volumetric forms floating in three-dimensional space. They must respect the same vanishing points and convergence as every other object in your scene.
- Horizontal cloud edges (tops and bottoms of cloud layers) converge toward the horizon vanishing points.
- Vertical thickness and side planes of taller clouds taper toward the same points.
- Smaller, distant clouds appear flatter and more compressed due to atmospheric perspective. The diagram clearly shows how treating clouds as simplified “boxes in perspective” eliminates the naive, cookie-cutter look and creates natural recession.
- Vary Size, Shape, and Density for Realism
- Foreground/dominant clouds → large, billowing, highly detailed with strong light and shadow.
- Mid-ground clouds → medium size, softer edges, less contrast.
- Background clouds → small, flattened, pale, and grouped in layers. Never draw every cloud the same size or shape—random variation mimics real atmospheric chaos.
- Clouds Cast Shadows—Use Them! One of the most powerful (and often overlooked) ways to add depth is to show the shadows clouds cast onto the ground, other clouds, and even themselves.
- Cumulus clouds cast soft, diffuse shadows below them—darker on the ground directly underneath, fading outward.
- When clouds pass over mountains, fields, or cities, the shadows create beautiful patterns of light and dark that guide the viewer’s eye.
- Shadows on lower cloud surfaces (undersides) are cooler (bluish-gray) and help define volume. Including these shadows instantly makes the sky feel massive and the scene feel grounded in real physics.
- Light Direction & Value Control
- Decide on a single, consistent light source (usually the sun).
- Bright tops and sides of clouds receive direct light → lightest values, warm whites/yellows.
- Undersides and shadowed sides → cooler grays, blues, even subtle purples.
- Keep the sky behind clouds lighter near the horizon (atmospheric scattering) and deeper blue higher up.
Step-by-Step Approach to Drawing Realistic Clouds
- Establish Horizon & Vanishing Points Lightly sketch your horizon line and at least one (preferably two) vanishing points. All cloud layers must converge toward these points.
- Block In Major Cloud Masses Use very light construction lines to rough out big cloud groups as simplified 3D forms (rounded boxes or irregular polyhedrons). Draw the tops and bottoms converging to vanishing points.
- Add Volume & Overlapping Layers Stack smaller cloud forms in front of and behind larger ones. Make distant clouds flatter and smaller; foreground clouds thicker and more sculptural.
- Define Light & Shadow Planes Shade the illuminated sides brightly and the undersides/backs cooler and darker. Leave the brightest highlights pure white or very light.
- Cast Shadows on the Ground & Other Clouds Project soft, diffuse shadows downward from each major cloud mass. Use hatching, soft blending, or washes to create gentle transitions. Shadows on lower clouds should be subtle and cool-toned.
- Refine Edges & Texture Soften hard edges with a blending tool or eraser for realistic fluffiness. Add subtle internal texture (wisps, ripples) with light strokes—avoid over-detailing distant clouds.
Common Mistakes to Avoid
- Drawing all clouds the same size and shape → looks artificial
- Making clouds perfectly symmetrical or floating like stickers → destroys depth
- Ignoring cast shadows → sky feels detached from the landscape
- Using hard outlines around every cloud → kills softness and realism
- Forgetting perspective convergence → clouds look pasted on
Why This Matters for Large-Scale Pictures
In epic landscapes, cityscapes, or fantasy scenes, clouds are not just background filler—they set the mood, control scale, and create contrast. Properly drawn clouds with correct perspective and cast shadows make the entire picture feel vast, atmospheric, and believable. A flat sky can flatten an entire masterpiece; a well-rendered sky can elevate it to breathtaking.
Practice Challenge: Take a simple landscape or cityscape sketch. Redraw the sky three times using:
- Cartoon puffy clouds (the “cute but wrong” way)
- Perspective-box construction (as shown)
- Full shadows + light logic Compare the results—you’ll immediately see the difference in depth and professionalism.
Master these cloud-drawing principles, and your skies will stop being a weak link and start becoming the star of the show. Your large-scale pictures will gain awe-inspiring scale, mood, and contrast.
Ready to give your skies the depth they deserve? Grab your pencil and start building those perspective clouds today!
Happy drawing! ☁️✏️