How to Hold a Pencil for Drawing: The Ultimate Guide to Proper Grips for Sketching, Gesture, and Detail Work

One of the most overlooked fundamentals in drawing is how you hold your pencil. The grip you use directly affects control, line quality, range of motion, fatigue, and the overall expressiveness of your marks. Many beginners default to the familiar “pen grip” they learned for writing—tight, close to the tip, and rigid—which severely limits freedom and leads to cramped hands, shaky lines, and inconsistent results.
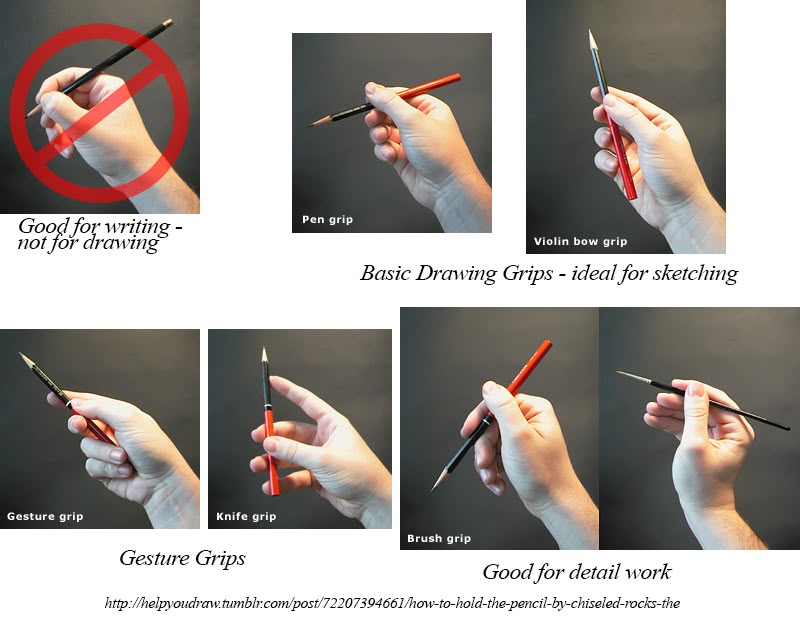
This professional tutorial, inspired by time-tested drawing instruction (including insights from resources like helpyoudraw.tumblr.com), clearly demonstrates the correct and incorrect grips for different drawing purposes. Learn the difference between writing grips, basic sketching grips, gesture grips, and precision grips so you can draw with confidence, fluidity, and control at any stage of your artistic journey.
Why Grip Matters in Drawing
- Writing grip (tight, near the tip) = Designed for small, precise movements needed in handwriting. It restricts arm and shoulder movement—essential for flowing, confident drawing strokes.
- Drawing grips = Allow you to use your whole arm, wrist, and fingers together. This creates smoother lines, better pressure variation, and less fatigue during long sessions.
- Different tasks require different grips: loose and flowing for gesture and broad sketching; controlled and close for fine detail.
Incorrect Grip: The Classic Writing / Pen Grip
- Description: Fingers close to the tip, thumb and index finger pinching tightly, hand resting on the paper.
- Why it’s wrong for drawing: Limits range of motion to fingers only → short, choppy lines; causes hand cramps; poor for shading large areas or loose sketching.
- Visual cue: A large red prohibition symbol (⛔) over this grip—avoid for all serious drawing work.
Recommended Basic Drawing Grips – Ideal for General Sketching & Observational Drawing
These grips give you freedom of movement while maintaining good control. Use them for most everyday sketching, life drawing, and preliminary work.
- Pen Grip (Modified)
- Hold the pencil farther back from the tip than writing position.
- Relaxed fingers, thumb and index forming a loose tripod.
- Allows wrist and small arm movements.
- Great transition grip for beginners moving away from writing habits.
- Violin Bow Grip (Overhand / Extended Grip)
- Hold the pencil between thumb and all four fingers, like gripping a violin bow.
- Pencil rests lightly on the side of the index finger.
- Excellent for long, sweeping strokes and broad shading.
- Maximizes shoulder and arm movement—perfect for large-scale work and confident lines.
Gesture Grips – Best for Loose, Expressive, Fast Drawing
These grips emphasize speed, flow, and big arm movements—ideal for gesture drawing, warm-ups, life drawing, figure sketching, and capturing energy.
- Gesture Grip
- Hold the pencil very far back, almost at the end.
- Loose overhand grip with fingers extended.
- Uses full arm from shoulder → dynamic, sweeping, rhythmic lines.
- Essential for timed poses (30 seconds to 2 minutes).
- Knife Grip
- Grip the pencil between thumb and middle finger, with index finger resting on top for guidance.
- Allows sharp, angular strokes and varied pressure.
- Great for quick contour lines and expressive mark-making.
- Brush Grip
- Hold the pencil upright, like a paintbrush, with fingers relaxed and high on the barrel.
- Perfect for light, sensitive lines and subtle shading.
- Mimics the natural movement of traditional brushwork—ideal for ink-like effects with pencil.
Precision & Detail Grips – For Fine Rendering & Finishing
- Use a modified pen grip—but higher up on the pencil and with a very relaxed hand.
- Rest the side of your hand lightly on the paper (or use a bridge/mahl stick).
- Keep movements small and controlled.
- Switch to this only when you need pinpoint accuracy (eyes, hair strands, mechanical details).
Quick Reference: Which Grip for Which Task?
| Drawing Task | Recommended Grip(s) | Key Benefit |
|---|---|---|
| Gesture / Warm-up / Figures | Gesture, Knife, Violin Bow | Maximum flow & arm movement |
| General Sketching / Blocking | Violin Bow, Modified Pen, Brush | Balanced control & freedom |
| Shading large areas | Violin Bow, Brush | Smooth, even tones |
| Fine detail / Rendering | Modified Pen (higher up) | Precision & small movements |
| Writing notes / signatures | Classic Pen Grip | Only acceptable use for this grip! |
Pro Tips for Better Grip Habits
- Hold the pencil farther back — 2–4 inches from the tip for most drawing.
- Relax your hand — Tension = shaky lines. Shake out your hand every few minutes.
- Use your whole arm — Practice drawing large circles and figure-eights from the shoulder.
- Experiment — Try all grips on the same subject (e.g., a quick 5-minute portrait) and compare results.
- Warm up — Spend 5–10 minutes daily with gesture grips to loosen your hand and train fluid movement.
Changing your grip is one of the fastest ways to instantly improve line quality and drawing confidence. It may feel awkward at first—especially moving from the writing grip—but within a few sessions, your lines will become smoother, bolder, and more expressive.
Which grip will you try first? Practice one new grip per drawing session and watch your sketches transform. Share your progress—we’d love to see how it changes your work!
Happy drawing! ✏️


