Mastering Motion Effects in Illustration: Techniques for Depicting Speed and Dynamism in Action Poses

Introduction
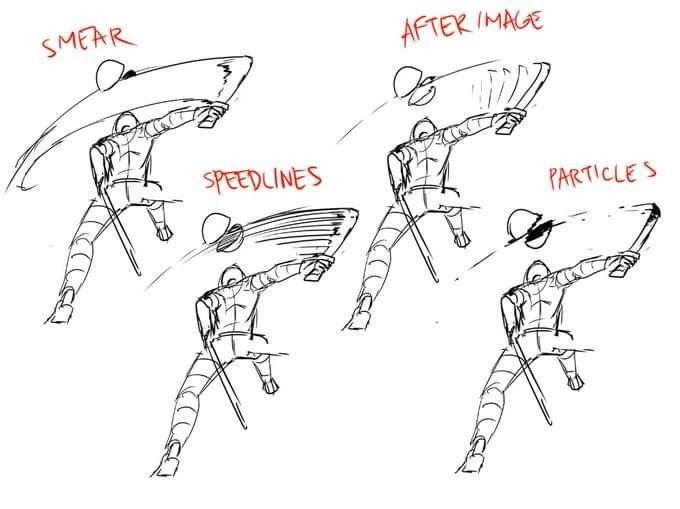
In the world of illustration, animation, and comic art, conveying motion and speed is essential for bringing dynamic scenes to life. The provided image showcases a series of sketches featuring a humanoid figure in a powerful swinging pose, likely wielding a sword or similar object. Each variation demonstrates a distinct visual effect to emphasize rapid movement: smear, speedlines, after image, and particles. These techniques, rooted in traditional animation practices from studios like Disney and Warner Bros., allow artists to simulate the blur and energy of fast actions without relying solely on multiple frames or high frame rates.
This tutorial is designed for aspiring illustrators, animators, and digital artists looking to enhance their work with professional-grade motion effects. We’ll explore each technique in detail, drawing from historical examples, practical applications, and step-by-step instructions. Whether you’re working in traditional media like pencil and ink or digital tools such as Clip Studio Paint, Adobe Animate, or Procreate, these methods can elevate static drawings into vibrant, action-packed visuals. By the end, you’ll have the tools to experiment and integrate these effects into your own artwork, making your illustrations more engaging and immersive for website posts, comics, or animations.
Understanding the Basics of Motion in Art
Before diving into specific techniques, it’s important to grasp why motion effects are necessary. In real life, the human eye perceives fast-moving objects as blurred due to limitations in processing speed—this is known as motion blur. In art, especially in static images or limited-frame animations, artists replicate this through stylized effects to imply velocity, direction, and intensity.
Key principles from the 12 principles of animation (developed by Disney animators) apply here:
- Squash and Stretch: Redistributes an object’s mass to maintain volume while exaggerating form for impact.
- Arcs: Most natural movements follow curved paths, which these effects should trace.
- Timing and Spacing: Faster actions require fewer frames with effects to fill gaps, creating smoothness.
- Slow In and Slow Out: Objects accelerate and decelerate, influencing how effects are spaced (e.g., more blur at peak speed).
These effects are particularly useful in scenarios like sword swings, punches, or dashes, as seen in the image. Historically, they evolved in the 1920s-1940s from comic strips to animated films, with innovations like dry brushing in Disney’s King Neptune (1932) and stylistic smears in Warner Bros.’ The Dover Boys (1942). In modern digital art, tools like blur filters automate some processes, but hand-drawn effects offer greater stylistic control.
Now, let’s break down each technique illustrated in the image.
1. The Smear Technique: Creating Fluid Blurs for Rapid Transitions
The smear technique, also called “elongated in-betweens” or “hand-drawn motion blur,” involves distorting the moving object or limb into an abstract, stretched shape to bridge keyframes. In the image, the top-left figure shows the arm and sword smeared into a curved, blurred arc, emphasizing the swing’s path without additional frames.
Historical Context
Smears originated in traditional animation to save on drawing costs while maintaining fluidity. In films like The Cat’s Tale (1941) by Warner Bros., animators like Chuck Jones used smears stylistically, combining them with dry brushing (a technique using a nearly dry ink brush for scratchy trails). This evolved from black-and-white comics’ speed lines into colorful blurs in technicolor shorts.
Step-by-Step Guide to Creating Smears
- Plan Your Keyframes: Start with anticipation (e.g., the figure winding up for the swing) and resolution poses (e.g., post-swing). Sketch the arc of motion lightly.
- Draw the Smear Frame: Between keyframes, elongate the moving part (arm and sword) along the arc. Avoid preserving exact volume—instead, widen or stretch it into a noodle-like or fragmented shape. For a sword swing, curve the smear to follow a circular path, making it thicker at the start/end and thinner in the middle for acceleration.
- Add Stylization: Use hatching (parallel lines along the edges) or subtract parts of the object for a messy, abstract look. In digital tools like Clip Studio Paint:
- Draw the base shape on a new layer.
- Apply Filter > Blur > Motion Blur (set Strength to 1-3, Angle to match the arc, Direction along the path).
- Adjust opacity for subtlety.
- Timing Considerations: Use 1-2 smear frames for quick actions. Expose on 1s (one drawing per frame) for high speed. Combine with multiples (e.g., extra arms) for complexity.
- Tips for Perfection:
- Sparingly use smears—overuse can make animation feel “watery.” Test on 2s (one drawing for two frames) first.
- Study live-action footage at 24 FPS to mimic natural blurs.
- For sword swings, emphasize the blade’s tip for maximum impact, as it moves fastest.
- Common Pitfall: Keeping characters too “on-model” leads to stiffness; exaggerate for energy.
Example: In this illustration of a sword swing, the smear creates a seamless blur that guides the viewer’s eye along the motion path.
2. Speedlines: Directing Energy with Linear Trails
Speedlines, visible in the bottom-left figure of the image, are straight or curved lines trailing behind the moving object, indicating direction and velocity. Here, lines radiate from the sword’s path, pulling the eye toward the swing’s endpoint.
Historical Context
Evolving from 1920s comic books, speedlines became staples in animation by the 1930s. They differ from smears by being additive elements rather than distortions, often combined with dry brushing for textured trails.
Step-by-Step Guide to Creating Speedlines
- Identify the Motion Path: Trace the arc of the swing (e.g., a quarter-circle for a downward slash).
- Draw the Lines: Add parallel lines behind the object, longer and denser near the origin for deceleration, shorter toward the front for focus. Vary thickness for depth—thicker lines for foreground energy.
- Incorporate in Digital Tools: In software like Adobe Illustrator or Clip Studio:
- Use the Pen or Brush tool with varying pressure.
- Apply motion blur lightly to soften edges.
- For comics, use rulers for straight lines or freehand for organic feel.
- Timing and Exposure: Ideal for single-frame impacts or short sequences. Negate with “-” in searches for variations (e.g., no radial lines).
- Tips for Perfection:
- Use sparingly to avoid clutter; focus on key actions.
- Combine with sound effect lines for immersive comics.
- For fast movements like the image’s swing, curve lines to match anatomy, preventing a “flat” look.
- Experiment: In anime, speedlines often converge on impact points for dramatic emphasis.
Example: This comic-style depiction uses speedlines to amplify the force of a rapid punch or swing, creating a sense of explosive speed.
3. After Image: Layering Echoes for Persistent Motion
The top-right figure in the image employs after images, where faint, overlapping versions of the figure or limb trail behind, suggesting ultra-fast movement. This creates a strobing effect, as if the eye is catching remnants of prior positions.
Historical Context
Popular in anime and modern CG, after images build on multiples from 1940s cartoons. They simulate high-speed perception, where the brain retains “ghosts” of motion, as in Bruce Lee fight scenes or The Flash comics.
Step-by-Step Guide to Creating After Images
- Keyframe Setup: Draw the current pose, then duplicate prior poses with reduced opacity (e.g., 50-20%).
- Position the Echoes: Space them along the arc, closer together at slow points (slow in/out) and farther at peak speed.
- Digital Implementation: In Clip Studio or Photoshop:
- Duplicate layers, offset slightly, and lower opacity.
- Use motion blur on echoes for blending.
- For animation, tween between frames.
- Timing: Best for sequences over 3-5 frames; use onion skinning to preview.
- Tips for Perfection:
- Limit to 2-4 images to avoid confusion.
- Color-shift echoes (e.g., fade to blue) for depth.
- Ideal for superhuman speeds, like the image’s swing, to imply blurring beyond normal vision.
- Avoid in slow actions; reserve for climactic moments.
Example: This drawing of a speeding character uses after images to convey blurring motion, much like a high-speed photograph.
4. Particles: Adding Debris for Explosive Energy
In the middle-right figure, particles—small dots or fragments—explode from the sword’s tip, suggesting impact or air displacement. This technique adds texture and chaos to motion.
Historical Context
Particles evolved from dry brush effects, seen in modern animations for dust trails or energy bursts. In tools like After Effects, they’re simulated with particle systems, but hand-drawn versions offer artistic flair.
Step-by-Step Guide to Creating Particles
- Determine Source: Identify high-energy points (e.g., sword tip during swing).
- Scatter Particles: Draw dots, shards, or streaks radiating outward, denser near the object and fading away.
- Digital Tools: Use brushes in Procreate or Particle Systems in After Effects:
- Set emission along the path; apply matte choker for fading.
- Blur for smoke-like trails.
- Timing: Animate over 2-4 frames for dissipation.
- Tips for Perfection:
- Vary sizes/shapes for realism (e.g., round for dust, sharp for shards).
- Combine with other effects for hybrids.
- For the image’s pose, use particles to imply wind or force, enhancing power.
- Test responsiveness: Stretch particles based on speed.
Example: This illustration employs particle effects to simulate high-speed trails in a cosmic or action context.

Conclusion: Integrating Motion Effects into Your Workflow
By mastering smear, speedlines, after images, and particles—as vividly demonstrated in the provided image—you can transform static illustrations into dynamic masterpieces. Start simple: Sketch a basic action pose, apply one technique, and iterate. Experiment across mediums, study classics like Disney and Warner Bros. animations, and use digital filters judiciously to complement hand-drawn work. Remember, these effects are tools for expression—use them to evoke feeling over perfection. For website posts, pair this tutorial with your own examples to engage readers and inspire creativity. Practice consistently, and your art will gain the speed and vitality it deserves!