Mastering Value and Form: A Classic Cross-Hatching Tutorial – Rendering a Sphere with Hatching Techniques to Achieve Realistic Volume and Light

Description:
Understanding how light interacts with form is one of the cornerstones of realistic drawing, whether you’re working in traditional media, digital painting, or illustration. This timeless exercise—rendering a sphere under directional light using only hatching lines—is one of the most effective ways to train your eye and hand to see and describe value, form, edge quality, and three-dimensional illusion on a flat surface.
In this professional, step-by-step tutorial, we break down three classic hatching styles commonly taught in classical ateliers, fine art schools, and figure-drawing classes. Each example demonstrates how subtle changes in line direction, spacing, density, and layering can dramatically affect the sense of volume, light direction, and surface quality—all while using nothing more than parallel hatching lines.
These three approaches are ideal for beginners building foundational rendering skills, intermediate artists refining control over value transitions, and advanced draftsmen seeking cleaner, more expressive hatching techniques. By the end, you’ll have a deeper understanding of how to turn simple line work into convincing three-dimensional form.
Why This Exercise Matters
- Trains value perception: You learn to see light, mid-tone, core shadow, reflected light, and cast shadow as distinct steps rather than blended gradients.
- Builds line economy and control: Every stroke must serve the form—no random scribbling.
- Teaches edge quality: Hard vs. soft transitions become intentional design choices.
- Translates directly to figure drawing, still life, portraiture, and concept art.
- Works in any medium: pencil, pen & ink, charcoal, digital brush (set to hard round with pressure off), or even etching.
Materials Recommended
- Smooth drawing paper (Bristol, sketchbook paper, or toned paper for variety)
- Graphite pencils (HB–6B range) or fine liner pens (0.1–0.5 mm for precision)
- Kneaded eraser (for lifting highlights or correcting density)
- Ruler or straightedge (optional for initial construction)
- Soft vine charcoal or conte (optional variation)
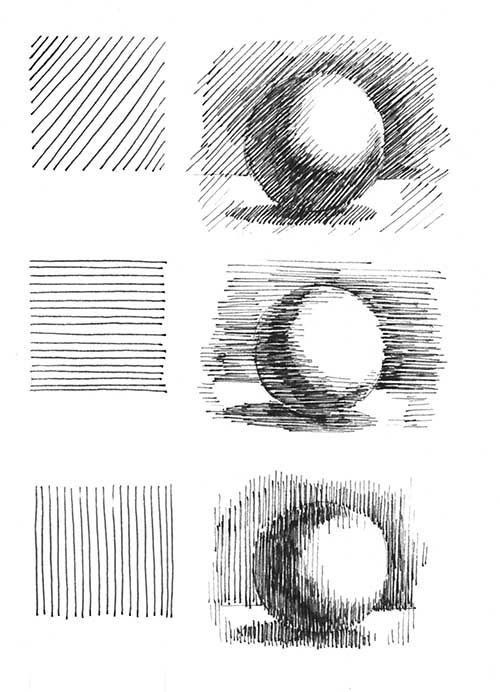
The Sphere Setup (Common to All Examples)
Imagine a perfect sphere resting on a flat surface, illuminated by a single strong light source coming from the upper left (approximately 10–11 o’clock position). This creates:
- A bright highlight on the top-left
- Gradual transition through mid-tones
- Core shadow on the lower-right
- Soft reflected light on the bottom-right
- A distinct cast shadow beneath the sphere on the ground plane
Begin by lightly sketching a perfect circle (use a compass or freehand with practice) and a simple horizon/ground line. Keep construction lines very faint—they should disappear under hatching.
Technique 1: Diagonal Hatching (Upper Example – Dynamic & Expressive)
This is the most common hatching style taught in beginner-to-intermediate courses because diagonal lines feel natural to most right-handed drawers and create strong directional energy.
Characteristics:
- Lines run consistently at ~45° (upper-left to lower-right or vice versa)
- Spacing starts wide in light areas → progressively tighter in mid-tones → very dense (almost solid) in core shadow
- Multiple layers are built gradually, always following the same angle
- Edges of the shadow are softened by reducing line density rather than changing direction
Step-by-Step Execution:
- Establish the lightest values first: sparse, widely spaced diagonal lines in the highlight and upper mid-tone regions.
- Gradually close the gaps as you move toward the terminator (the line where light meets shadow).
- In the core shadow, layer a second (and sometimes third) set of identical diagonal strokes, increasing pressure slightly for darker value.
- Soften the transition into reflected light by lightening pressure and widening spacing again.
- Add the cast shadow with the same diagonal direction but slightly heavier density to indicate it’s on the ground plane.
- Final refinement: Use the kneaded eraser to gently lift a crisp highlight if needed and unify transitions.
Best for: Expressive sketches, quick studies, comic inking, concept art where energy matters.
Technique 2: Horizontal Hatching (Middle Example – Calm & Structured)
Horizontal lines run parallel to the picture plane / ground line, creating a very stable, almost serene rendering.
Characteristics:
- Extremely even pressure control is required—any variation in spacing is immediately visible.
- Creates a strong sense of horizontal light banding, which can mimic classical engraving styles.
- Transitions feel very deliberate and architectural.
Execution Tips:
- Start with very light, evenly spaced horizontal lines across the entire sphere.
- Gradually darken by adding more layers in the same direction, increasing density toward the core shadow.
- Maintain perfect parallelism—slight convergence can unintentionally suggest perspective distortion.
- The cast shadow often uses the same horizontal rhythm but with bolder, closer lines to anchor the form to the surface.
Best for: Technical illustration, scientific drawing, portrait underdrawing, or when you want a very clean, controlled look.
Technique 3: Vertical Hatching (Lower Example – Sculptural & Dramatic)
Vertical lines run top-to-bottom, mimicking the direction of gravity and emphasizing the spherical form’s roundness through contrast.
Characteristics:
- Creates strong vertical light fall-off, making the sphere feel very three-dimensional and “sculpted.”
- Excellent for showing the curvature of rounded forms (cheekbones, eye sockets, muscle bellies).
- Cast shadow often feels heavier and more grounded.
Execution Tips:
- Begin with sparse vertical strokes in the lit areas.
- Tighten spacing dramatically as you approach the terminator and core shadow.
- Use heavier pressure or additional layers in the darkest areas to achieve deep blacks without cross-hatching (yet).
- Soften edges by feathering the line ends or slightly varying direction near transitions.
Best for: Figure drawing, anatomy studies, dramatic lighting setups, charcoal-style renderings.
Advanced Variations to Explore
- Cross-hatching: Combine two directions (e.g., diagonal + vertical) for richer darks without losing clarity.
- Contour hatching: Follow the form’s curvature instead of straight lines (more advanced).
- Hatching on toned paper: Use white chalk or gouache for highlights to expand dynamic range.
- Digital adaptation: Use a hard round brush with stabilizers turned on; vary opacity instead of pressure.
Final Advice
Spend time on each of these three styles separately before combining them. The goal is not perfection on the first try, but training your eye to see value steps and your hand to execute clean, purposeful lines. Practice this sphere exercise daily for 10–15 minutes—it’s one of the highest-return drawing drills available.
Once comfortable, apply the same principles to more complex forms: eggs, cylinders, cubes, draped cloth, and eventually the human head and figure. Mastery here directly improves every other area of your drawing.
Keep your sketchbook filled with these sphere studies—they become your personal reference library for value and hatching decisions in future work.
Happy hatching—build form with every line!