Doxy’s Notes: A Reliable Head Construction Method for Drawing Consistent Heads from Any Angle – Step-by-Step Tutorial

Description:
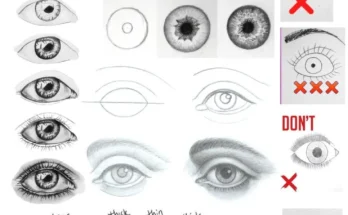
Mastering head construction is one of the most essential skills for any artist who draws characters from imagination, whether for illustration, concept art, comics, animation, or portrait work. In this detailed tutorial inspired by Doxy’s Notes, you’ll learn a straightforward yet powerful method for building consistent, foreshortened, and perspective-accurate heads at virtually any angle. This approach uses a tall rectangular volume as the foundational form—combined with simple geometric guides like circles, ovals, and cross lines—to create reliable proportions and structure, even under extreme rotation or foreshortening.
This technique is especially valuable because it prioritizes measurable consistency over freehand guesswork. It helps bridge the gap between reference-heavy drawing and confident construction from imagination, making it ideal for character designers, comic artists, and anyone tired of heads that “drift” in different views. While not entirely unique (it echoes principles from Loomis, Bridgman, and other classical methods), this version emphasizes a tall rectangular base for greater flexibility in stylization—whether realistic, semi-stylized, or cartoonish.
Perfect for intermediate artists looking to level up their head drawing reliability, or beginners ready to move beyond basic front/side views. Follow along step by step to build heads that feel solid, proportional, and anatomically grounded—no matter the pose or camera angle.
Materials Recommended:
- Paper (smooth sketchbook or printer paper works well)
- Pencils (HB or 2B for construction lines, softer for refinement)
- Eraser (kneaded for clean adjustments)
- Ruler (optional for initial rectangular volume)
- Optional: Digital tablet/software if adapting to Clip Studio Paint, Procreate, or Photoshop
Core Concept: The Tall Rectangular Volume as Your Anchor
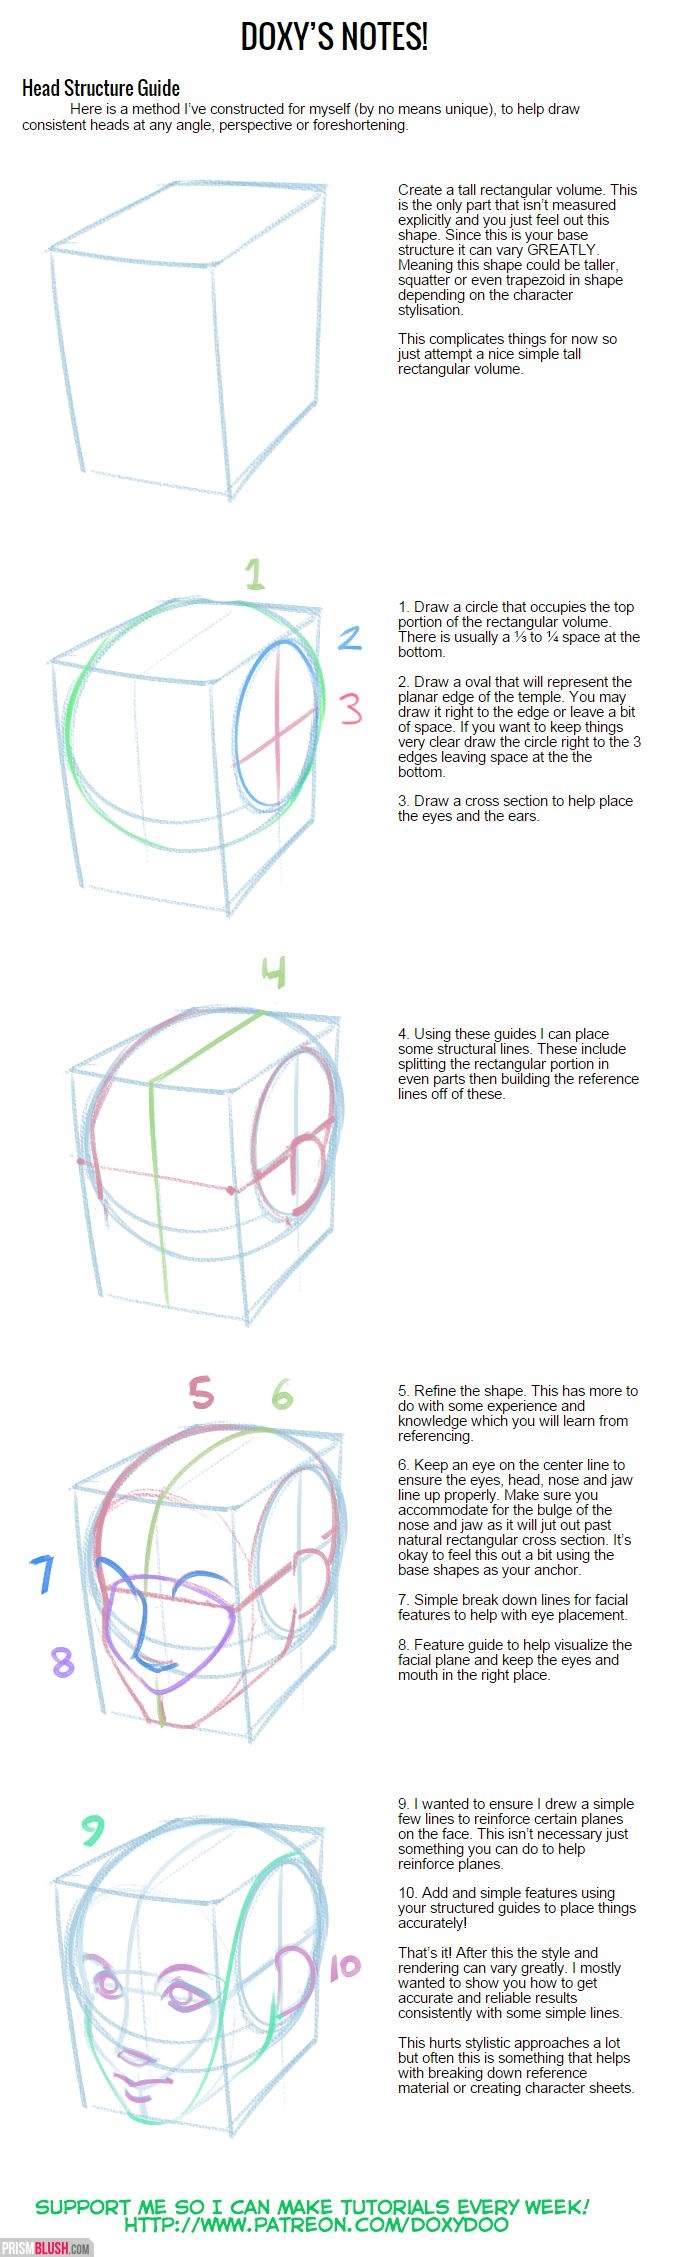
The foundation of this method is a tall rectangular prism (think of a slightly elongated box standing vertically). This shape represents the overall cranial mass and allows for easy adjustment in height-to-width ratio depending on your character’s design—taller and narrower for stylized anime heads, squatter for more realistic proportions, or even subtly trapezoidal for unique silhouettes.
Unlike perfectly cubic or spherical starting points, the rectangular volume gives you explicit control over the “height” of the head space, making it easier to accommodate forehead, hair volume, chin length, and jaw projection without losing consistency across angles.
Step-by-Step Breakdown (Numbers correspond to the original notes)
- Establish the Rectangular Volume Draw a tall rectangular box in perspective. Keep it simple at first—no need to overthink distortion. This is your unchanging anchor for the entire head. The top portion will house the cranium, while the lower part accommodates the face and jaw.
- Place the Cranial Sphere Draw a circle that fills most of the top portion of the rectangle (usually leaving ⅛ to ¼ space at the bottom for the jaw/chin area). This circle represents the rounded cranium. Keep it perfectly circular from your viewpoint to maintain volume.
- Add the Planar Oval (Temple Edge Guide) Draw an oval that wraps around the front edge of the rectangular volume to define the planar transition from the side to the front of the face. This oval often aligns near the temple area. Add a simple cross (horizontal and vertical center lines) through the circle and oval. These act as your primary orientation guides for placing eyes, nose, mouth, and ears symmetrically.
- Structural Contour Lines Introduce key curved and straight lines to map the major planes:
- Vertical center line down the face
- Horizontal lines for brow, eye level, nose base, and mouth
- Curved lines for cheekbones, jaw edge, and brow ridge These lines split the rectangular form and help project features correctly in perspective. Pay attention to how the nose bridge and jaw “bulge” past the ideal circular cross-section—this is natural anatomy, not a flaw.
5–6. Refine the Overall Shape Using your reference knowledge (or photo studies), smooth and adjust the silhouette. Keep checking the center line to ensure symmetry and alignment. The rectangular base helps you see where foreshortening compresses forms—trust it over instinct at first.
- Simple Facial Breakdown Draw basic curved lines to indicate the “heart” or mask-like shape of the facial plane. This helps visualize how features wrap around the three-dimensional form rather than lying flat.
- Feature Placement Guide Use the cross and horizontal guides to lock in eye level, nose length, mouth position, and ear placement. A common rule: eyes sit roughly halfway down the head, but adjust slightly based on age/style. The purple heart-like shape in the notes illustrates how the facial features nest within the planar oval.
- Reinforce Key Planes Add a few light lines to emphasize important planes (forehead, cheek, jaw, chin). These aren’t final contours—they’re reminders of form and light/shadow direction. Skip if your style is looser, but they’re invaluable for beginners building 3D understanding.
- Add Final Features Place eyes, nose, mouth, ears, and basic hair using your structured guides. The rectangular volume and cross lines ensure everything stays proportional and perspective-correct. Render as desired—line art, shading, or color.
Final Tips from Doxy’s Notes
- This method shines when breaking away from heavy photo reference or rigid character sheets.
- It can “hurt” overly stylized approaches at first because it forces anatomical logic—but that’s exactly why it produces more reliable, consistent results over time.
- Practice rotating the rectangular volume in your sketchbook to internalize how features shift in extreme angles (up shots, down shots, ¾ views).
- Once comfortable, experiment with stylization: stretch the rectangle taller for elegant proportions, compress it for chibi/cute styles, or tilt it for dynamic energy.
This construction technique delivers accurate, repeatable heads with minimal guesswork. With regular practice, you’ll find yourself drawing confident three-quarter, profile, and foreshortened views without constant redrawing.
Support artists like Doxy who share weekly tutorials—check out their Patreon (patreon.com/doxydoo) to help fund more high-quality guides like this one!
Happy drawing—build those heads with confidence!