Mastering One-Point Perspective: A Step-by-Step Tutorial for Drawing Realistic Exterior Eye-Level Street Views

Description:
In the world of architectural and urban sketching, one-point perspective is a foundational technique that allows artists, designers, and illustrators to create immersive, realistic depictions of scenes where parallel lines converge at a single vanishing point on the horizon. This tutorial focuses on developing an exterior eye-level view of a bustling street scene, transforming a simple sketch into a detailed, believable composition. Ideal for beginners and intermediate artists, this guide draws inspiration from traditional drafting methods to build depth, scale, and atmosphere step by step. Whether you’re an aspiring architect, a hobbyist sketcher, or a digital artist adapting these principles to software like Procreate or Adobe Illustrator, mastering one-point perspective will elevate your ability to render three-dimensional spaces on a two-dimensional surface.
By following this tutorial, you’ll learn how to establish a horizon line, place a vanishing point, measure proportions accurately, and layer in details like buildings, vehicles, and figures. The result is a dynamic street view that feels alive and spatially coherent. We’ll break it down into eight progressive stages, each building on the last, with tips for common pitfalls and variations. This approach ensures your drawing maintains accurate perspective while allowing room for creative interpretation.
Materials You’ll Need:
- Drawing paper (preferably grid or tracing paper for precision in early stages)
- Pencils (HB for light sketching, 2B or 4B for bolder lines and shading)
- Ruler or straightedge for clean lines
- Eraser (kneaded eraser for subtle adjustments)
- Optional: Vellum or tracing paper for overlays, colored pencils or markers for final detailing, and reference photos for architectural accuracy
- A flat surface and good lighting to maintain consistent eye level during sketching
Preparation: Understanding the Basics of One-Point Perspective
Before diving into the steps, grasp the core principles. In one-point perspective, all parallel lines (such as the edges of buildings or roads) recede toward a single vanishing point (VP) on the horizon line (HL), which represents the viewer’s eye level. This creates the illusion of depth. For an exterior eye-level view, imagine standing on a street looking straight ahead—the ground plane slopes away, and vertical lines remain perpendicular to the horizon.
Choose your composition: A simple urban street with buildings on one or both sides works best. Keep the vanishing point centered or slightly off-center for balance. If you’re new to this, lightly sketch guidelines and erase as you go to avoid overcommitment early on.
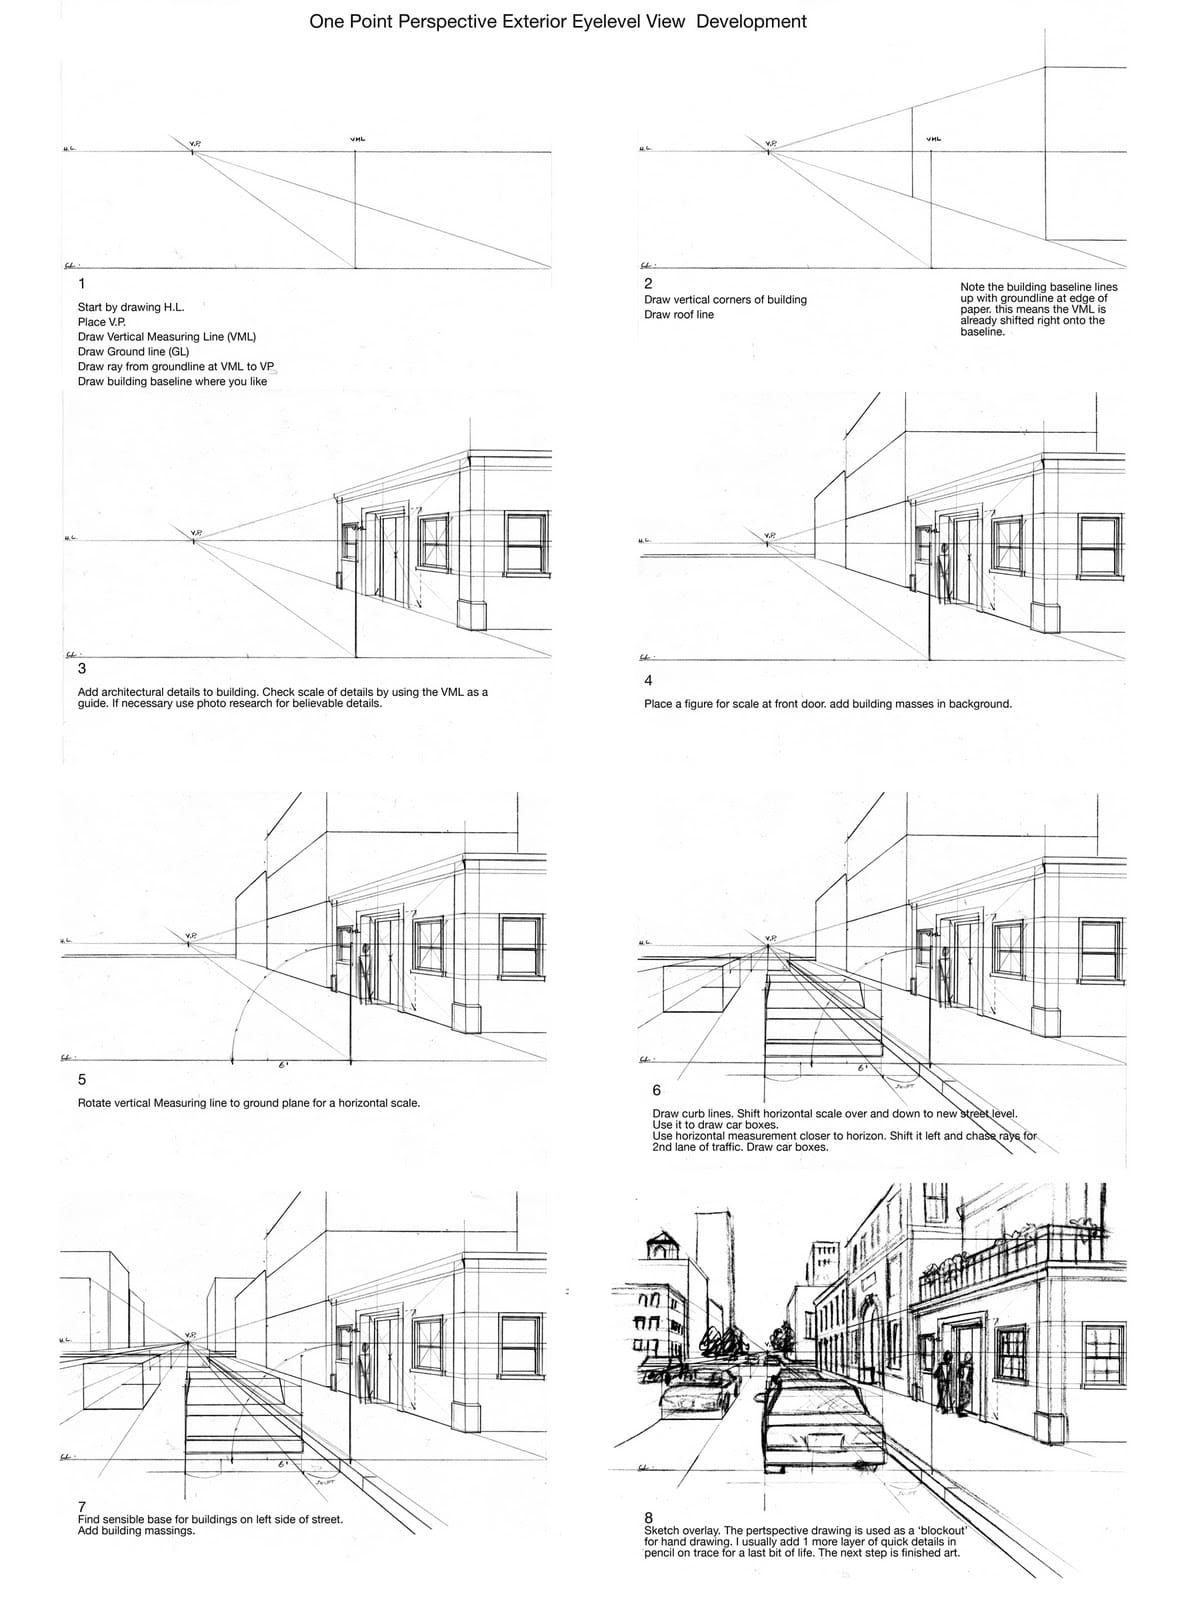
Step 1: Establishing the Foundation – Horizon Line, Vanishing Point, and Baseline
Begin with the structural backbone of your drawing. Draw a horizontal line across your paper to represent the horizon line (HL)—this should be at eye level, typically in the middle or upper third of your page for a grounded view.
Place the vanishing point (VP) on the HL, ideally centered for symmetry or slightly offset for dynamism. Next, draw a vertical measuring line (VML) intersecting the HL; this acts as a scale reference for heights.
Draw the ground line (GL) below the HL, parallel to it, to define the base plane. From the intersection of the VML and GL, draw a ray extending to the VP—this creates your first perspective line.
Finally, sketch the building baseline along this ray where it feels compositionally pleasing. This baseline represents the foundation of your foreground structure. Tip: Keep lines light at this stage; use a ruler for precision to ensure all elements align toward the VP. Common mistake: Placing the VP too high or low, which distorts the sense of scale—aim for it to feel natural, as if you’re standing there.
Step 2: Building the Primary Structure – Vertical Corners and Roof Line
With the baseline in place, add vertical lines upward from key points on the baseline to define the corners of your main building. These verticals should be perpendicular to the HL and vary in height to suggest different architectural elements (e.g., a taller facade or shorter annex).
Connect the tops of these verticals with a roof line that also recedes to the VP. This creates the basic box form of the building.
Note: If your baseline appears shifted slightly right of the VML (as in some reference sketches), this is intentional—it allows for a more dynamic composition by offsetting the primary subject. Analyze the angles: The VML helps verify that the baseline aligns correctly with the perspective rays. Pro tip: Use the VML to measure uniform heights; mark increments along it (e.g., every inch representing a story in a building) and project those to the VP for consistent scaling.
Step 3: Adding Architectural Details – Windows, Doors, and Scale Check
Refine the building by incorporating realistic details. Use the VML as a guide to check proportions—rotate it mentally or lightly sketch projections to ensure elements like windows and doors scale down as they recede.
Add features such as windows (rectangular grids diminishing toward the VP), doors, cornices, or signage. If details feel off, reference photo research for believable architecture (e.g., study urban photos from cities like New York or Paris).
Guide: Necessary photo research ensures authenticity—look for scalable elements like brick patterns or balcony rails. Use the VML to plot heights accurately; for instance, a door might be 7 units on the VML, projected back. Avoid overcrowding; focus on 3-5 key details per building face. This step transitions your sketch from outline to habitable structure.
Step 4: Introducing Scale and Background – Figures and Additional Masses
To ground the scene in reality, place a human figure for scale at the front door. Draw a simple stick figure or silhouette, ensuring its height aligns with the VML (average human: about 6-7 feet, or proportional units).
Extend the composition by adding building masses in the background—sketch distant structures receding to the VP, shorter and less detailed to emphasize depth.
Place the figure dynamically, perhaps mid-stride, to add life. Background masses should overlap slightly for layering. Tip: Figures help viewers relate; if the door is 7 units high, the figure should match. This prevents the scene from feeling empty or disproportionate.
Step 5: Expanding the Ground Plane – Rotating for Horizontal Scale
Rotate the vertical measuring line conceptually to the ground plane to create a horizontal scale. This allows measurement along the street or sidewalk.
Draw arcs or light guidelines from the VML to plot horizontal distances, ensuring they converge at the VP. This step prepares for curbs, roads, and other ground elements.
Pro tip: Rotation simulates a pivot; use it to measure widths (e.g., sidewalk = 2 units). Keep rotations subtle to maintain accuracy.
Step 6: Detailing the Street – Curbs, Lanes, and Vehicles
Place the curb line parallel to the baseline, shifting your horizontal scale over and down to a new street level closer to the horizon.
Use this shifted scale to add a second lane of traffic: Draw car boxes (simple rectangles in perspective) along rays to the VP. Chase rays left or right for additional elements like parked vehicles.
Instructions: Draw curb lines first, then shift scales downward for depth. For cars, start with box forms (wheels as circles in perspective), adding details like hoods later. Second lane: Shift left, trace rays for convergence. This builds foreground-to-background transition, enhancing immersion.
Step 7: Balancing the Composition – Bases for Opposite-Side Buildings
Find a sensible base for buildings on the left (or opposite) side of the street, ensuring they align with the ground plane and recede to the VP.
Add building masses similarly to Step 4—verticals for height, details scaled appropriately. This fills the scene symmetrically.
Tip: Bases should feel grounded; use the GL extensions. Add variety: Taller buildings in back for depth. Masses add weight—avoid flatness by varying rooflines.
Step 8: Finalizing with Overlays and Detailing – From Sketch to Finished Art
Overlay your sketch with tracing paper or vellum for refinement. Use the perspective drawing as a ‘blockout’—a rough guide—and add layers of detail to taste.
Hand-draw overlays for organic feel: Pencil in textures (bricks, shadows), people, trees, or signage. Trace for crisp lines, infusing ‘life’ through subtle imperfections.
The next step is finished art—ink, color, or digitize. Overlay adds flexibility; details ‘to taste’ mean personalize (e.g., rainy street with reflections). Common pitfall: Over-detailing foreground—balance with fading backgrounds.
Conclusion: Tips for Practice and Variations
Congratulations! You’ve created a compelling one-point perspective street view. Practice by varying the VP position for dramatic angles or adding elements like trees (branches receding to VP). For advanced twists, incorporate two-point perspective for corners or experiment with night scenes using shading.
Common troubleshooting: If lines don’t converge, double-check the VP. Scale issues? Rely on the VML consistently. Share your results online for feedback—this technique is versatile for comics, concept art, or urban planning visuals.
With regular practice, one-point perspective becomes intuitive, opening doors to more complex drawings. Explore resources like “Perspective Made Easy” by Ernest Norling for deeper dives. Happy sketching!