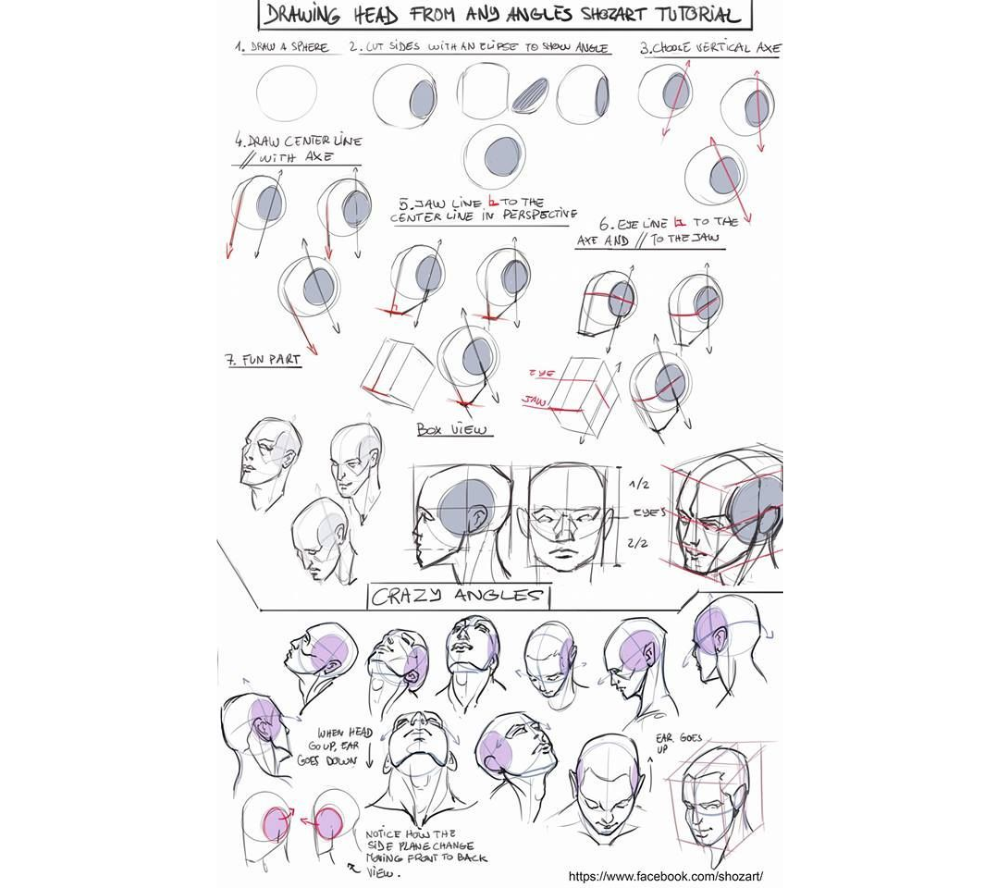
Drawing Head from Any Angles Shozart Tutorial Description

The image, titled “Drawing Head from Any Angles Shozart Tutorial,” is an instructional guide by Shozart, aimed at teaching artists how to draw the human head from various perspectives using a structured, geometric approach. Hosted on a Facebook page (https://www.facebook.com/shozart/), this tutorial provides a step-by-step process, detailed diagrams, and practical examples to help artists understand head construction in three-dimensional space. The layout is organized into three main sections: a step-by-step guide at the top, a detailed breakdown of head proportions in the middle, and a “Crazy Angles” section at the bottom, demonstrating the technique’s application across challenging perspectives. This guide is an excellent resource for artists looking to improve their ability to draw heads dynamically and accurately.
Step-by-Step Guide to Head Construction
The top section outlines a six-step process for drawing the head, illustrated with simple sketches and annotations in red and black ink:
- Draw a Sphere: The process begins with a basic sphere, representing the cranium. A small sketch shows the sphere with light shading to indicate depth.
- Cut Sides with an Ellipse to Show Angle: The sphere is then modified by cutting flat planes on the sides, creating an ellipse to indicate the head’s angle and orientation in space.
- Circle Vertical Axis: A vertical axis is drawn through the sphere to establish the direction the head is facing, with arrows indicating rotation.
- Draw Center Line with Axis: The center line is added along the axis, dividing the head into symmetrical halves and serving as a guide for feature placement.
- Jaw Line to the Center Line in Perspective: The jawline is sketched, following the center line and adjusting for perspective to create a three-dimensional effect.
- Eye Line to the Jaw and Up/Down: The eye line is drawn halfway down the head, with additional lines marking the jaw’s position and the head’s tilt (up or down), ensuring proper proportion and alignment.
Additional sketches labeled “Fun Part” show the sphere with the jawline and eye line in various angles, reinforcing the importance of perspective. A “Box View” diagram illustrates the head as a simplified box, helping artists visualize the planes and structure.
Detailed Breakdown of Head Proportions
The middle section provides a more detailed analysis of head proportions, using both side and front views:
- Side View: A sketch shows the head in profile, with the center line dividing it vertically. The eye line is marked at the halfway point, and the jawline extends downward, with annotations noting, “When head goes up, ear goes down.”
- Front View: A front-facing head is divided into sections: the eye line at 1/2 the height, the nose at 2/3, and the mouth further down. The sketch emphasizes maintaining symmetry along the center line.
- Box View with Proportions: A three-quarter view of the head within a box structure shows the same proportions, with the center line and eye line clearly marked, helping artists apply the technique in perspective.
Crazy Angles Section
The bottom section, labeled “Crazy Angles,” showcases the technique’s versatility through a series of head sketches in challenging perspectives:
- Heads are drawn looking up, down, and at various angles, with construction lines visible to show the underlying structure.
- Annotations highlight key adjustments, such as “Notice how the side plane changes moving from back view to front view,” and “Ear goes up” when the head tilts downward.
- The sketches demonstrate how the center line, eye line, and jawline shift with each angle, providing practical examples for artists to study and replicate.
Connection to Previous Guides
This Shozart tutorial complements the earlier posts in your series by continuing the theme of skill-building and precision across disciplines:
- Woodworking, Measuring, and Welding Tools: The structured approach to head drawing mirrors the precision required in woodworking (e.g., using a speed square for angles), measuring (e.g., using a protractor for perspective), and welding (e.g., using a try square for alignment). The geometric construction method also reflects the use of tools to create accurate forms.
- Pterosaur Fossil: The scientific illustration of pterosaur bones shares a focus on anatomical accuracy, similar to the head construction process, where understanding structure and proportion is key.
- Beginner Art Lessons by JeYRam: The “Basics of Drawing” post introduced combining shapes (boxes and cylinders) to draw a dresser, a foundational skill that this tutorial builds upon by using spheres and ellipses to construct the head.
- Facial and Centerline/Cube Construction by Loomis: This guide directly aligns with the Loomis tutorial, as both emphasize geometric construction and perspective. While Loomis uses a cube-based method, Shozart starts with a sphere, offering a complementary approach to head drawing. Both tutorials stress the importance of centerlines and proportional landmarks, deepening the learner’s understanding of head anatomy.
Educational Value and Context
Hosted on Shozart’s Facebook page, this tutorial is a practical resource for artists seeking to master head drawing from any angle. The step-by-step process, combined with detailed proportion guides and dynamic examples, makes it accessible for beginners while offering depth for intermediate artists. The emphasis on perspective and construction lines aligns with the broader theme of precision seen across your website’s content, from crafting to scientific illustration.
Captured as of 08:20 AM EDT on Friday, June 06, 2025, this tutorial is a valuable addition to your collection, providing actionable insights for artists and reinforcing the interconnectedness of technical and artistic skills.