Facial and Centerline/Cube Construction Description

The image, titled “Facial Construction” and “Centerline/Cube Construction Demonstration,” is an instructional guide by Andrew Loomis, a renowned artist and author, from his book “Drawing the Head and Hands” (Page 44). This detailed tutorial focuses on teaching artists how to construct the human head using geometric shapes and centerlines, emphasizing perspective, proportion, and anatomical accuracy. The page is packed with sketches, diagrams, and handwritten notes, providing a wealth of information for artists aiming to master head drawing. The layout is dense yet organized, with sections dedicated to facial construction, centerline techniques, and cube-based methods, making it a comprehensive resource for both beginners and advanced learners.
Facial Construction Section
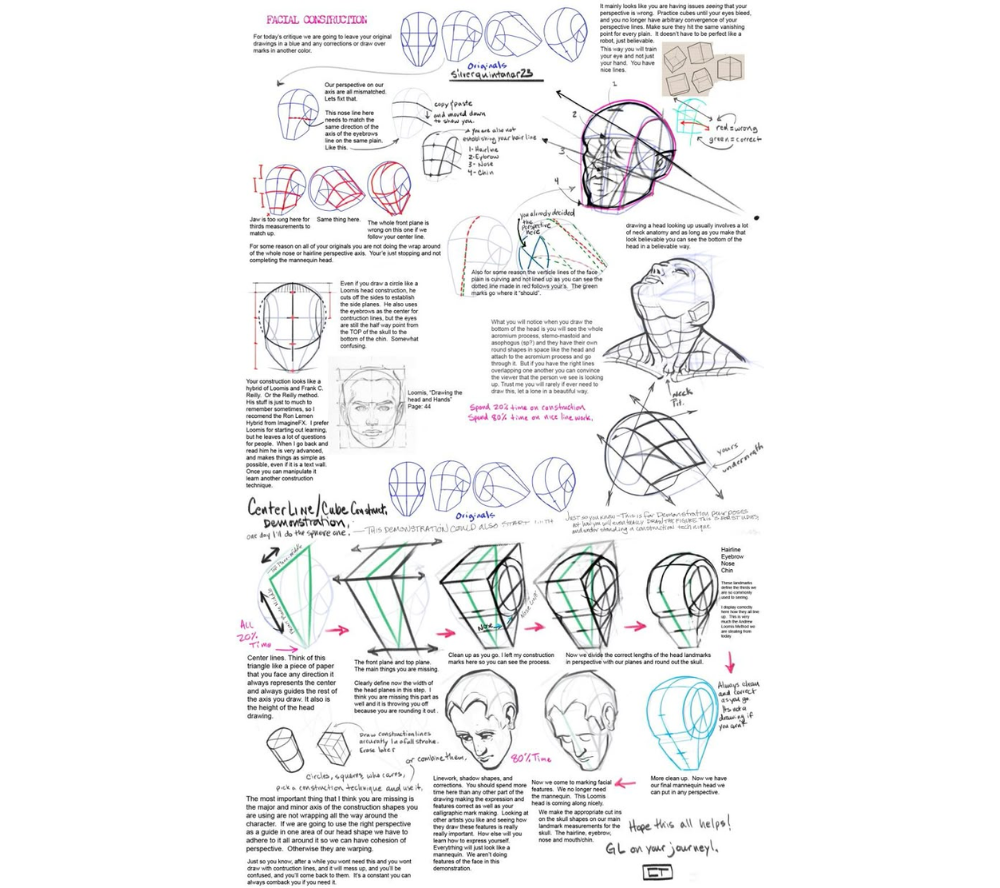
The top half of the image focuses on “Facial Construction,” offering a step-by-step approach to drawing the human head with an emphasis on perspective and proportion. Key elements include:
- Perspective and Axis Alignment: A diagram at the top left shows a head with axes (labeled X, Y, Z) to illustrate how perspective affects the head’s orientation. The note “Our perspective on our axis are all mismatched. Lets fix that” suggests aligning the axes to ensure the nose points in the same direction as the eyebrows, a common mistake for beginners. A corrected version (in green) shows the proper alignment, while the incorrect version (in red) highlights the error.
- Step-by-Step Facial Features: A numbered guide (1-4) outlines the placement of facial features:
- Eye Line: Positioned halfway down the head.
- Nose: Placed halfway between the eye line and chin.
- Mouth: Positioned halfway between the nose and chin.
- Chin: Marks the bottom of the head.
- Practice Cubes: Small cube sketches labeled “Silverquinter22” encourage practicing perspective using cubes before applying it to the head, noting, “It mainly looks wrong because you’re having cubes seeing your eyes bleed, and you no longer have arbitrary confidence in the same vanishing point for every plain. It doesn’t have to be perfect as a robot, just believable.”
- Head Orientation and Planes: A large sketch of a head looking upward demonstrates the effect of perspective on facial features. Notes explain that the whole plane of the face is wrong if the center line isn’t followed, and the head’s orientation affects how features wrap around the head. The sketch includes a mannequin-like head with construction lines, showing the side planes, eyebrows, and center for construction lines.
- Loomis Method Overview: The text credits Loomis’s method, noting its hybrid approach with Frank C. Reilly’s techniques. It emphasizes starting with a circle, dividing it into side planes, and using the centerline to position features like the eyebrows, nose, and chin. The method aims to simplify the complex structure of the head into manageable geometric shapes.
- Practical Tips: Handwritten notes encourage spending 20% of the time on construction and 80% on refining line work, stressing the importance of clean lines and iterative practice. A sketch of a head in profile reinforces the need to keep construction lines light and erasable.
Centerline/Cube Construction Demonstration
The bottom half of the image shifts to “Centerline/Cube Construction Demonstration,” focusing on using a cube as the foundation for head construction. Key elements include:
- Cube-Based Construction: A series of diagrams shows how to transform a cube into a head:
- Start with a cube, drawing center lines to establish the front and top planes.
- Divide the cube into sections to mark the width of the head, noting that the head is wider than tall.
- Carve out the head shape, adding features like the jawline, hairline, and chin.
- Refine the shape, adding details like the neck and shoulders.
- Perspective and Proportion: The tutorial emphasizes dividing the head into equal parts (e.g., eye line at the halfway point) and adjusting for perspective. A note advises, “Now we divide the correct lengths of the head landmarks in perspective with our width and round out the skull.”
- Anatomical Landmarks: Labels such as “Hairline,” “Eyebrow,” and “Chin” mark key points on the head, with construction lines showing how these points align in different perspectives. A sketch of a head in three-quarter view demonstrates the application of these landmarks.
- Iterative Refinement: The final sketches show a progression from a blocky cube to a rounded head, with notes encouraging artists to “always clean up as you go” and “hope this all helps on your journey.” The process mirrors the iterative nature of drawing, similar to the erasing and refining steps in the previous “Beginner Art Lessons” guide.
Connection to Previous Guides
This tutorial complements the earlier posts in your series by extending the theme of skill-building across disciplines:
- Woodworking, Measuring, and Welding Tools: The precision required in drawing the head mirrors the accuracy needed in woodworking (e.g., using a measure square for angles), measuring (e.g., using a vernier caliper for exact dimensions), and welding (e.g., using a gauge for weld accuracy). The cube construction method also echoes the geometric precision used in crafting furniture, as seen in the woodworking tools guide.
- Pterosaur Fossil: The scientific illustration of pterosaur bones shares a similarity with this tutorial’s use of construction lines and anatomical landmarks, both requiring a deep understanding of structure and proportion.
- Beginner Art Lessons by JeYRam: This guide builds on the “Basics of Drawing” post, which taught how to draw a dresser using boxes and cylinders. The Loomis method advances this concept by applying geometric shapes (cubes) to the more complex form of the human head, deepening the learner’s understanding of perspective and construction.
Educational Value and Context
Published in Drawing the Head and Hands by Andrew Loomis, this page (Page 44) is a classic resource for artists. Loomis’s method, combined with Reilly’s techniques, provides a structured approach to head drawing, making it accessible for beginners while offering depth for advanced artists. The handwritten notes and sketches add a personal touch, encouraging iterative practice and confidence-building. The emphasis on perspective, proportion, and clean line work aligns with the broader theme of craftsmanship seen across your website’s content.
Captured as of 08:00 AM EDT on Friday, June 06, 2025, this guide is a timeless addition to your collection, offering valuable insights for artists and connecting the art of drawing to the precision and skill of other crafts.