In my latest post, I explained the importance of highlights and shadows and the main rules you need to know. But this post will be about highlights, shadows, and cast shadows in drawings, with many examples of cast shadows. I will explain the geometry behind the process if you want to give a sense of realistic volume and depth to your drawings.
Remember to download the PDF where you can try these examples by yourself! It took me some time to finish this post; I am not gonna lie! I wanted to make it clear and easy to understand. But here it is, finally!


Look at this ball; this is how it looks when light hits it. There are three simple areas of a form that you need to know.
– Light side: The Highlight is the very lightest part. It’s where the light directly hits the object, so it is the best indicator when you look at your subject to determine where and at what angle the light is coming from. I usually make this part very white.
– Shadow side: The dark side of an object not facing the light reveals the shape’s form and mass.
– Cast shadow: is situated right under the object and is attached to it. It gives the physical presence of the object, and it makes it look heavy set in the environment it’s in.


How It Works
A. Light source (street lamp)
B. Object (cube)
C. Ground mark of the light source (position of the light source on the ground)
D. Lines, connecting the ground mark of the light source and the corners of the object touching the ground.
E. Lines, connecting the light source and the top corners of the object.
F. The intersection of 4 and 5 is the endpoint of the drop shadow on the ground.
How to add Cast-Shadows?
A Step by Step Guide

1- Let’s draw the cast shadow of a cube! In this case, the light source is a street lamp (which is directly on the ground), so you don’t need to define its position on the surface. I recommend you draw the object with the ”see-through sides” (like it is made of glass).

2- First, connect the ground mark of the light source with the corner of the object touching the ground (black lines). Use a pencil so it would be easier to erase the helping lines.

3- Connect the light source with the top corners of the object (yellow lines).

4- The intersection of the black lines and yellow lines are the points that form a shadow shape on the ground. All you have to do is to connect the dots!
Follow the same steps if you need to draw a shadow that falls on multiple surfaces (like floor and walls).
Let’s say your box is close to the wall. The drop shadow will fall on both the floor and the wall. Just bend the line when it hits the wall!

How to add Cast-Shadows?
Using a Natural Light

1- In this case, the light source is the sun (natural light). The first thing to do is to trace the horizon line. As the sun is far away, we define its position (reference point) on the horizon line. Just draw a straight line down.

2- From the Sun reference point, draw lines through the bottom corners of the box (black lines). As I said before, I recommend you to draw the object with the ”see-through sides” (like it is made of glass). This will help you trace your lines more easily, at least, until you understand the concept clearly.

3- From the light source, draw lines through the top corners of the box until they reach the ground line.

4- Mark the crossing points and connect them.

5- Connecting all points will create a shadow outline.

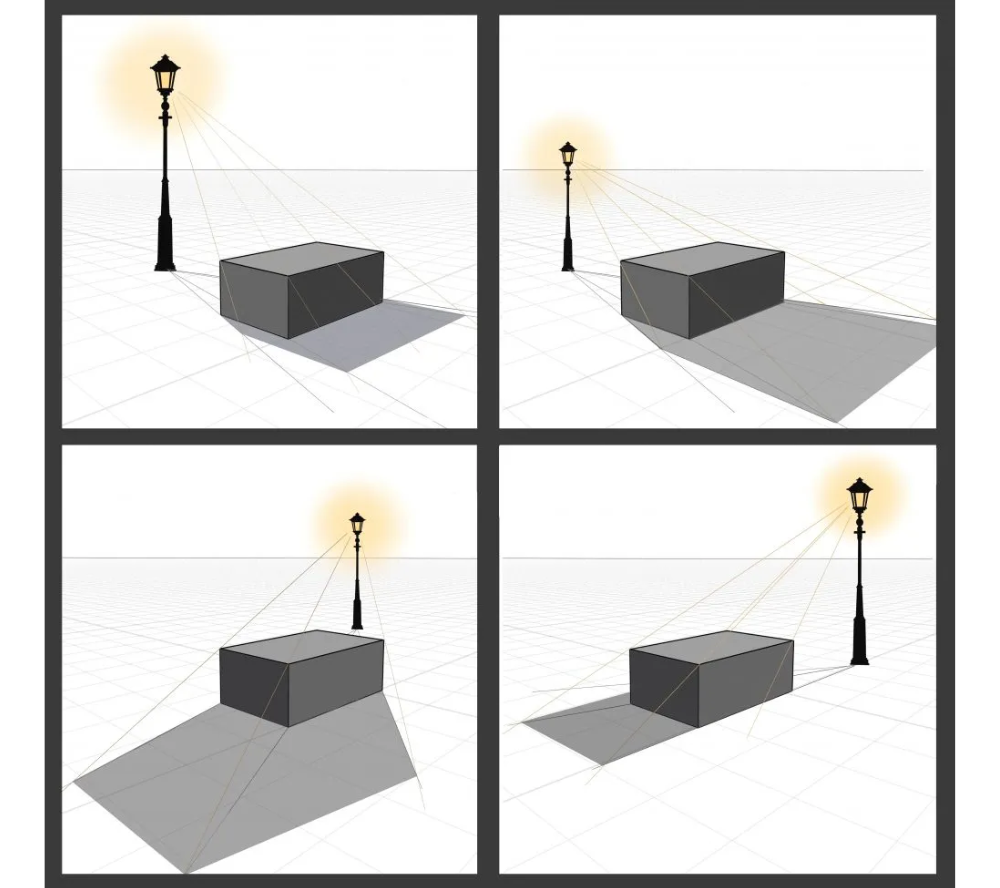
6- Try with different object and different light positions.

→ When the object gets more complicated, I usually divide it into a few shapes and then add their cast shadows.
→ Do not forget that the difference between natural light (sun, moon) and artificial light (street lamp, flashlight…) is that the natural one’s reference point position is located on the horizon line.
→ Practice with different objects and lights until you get familiar with them; after a while, this will get easy and logical!


I made this post about highlights, shadows, and cast-shadows in drawings because learning this will take your art to a higher level. I know that this subject always looks complicated, but it is not. As I said for the Perspective Rules, once you know it, you know it! Once you get used to these rules, you will be able to add shadings easily and this will become so much fun!
Remember to download the PDFs I prepared, so you can directly try on them and feel free to show me on Instagram! Also, check out my latest post!
