Core Principles of Effective Crosshatching

🎯 Goal: Create depth and texture while maintaining form clarity.
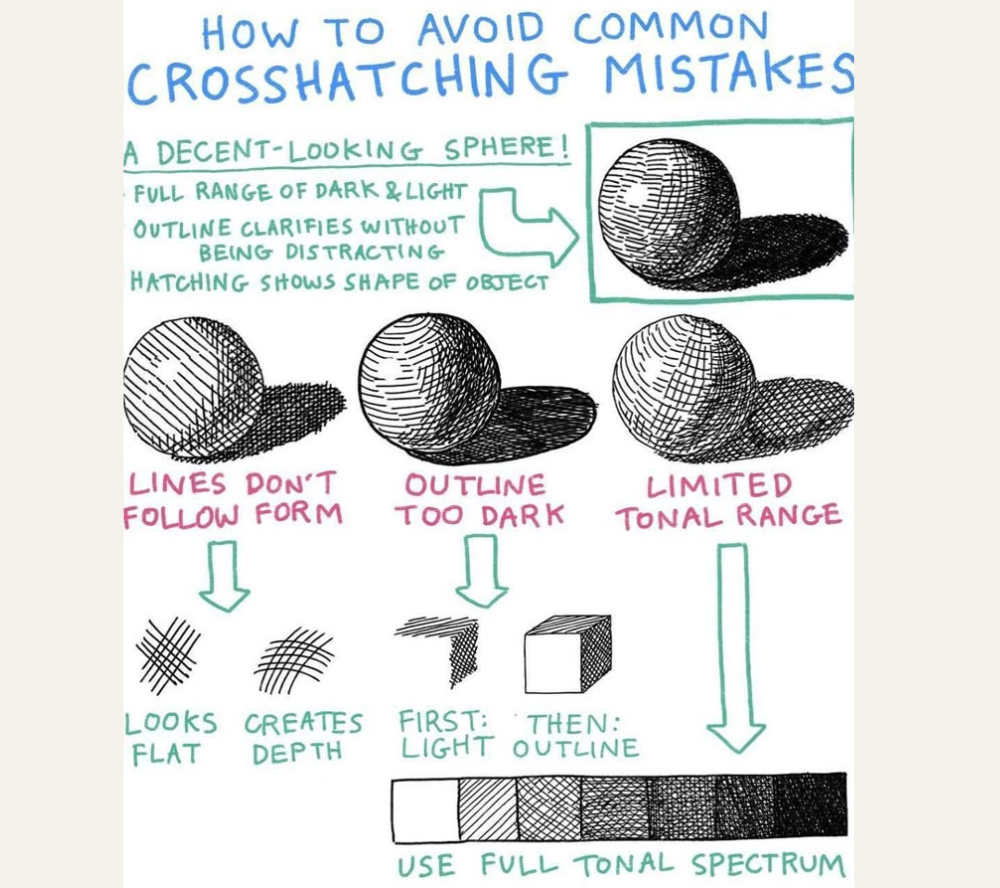
✅ Do This
-
Follow the Form
-
Curve lines along the object’s shape (e.g., sphere hatching should mimic its contour).
-
Example: For a sphere, use concentric curved lines.
-
-
Full Tonal Range
-
Use light → medium → dark values:
-
Light: Widely spaced lines
-
Dark: Tight, multi-directional layers
-
-
-
Clean Outlines
-
Keep outlines subtle (avoid thick, distracting borders).
-
❌ Avoid These
-
Flat Appearance
-
Mistake: Parallel lines ignoring form (→ “2D” look).
-
Fix: Vary line direction to emphasize volume.
-
-
Overcrowding
-
Mistake: Overlapping lines too soon (→ muddy tones).
-
Fix: Build layers gradually (start lightest).
-
-
Limited Value Range
-
Mistake: Only mid-tone hatching (→ lacks depth).
-
Fix: Reserve darkest tones for shadows (e.g., sphere’s base).
-
Step-by-Step Crosshatching Demo
Sphere Example
-
Outline
-
Sketch a circle with light pencil.
-
-
First Layer
-
Add curved lines (↗️ direction) for highlights.
-
-
Depth Building
-
Layer ↘️ lines in shadow areas.
-
Darken the core shadow (bottom 1/3).
-
-
Blending
-
Use a stump or finger to soften transitions.
-

Pro Tips
✏️ Tool Matters:
-
Fine liners (0.1–0.3mm) for precision.
-
Brush pens for dynamic strokes.
🎨 Advanced Technique:
-
Cross-contours: Hatch along both horizontal and vertical curves for ultra-realism.
Troubleshooting Guide
| Issue | Cause | Solution |
|---|---|---|
| “Flat” look | Lines ignore form | Curve strokes to follow shape |
| “Dirty” tones | Overworked layers | Work light-to-dark slowly |
| Uneven texture | Inconsistent angle | Use a 45° guideline |
Exercise to Practice
-
Draw 3 spheres:
-
① Form-focused hatching
-
② Full tonal range
-
③ Common mistakes (for comparison)
-
Quote to Remember:
“Crosshatching is sculpting with lines—every stroke should reveal form.”