How to Draw a Baseball Hitter
Dynamic Action Illustration Guide

Materials Needed
✏️ Pencils: HB (sketching), 2B (shading)
📄 Paper: Smooth sketch paper
🧽 Eraser: Kneaded for highlights
🖋️ Optional: Fine liner for outlines
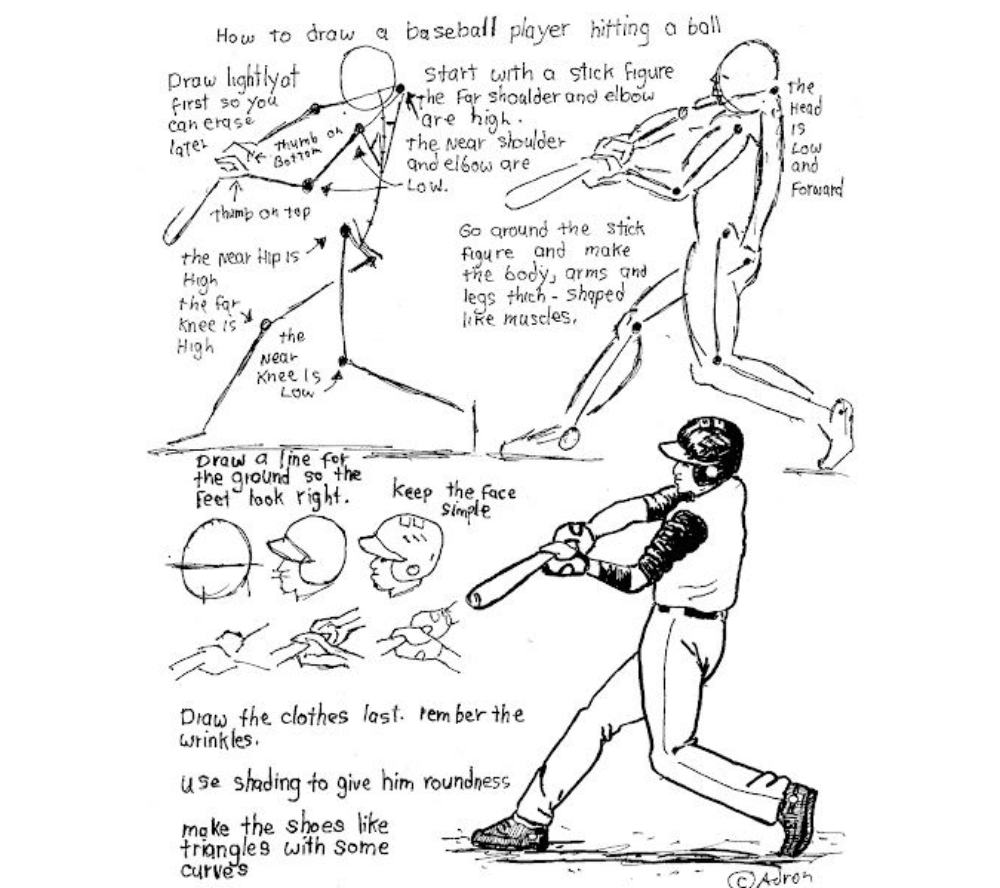
Step 1: Pose & Structure
Stick Figure Framework
-
Action Pose:
-
Front shoulder/elbow LOW (closest to viewer).
-
Back shoulder/elbow HIGH (powering the swing).
-
Bent knees for balance.
-
-
Bat Angle:
-
Draw a diagonal line from hands to follow-through position.
-
 Example: Angular stick figure shows swing torque.
Step 2: Muscle & Form
Anatomy Basics
-
Arms/Legs: Thicken with slight curves (biceps, thigh muscles).
-
Torso: Twist at the waist for dynamic motion.
-
Feet: Anchor with one foot forward (angled triangle shape).
Pro Tip:
“Exaggerate the shoulder dip to emphasize the swing’s power.”
Step 3: Facial Features & Gear
Simplified Details
-
Face: Single line for eyes/nose (side profile).
-
Helmet: Oval with brim shading.
-
Glove: Mitt shape near chest (angled down).
Avoid: Over-detailing fingers—suggest them with curves.
Step 4: Clothing & Wrinkles
Jersey & Pants
-
Fabric Folds:
-
Radial wrinkles at elbows/knees.
-
Stretch lines across the back during swing.
-
-
Cleats: Triangular with curved soles.
Step 5: Shading & Depth
3D Effects
-
Cross-Hatching: Under cap brim, glove, and shoe treads.
-
Highlights: Leave knees, bat, and helmet logo bright.
-
Ground Shadow: Darken under feet for stability.
Common Mistakes
❌ Flat Pose: Ensure shoulders/hips aren’t parallel.
❌ Stiff Bat: Curve the follow-through slightly.
Artistic License:
“Suggest the ball as a blurred circle for motion.”
Final Touches
-
Add dirt clouds near cleats for action.
-
Optional: Team logo on the jersey.
Reference: Adapted from drawinglessonsfortheyoungartist.blogspot.com