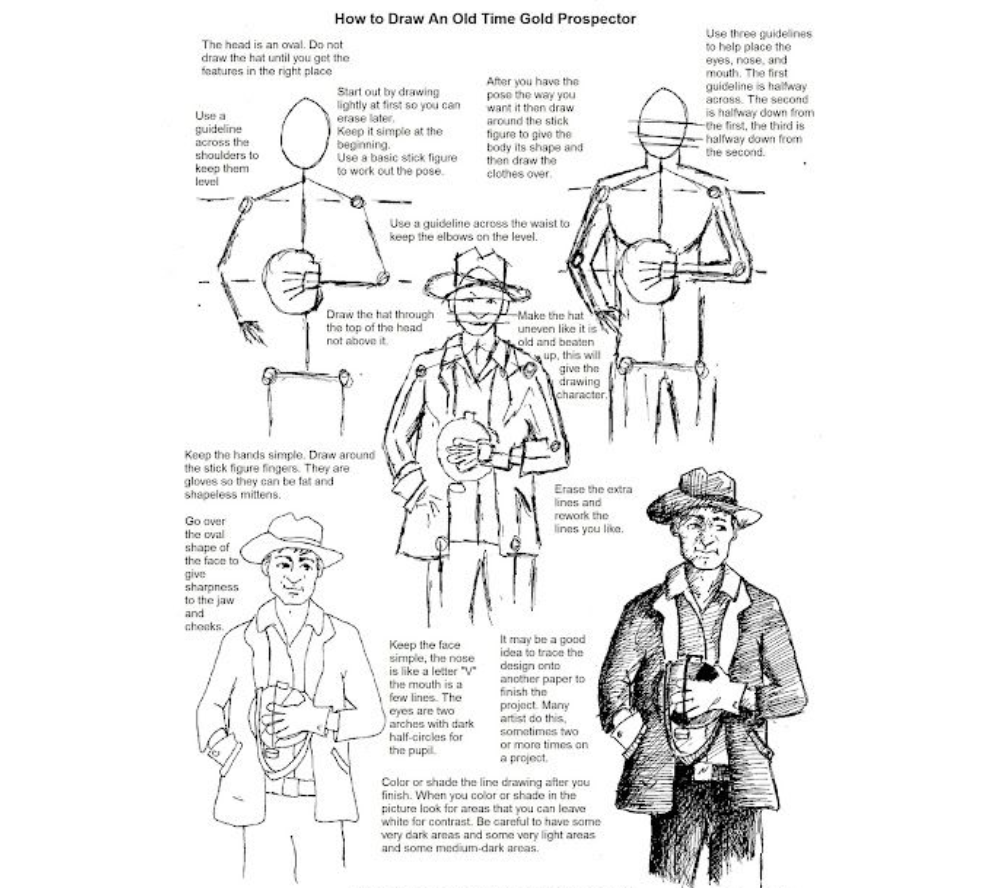
How to Draw an Old-Time Gold Prospector
*19th-Century Gold Rush Character*

Materials Needed
✏️ Pencil (HB or 2B)
📄 Paper
🧽 Eraser
🖍️ Optional: Coloring tools (watercolor, markers)
Step 1: Basic Structure
-
Head: Lightly sketch an oval.
-
Tip: Place halfway down the page to leave room for the hat.
-
-
Guidelines:
-
Draw a horizontal line for shoulders (keep level).
-
Add three facial guidelines:
-
Line 1 (top): Eyebrows
-
Line 2 (middle): Nose base
-
Line 3 (bottom): Mouth
-
-
Step 2: Pose & Proportions
-
Stick Figure:
-
Use simple lines for arms (bent at elbows) and legs (slightly bent).
-
Key: One hand on hip, other holding a pan or pickaxe.
-
-
Body Shape:
-
Draw around the stick figure to create a rounded torso (prospectors wore bulky clothes).
-
Step 3: Facial Features
👃 Nose: Angular “V” shape (wrinkled from squinting).
👄 Mouth: Curved line with a mustache above.
👀 Eyes: Small half-circles with dark pupils (shaded upper lids for depth).
🧔 Beard: Scruffy, uneven lines along the jaw.
Step 4: Clothing & Details
🎩 Hat:
-
Draw the brim through the head oval (not above).
-
Make it asymmetrical (battered look).
🧥 Outfit: -
Suspenders over a collared shirt.
-
Patchy pants with boots.
🧤 Gloves: Simplified mittens (no fingers).
Step 5: Shading & Texture
✏️ Techniques:
-
Use cross-hatching for shadows (under hat, folds in clothes).
-
Darken areas like the beard and hat rim.
-
Leave highlights on the nose and pan for contrast.
Common Mistakes to Avoid
❌ Placing the hat floating above the head.
❌ Over-detailing hands (gloves hide fingers).
❌ Stiff posture (gold prospectors leaned forward).
Pro Tip:
*”Practice the pose on scrap paper first. Many artists sketch 2-3 drafts before finalizing.”*
Final Touches
-
Add props: Gold pan, pickaxe, or burro in the background.
-
Optional: Sepia tones for an antique look.
Art Credit: Adapted from Arlena’s tutorial (2020)