Mastering Leg Anatomy: A Detailed Tutorial on Shaping and Proportions

Elevate your figure drawing skills with our in-depth tutorial on shaping the leg, inspired by a meticulously crafted reference image. Designed for artists of all levels, this guide provides a professional approach to understanding leg anatomy, proportions, and common pitfalls, ensuring your sketches achieve realistic and dynamic results. As of 07:32 PM EST on Thursday, November 13, 2025, this step-by-step lesson offers practical techniques to refine your artwork with confidence.
Understanding Leg Anatomy and Proportions
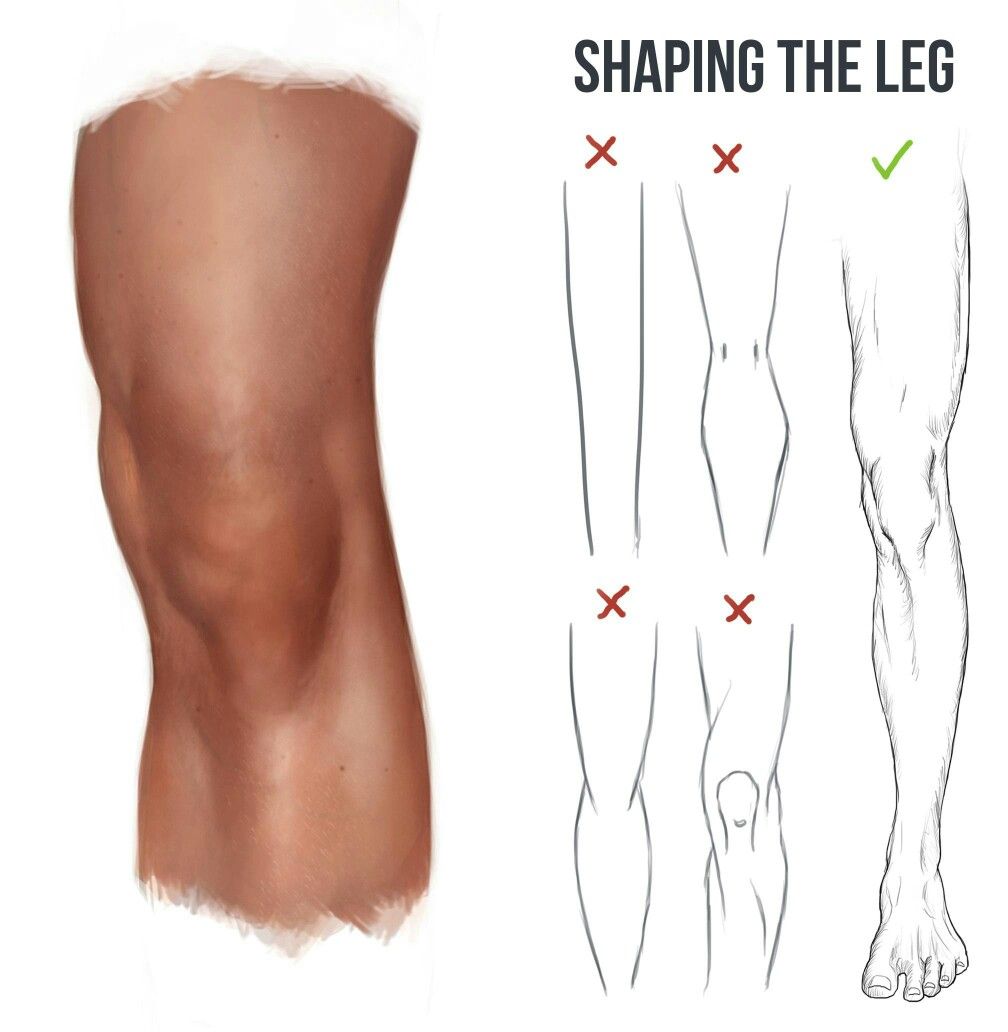
The tutorial begins with a focus on the leg’s natural form, using a detailed shaded example to showcase the smooth curves and subtle contours from thigh to calf. The reference image highlights the importance of avoiding overly straight or angular lines, which can distort the leg’s natural shape. Key anatomical features include the gentle inward curve above the knee and the tapering toward the ankle, with the shaded illustration serving as a benchmark for realistic rendering. The accompanying sketches emphasize the thigh’s width and the knee’s pivotal role in maintaining proportion.
Step-by-Step Drawing Process
- Establish the Base Shape: Start with a light outline of the leg, observing the thigh’s broader curve as shown in the shaded example.
- Define the Knee Area: Mark the knee’s position with a slight inward dip, avoiding the straight or overly pinched shapes marked with “X” in the reference.
- Shape the Calf: Draw a smooth taper from the knee to the ankle, ensuring the leg maintains a natural flow rather than a uniform width.
- Refine Contours: Add subtle curves and shading to reflect muscle definition, using the shaded leg as a guide for light and shadow placement.
- Review and Adjust: Compare your sketch to the “✓” example, correcting any flat or exaggerated areas to align with the natural leg shape.

Common Mistakes and How to Avoid Them
The reference image clearly delineates common errors with “X” markings, including:
- Straight Lines: Legs drawn as uniform sticks lack the natural curve and volume of the thigh and calf.
- Overly Pinched Knees: Exaggerated inward angles at the knee disrupt proportion and realism.
- Flat Profiles: Absence of contouring makes the leg appear two-dimensional rather than rounded.
The “✓” example demonstrates the correct approach, with a balanced curve from thigh to ankle and a well-defined knee, offering a visual standard to emulate.
Practical Tips for Artists
- Use References: Regularly consult the shaded leg and sketch examples to check proportion and contour accuracy.
- Practice Curves: Focus on drawing smooth, flowing lines to capture the leg’s natural shape.
- Shading Techniques: Apply light hatching or blending to enhance depth, mimicking the shaded example’s realism.
- Tool Suggestion: Use a range of pencils (e.g., HB for outlines, 2B for shading) and a kneaded eraser for adjustments.
Enhancing Realism and Depth
The tutorial emphasizes the importance of contouring to reflect the leg’s three-dimensionality. The shaded example illustrates how light falls across the thigh and calf, creating a realistic gradient that artists should replicate. The comparison of incorrect and correct sketches encourages iterative practice, helping artists develop an eye for detail and improve over time.
This tutorial is an essential resource for artists aiming to master leg drawing. Leverage the detailed visuals and practical advice from the reference image to refine your skills. Explore our ongoing series on figure drawing for more techniques and inspiration. Happy sketching!
This professionally crafted post is tailored for a website, providing a thorough and accessible tutorial based on the uploaded image, with a focus on practical application and skill development as of the current date and time.