Simplifying Female Hips: A Step-by-Step Drawing Tutorial

Unlock the secrets to drawing female hips with ease using our comprehensive tutorial, inspired by a detailed reference image from Gkojn. Perfect for artists at any skill level, this guide offers practical tips and techniques to master the curves and proportions of the female hip region. Whether you’re sketching for character design or anatomical studies, this step-by-step approach will help you create confident, realistic drawings by 10:58 AM EST on Wednesday, November 12, 2025.
Understanding Hip Anatomy and Proportions
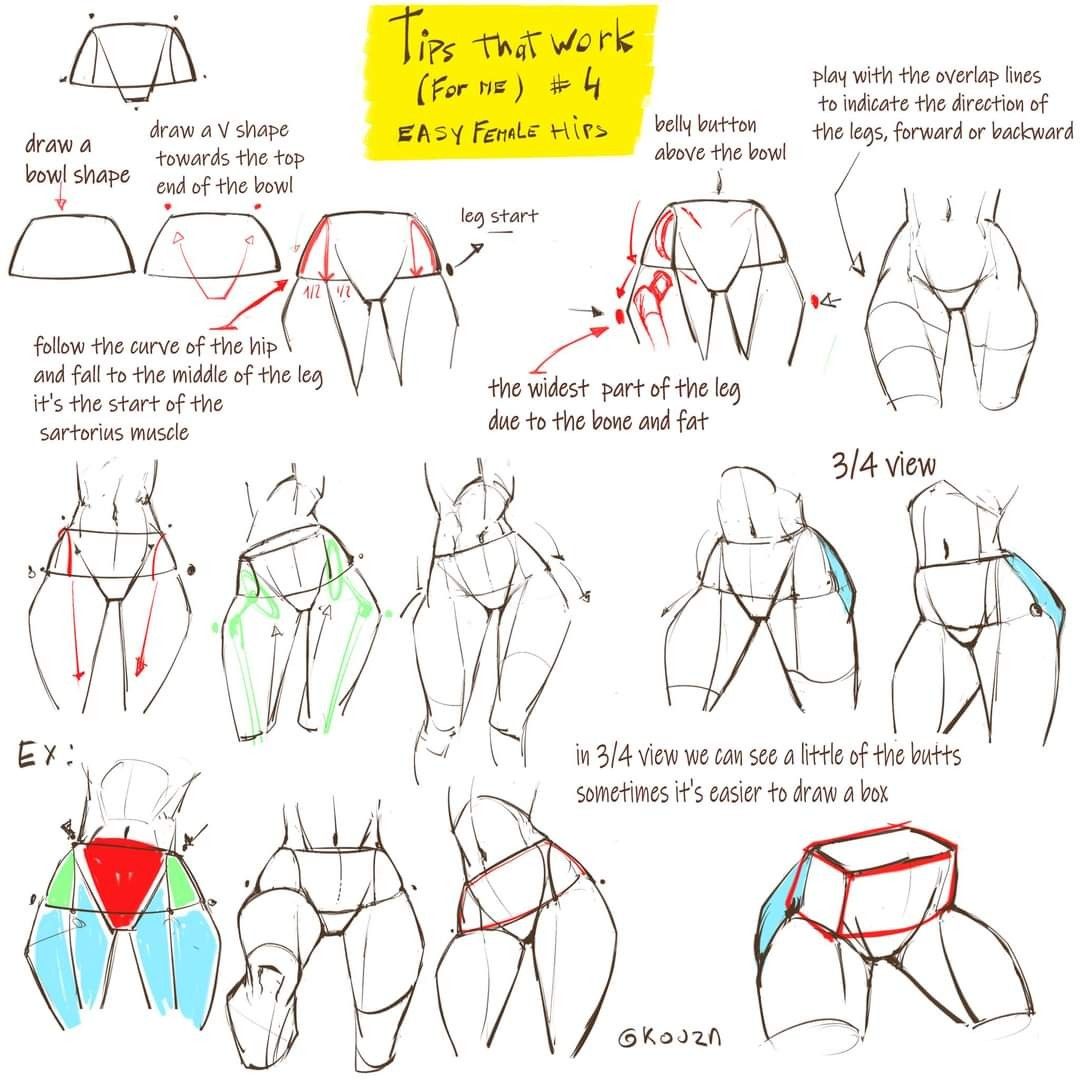
The tutorial begins with a focus on the hip’s unique structure, emphasizing its widest part due to bone and fat distribution. The reference image illustrates a “bowl shape” technique, starting with a V-shape at the top to define the pelvis, followed by smooth curves that fall to the middle of the leg where the sartorius muscle begins. Annotations highlight key areas, such as the leg start point and the belly button’s position above the bowl, providing a clear roadmap for sketching. The image also contrasts different views, including a 3/4 perspective, to show how the buttocks and hip alignment shift.
Step-by-Step Drawing Process
- Create the Base Shape: Draw a V-shape at the top of the pelvis, transitioning into a bowl-like outline to establish the hip’s foundation.
- Follow the Curves: Trace the hip’s natural curve downward, tapering toward the middle of the leg, as guided by the red and green lines in the reference.
- Define the Widest Part: Mark the widest section of the leg, influenced by bone and fat, using the image’s highlighted areas for accuracy.
- Incorporate Overlap Lines: Add overlap lines to indicate leg direction (forward or backward), enhancing depth and perspective.
- Adjust for View: In a 3/4 view, sketch a box to frame the hips and buttocks, simplifying the process as suggested by the tutorial.
Practical Tips for Artists
- Start with Guidelines: Use the V-shape and bowl technique to maintain proportion and flow.
- Practice Curves: Focus on smooth, continuous lines to capture the hip’s graceful contour.
- Experiment with Views: Try the 3/4 perspective with a box method to ease complex angles.
- Tool Recommendation: Use a pencil (e.g., HB) for initial sketches and red/green markers for guidelines, as seen in the image.
Enhancing Depth and Realism
The tutorial encourages playing with overlap lines to suggest movement and depth, a technique vividly demonstrated in the reference. The 3/4 view tip, using a box to outline the buttocks, simplifies the process while maintaining anatomical accuracy. This method helps artists visualize the hip’s three-dimensionality, making it easier to adjust poses and add clothing or shading later.
This tutorial is an invaluable resource for artists aiming to master female hip drawing. Utilize the detailed visuals and practical advice from the reference image to refine your skills. Explore our ongoing series on figure drawing for more techniques and inspiration. Happy sketching!
This professionally crafted post is tailored for a website, providing a detailed and accessible tutorial based on the uploaded image, with a focus on practical application and skill enhancement as of the current date and time.