Mastering Facial Proportions: A Step-by-Step Grid Method Tutorial for Drawing Realistic Male Portraits in Pencil

Unlock the secrets to drawing hyper-realistic male portraits with precision and confidence using the Grid Method for Facial Proportions. This comprehensive, professional-grade tutorial breaks down the human face into measurable, repeatable units—ensuring anatomical accuracy from the very first sketch.
What You’ll Learn in This Tutorial:
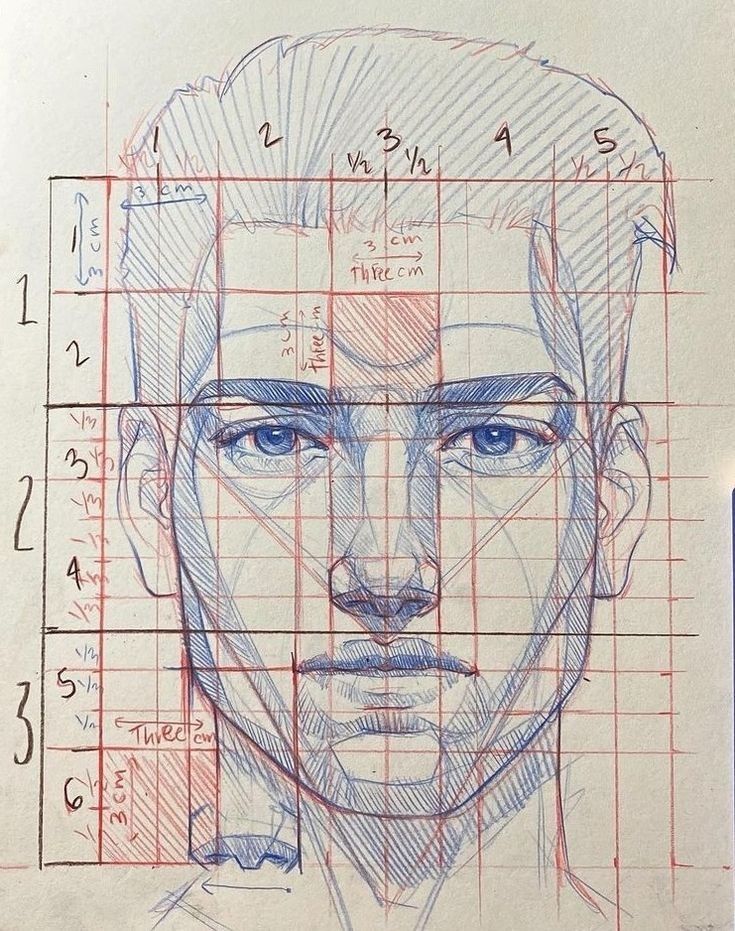
1. The Grid Framework: Foundation of Accuracy
- 3×6 Grid System: The face is divided into a 3-column by 6-row grid, with each cell representing 3 cm in real-world scale (adjustable for any canvas size).
- Vertical Alignment: Columns 1, 2, and 3 align with the outer edges of the head, ears, and central facial features.
- Horizontal Divisions: Rows 1–6 map critical landmarks:
- Row 1: Top of the head (hairline begins)
- Row 2: Forehead midpoint
- Row 3: Eyebrow level
- Row 4: Base of the nose
- Row 5: Bottom of the lower lip
- Row 6: Base of the chin
2. Key Proportional Rules (The “Rule of Thirds” in Action)
- Eyes at Midpoint: The eyes sit exactly halfway between the top of the head and the chin (Row 3).
- Three Equal Segments:
- Hairline to eyebrows = 1 unit
- Eyebrows to base of nose = 1 unit
- Base of nose to chin = 1 unit
- Nose Width: Aligns with the inner corners of the eyes.
- Mouth Width: Matches the distance between the pupils.
- Ear Placement: Ears span from the eyebrow line (Row 3) to the base of the nose (Row 4).
3. Step-by-Step Construction Process
- Draw the Grid: Use a light red pencil to sketch a 3×6 grid (3 cm squares).
- Plot Key Landmarks:
- Mark the top of the head (Row 1, Column 2)
- Place eyes at Row 3, Columns 1.5–2.5
- Nose base at Row 4, Column 2
- Mouth at Row 5, Column 2
- Refine with Curves: Soften angular grid lines into organic facial contours.
- Add Shading & Texture: Use cross-hatching and blending for realistic skin, hair, and shadow depth.
4. Tools & Materials
- Pencils: HB (structure), 2B–6B (shading)
- Paper: Smooth Bristol board (recommended)
- Ruler & Red Pencil: For precise grid lines
- Kneaded Eraser: For clean highlights and corrections
5. Pro Tips for Realism
- Observe Negative Space: Use the grid to measure distances between features.
- Angle the Jaw: Male jawlines are typically wider and more angular than female.
- Vary Line Weight: Thicker lines for shadows, lighter for highlights.
- Study Light Source: Consistent shading direction enhances 3D form.
Perfect for:
- Beginner to intermediate artists
- Portrait drawing enthusiasts
- Art students preparing for exams or portfolios
- Digital artists seeking traditional foundation skills
Downloadable Resources (Coming Soon):
- Printable 3×6 Grid Template (3 cm scale)
- High-Res Reference Photo (Male Model, Front View)
- Layered PSD File (for digital adaptation)
Start Drawing with Confidence. With this grid-based system, you’ll never guess proportions again. Whether you’re sketching from life, photos, or imagination—this method guarantees consistent, professional results every time.
Follow along with the annotated sketch above and transform your portrait game today.
#PortraitDrawing #RealismTutorial #GridMethod #ArtFundamentals #PencilSketching