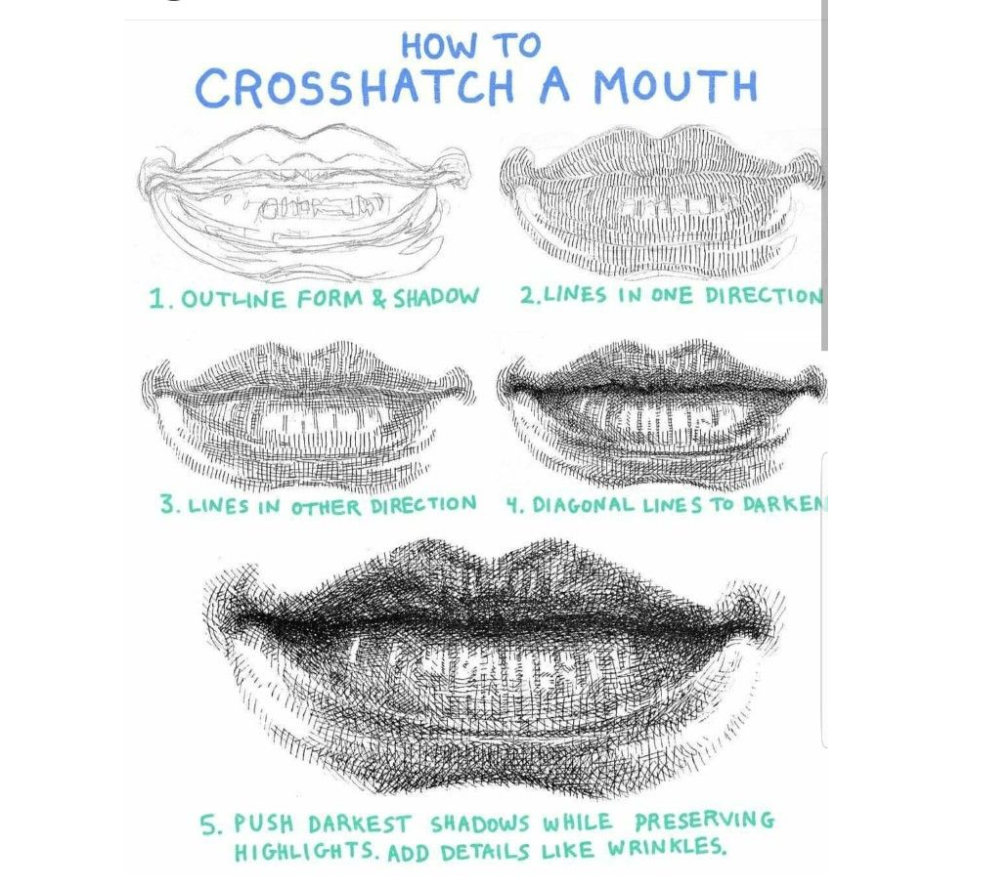
How to Crosshatch a Realistic Mouth: Step-by-Step Guide

Materials Needed
✏️ HB & 4B pencils
📄 Smooth drawing paper
🧽 Kneaded eraser
🔍 Blending stump (optional)
1. Outline Form & Shadow Areas
-
Basic Shape:
-
Draw a stretched M for upper lip
-
Wider U for lower lip
-
-
Mark Shadows:
-
Corners of mouth
-
Center groove of upper lip
-
Under lower lip
-
Tip: “Lips follow the curve of the teeth—think cylindrical, not flat.”
2. First Direction Hatching
-
Curved Lines:
-
Upper lip: Strokes radiate from center outward (🎯 direction)
-
Lower lip: Vertical lines to emphasize volume
-
-
Pressure:
-
Light for mid-tones
-
Avoid highlight areas (lip center, Cupid’s bow)
-

3. Opposing Direction Layer
-
Upper Lip: Add horizontal lines to build shadow at edges
-
Lower Lip: Diagonal lines (45°) for sheen
-
Blend: Use a finger or stump for smooth transitions
Common Mistake: Overworking highlights—preserve white paper for lip gloss effect.
4. Diagonal Lines (Depth & Texture)
-
Philtrum Groove: Tight crosshatching
-
Wrinkles: Tiny zigzag lines (subtle on young lips, pronounced on aged lips)
-
Corners: Darkest marks for shadow traps
5. Final Details
⚫ Deepen Shadows:
-
Lip corners (almost black)
-
Under lower lip
✨ Enhance Realism: -
Erase tiny highlights on lower lip
-
Add vertical cracks for dry lips (if desired)
Pro Tip: “Squint to check value contrast—the mouth should ‘pop’ from the face.”
Lip Crosshatching Checklist
| Step | Focus Area | Tool |
|---|---|---|
| 1 | Outline & shadow zones | HB Pencil |
| 2 | Curved base layer | HB Pencil |
| 3 | Opposing angles | 2B Pencil |
| 4 | Texture/details | 4B Pencil |
| 5 | Highlights | Eraser |
Why This Works
-
Volume: Curved lines mimic lip curvature
-
Texture: Diagonal lines suggest natural lip wrinkles
-
Focus: Dark corners draw attention to the mouth center
Style Variations:
-
Comic Style: Exaggerate Cupid’s bow
-
Hyper-Realism: Add subsurface scattering (pink undertones)