Step-by-Step Tutorial on Drawing Bust Shots: Mastering Upper Body Proportions, Contours, and Anatomy for Character Illustration

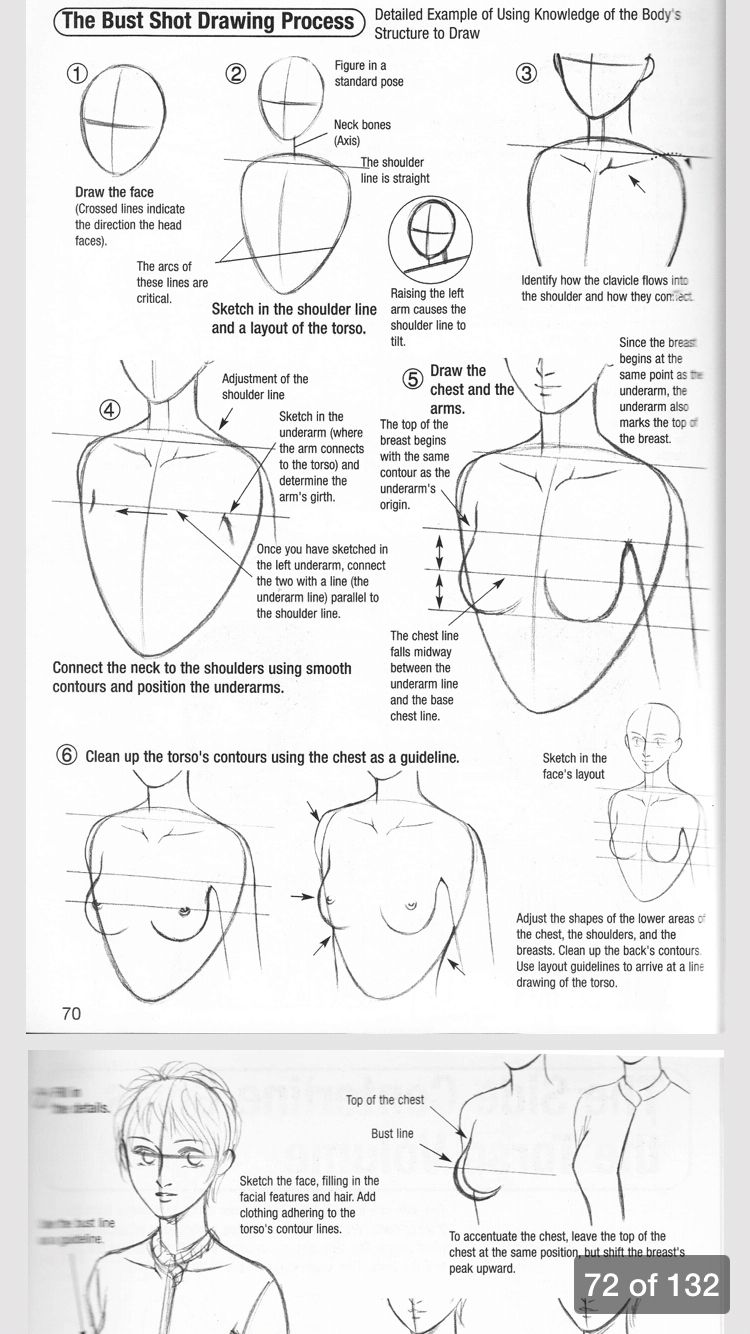
In the art of character design and portrait illustration, particularly in styles like manga, anime, or realistic figure drawing, the bust shot—focusing on the head, shoulders, and upper torso—serves as a fundamental composition for conveying emotion, personality, and anatomy. This detailed tutorial is derived from a classic instructional reference page (appearing to be from a drawing guidebook, pages 70 and 72 of 132), which outlines “The Bust Shot Drawing Process” through sequential sketches and annotations. The image demonstrates a methodical approach using construction lines, proportional guidelines, and cleanup techniques to build a female bust shot in a standard pose. It emphasizes critical elements like shoulder arcs, neck axis, clavicle flow, underarm positioning, and bust contours, ensuring anatomical accuracy while allowing for stylistic flexibility.
This guide is ideal for beginner to intermediate artists practicing with pencil and paper, or digital tools such as Clip Studio Paint, Photoshop, or Procreate. We’ll break it down into numbered steps mirroring the reference, with explanations of each phase, potential pitfalls, and exercises to apply the concepts. Key principles include starting with simple guidelines for direction and proportion, progressively adding details, and refining contours for a clean, professional finish. By following this process, you’ll learn to create balanced bust shots that avoid common issues like asymmetrical shoulders or unnatural chest placement, making your characters more lifelike and expressive. Remember to use light strokes for initial construction (e.g., HB pencil or low-opacity layers digitally) and gradually darken for final lines.
Section 1: Establishing the Head and Directional Guidelines (Step 1)
The tutorial begins with the head as the anchor point, using crossed lines to set the face’s orientation—a technique common in Loomis or anime-style construction.
- Draw the Face with Crossed Lines: Start by sketching a basic oval or circle for the head. Add a vertical centerline (axis) to indicate the head’s tilt and a horizontal line for eye level. The reference notes that “Crossed lines indicate the direction the head faces,” so angle these based on your desired pose—straight for neutral, or tilted for dynamic angles. This establishes the “Neck bones (Axis)” flowing downward.
- Importance of Initial Direction: These lines are critical as they dictate the entire bust’s alignment. In the image, the head is in a standard frontal pose, but you can experiment with slight rotations (e.g., 15-30 degrees) for variety.
- Practical Tips and Exercise: Use a mirror or reference photo to match real head tilts. Common error: Misaligning the cross with the neck—ensure the vertical line extends smoothly into the torso. Exercise: Sketch 5 heads with varying directions, measuring symmetry with a ruler or digital grid.
This step sets the foundation, preventing later distortions in the shoulders or chest.
Section 2: Sketching the Shoulder Line and Torso Layout (Step 2)
Moving downward, the reference introduces the shoulder line as a key structural element, treating the torso as a simplified form.
- Add the Shoulder Line: From the base of the neck (where the axis ends), draw a gently curved horizontal line for the shoulders. The annotation highlights “The arcs of these lines are critical” and “Sketch in the shoulder line and a layout of the torso.” Make it slightly wider than the head (about 1.5-2 times for females) and tilt it subtly if the head is angled—e.g., “Raising the left arm causes the shoulder line to tilt.”
- Basic Torso Outline: Block in the torso as a tapered rectangle or oval below the shoulders, ending at the mid-chest level. This layout ensures proportionality: shoulders align with the clavicle bones, flowing into the arms.
- Application and Variations: For masculine figures, broaden the shoulders; for stylized art, exaggerate the curve for drama. Tip: Use erasable guidelines to adjust tilt. Avoid mistake: Flat shoulders—add a natural dip at the center for realism. Exercise: Draw the shoulder line over a traced head, varying arm positions to see how it affects the arc.
This phase builds the upper body’s framework, linking head to torso seamlessly.
Section 3: Identifying Clavicle Flow and Arm Integration (Step 3)
The reference stresses how the clavicle (collarbone) connects to the shoulders, using arrows to show flow.
- Figure in a Standard Pose: Refine the shoulder line by adding the clavicle as curved arcs from the neck pit to the arm joints. The note “Identify how the clavicle flows into the shoulder and how they contact” guides you to draw smooth transitions, avoiding sharp angles.
- Arm and Neck Bone Details: Extend lines downward for the arms, ensuring they start from the shoulder’s outer edge. The axis from the neck should remain straight for balance.
- Exercise for Mastery: Practice tracing clavicle paths on photos of models. Common pitfall: Ignoring contact points—ensure the clavicle “flows” naturally into the deltoid muscle area.
Section 4: Adjusting the Shoulder Line and Adding Underarms (Step 4)
This step focuses on refinement, introducing underarm sketches for volume.
- Adjustment of Shoulder Line: Tweak the initial shoulder arc for accuracy, sketching in the underarm where the arm connects to the torso. Annotations like “Sketch in the underarm (where the arm connects to the torso) and determine the arm’s girth” emphasize measuring arm thickness (typically 1/3 of shoulder width).
- Determining Arm Proportions: Draw the underarm as a curved indentation, parallel to the shoulder line. This adds depth, showing how the arm hangs.
- Tips for Realism: Digitally, use transform tools for adjustments; traditionally, erase and redraw lightly. Error to avoid: Oversized arms—scale them to fit the torso layout. Exercise: Add underarms to previous sketches, testing different girth for body types (slim vs. muscular).
Section 5: Drawing the Chest and Arms with Origin Points (Step 5)
Here, the bust takes shape, with emphasis on the chest’s top and contours.
- Draw the Chest and Arms: Begin the bust at the same point as the underarm, marking the top of the breast with a horizontal line. The reference states “Since the breast begins at the same point as the underarm, the underarm also marks the top of the breast.” Draw breasts as soft, teardrop shapes originating from the clavicle area, with the chest line falling midway between the underarm and base.
- Contour and Origin Details: Use the same contour as the underarm’s origin, ensuring parallelism. Annotations highlight “The chest line falls midway between the underarm line and the base” and “Once you have sketched in the left underarm, connect the two with a line (the underarm line) parallel to the shoulder line.”
- Variations for Diversity: Adjust for different bust sizes—smaller for youthful characters, fuller for mature. Tip: Add subtle shading for volume. Exercise: Render 3 bust variations, focusing on contour flow.
Section 6: Cleaning Up Contours and Final Adjustments (Step 6)
The final steps involve polishing, using the chest as a guideline.
- Clean Up the Torso’s Contours: Erase construction lines, smoothing the neck-to-shoulder connection with “smooth contours and position the underarms.” Use the chest line as a guide for overall flow.
- Adjust Shapes and Add Details: Refine the lower chest, shoulders, and breasts. The reference notes “Adjust the shapes of the lower areas of the chest, the shoulders, and the breasts. Clean up the back’s contours. Use layout guidelines to arrive at a line drawing of the torso.”
- Incorporating Face and Finishing Touches: Sketch the face’s layout, filling in facial features, hair, and clothing adhering to the torso’s contour lines. The bottom illustrations show “Top of the chest, Bust line” and advise “To accentuate the chest, leave the top of the chest in the same position, but shift the breast’s peak upward.”
- Final Exercise: Complete a full bust shot from start to finish, timing yourself for efficiency. Common error: Inconsistent contours—check against a mirror flip.
Additional Professional Tips and Resources
- Tools Recommendations: Start with mechanical pencils (0.5mm) for precision; digitally, use stabilizer settings for smooth lines.
- Anatomical Insights: Cross-reference with resources like “How to Draw Manga” series or anatomy apps to deepen understanding of clavicle and bust anatomy.
- Common Challenges: If proportions feel off, use head-to-shoulder ratios (1:1.5). For dynamic poses, apply these steps with foreshortening.
- Practice Regimen: Dedicate sessions to bust shots in various styles—realistic, stylized—to build versatility.
This tutorial provides a structured path to proficient bust shot drawing, enhancing your portfolio with polished, anatomically sound illustrations. Apply these techniques consistently, and experiment with poses to evolve your style. For advanced topics like shading or full-body integration, visit our related tutorials!


