Mastering the Fundamentals of Pool: Optimal Stance and Precise Cue Ball Striking Techniques
In the world of billiards, whether you’re a beginner honing your skills or an experienced player refining your game, mastering the basics of stance and cue ball control is essential for consistent performance. This comprehensive tutorial breaks down the key elements of an effective pool stance and the art of hitting the cue ball with intention. Drawing from proven techniques used by professionals, we’ll explore how to position your body for stability and accuracy, and how to apply various spins (commonly known as “English”) to manipulate the cue ball’s path and behavior. By following these steps, you’ll not only improve your aiming and shot execution but also enhance your overall strategy, turning each shot into a setup for the next. This guide is designed to be practical, with step-by-step instructions, tips, and common pitfalls to avoid, ensuring you can apply these concepts directly to your practice sessions on the table.

Section 1: Establishing a Solid Stance – The Foundation of Every Shot
A proper stance in pool is akin to the foundation of a building: it provides stability, balance, and the precision needed to execute shots reliably. Without it, even the best aiming technique can falter due to unnecessary body movement or misalignment. The goal is to create a stance that minimizes variables, allowing you to focus solely on the shot at hand. Here’s how to build it step by step:
- Foot Position for Balance and Alignment:
- Start by positioning your feet shoulder-width apart or slightly wider for a stable base. Your dominant foot (the one on the same side as your shooting hand) should be placed slightly behind the line of the shot, while your non-dominant foot points forward toward the cue ball.
- Imagine a straight line extending from the cue ball through your cue stick to your body. Align your feet along this “shot line” to ensure your body doesn’t twist or sway during the stroke. As illustrated in standard pool diagrams, the cue should arc naturally over your forward foot, creating a curved path that promotes fluid motion.
- Pro Tip: Avoid locking your knees; keep them slightly bent to absorb any minor shifts in weight. This position prevents fatigue during long games and maintains consistency across shots.
- Back Arm Positioning for Vertical Precision:
- Your back arm (the one gripping the butt of the cue) should act as a pendulum, moving only at the elbow joint. Keep the upper arm as vertical as possible – ideally perpendicular to the table surface – to eliminate side-to-side wobble.
- This vertical alignment reduces unnecessary torque and ensures the cue travels in a straight line toward the cue ball. Common mistake: Allowing the shoulder to drop or rotate, which introduces inconsistencies in your stroke.
- Practice Drill: Stand in front of a mirror or use a video recording app to check your arm’s alignment. Perform 10-15 practice strokes without hitting the ball, focusing on elbow-only movement.
- Head and Eye Alignment for Rifle-Like Aiming:
- Lower your head directly over the cue stick as much as comfortably possible. This “chin-to-cue” proximity allows you to sight down the cue like aiming a rifle, providing a clear, unobstructed view of the shot line.
- Your dominant eye should align with the cue shaft for optimal depth perception. If you’re unsure of your dominant eye, perform a simple test: Extend your arms and form a triangle with your thumbs and index fingers, framing a distant object. Close one eye at a time – the eye that keeps the object centered is dominant.
- Benefit: This low head position minimizes parallax errors (where the shot looks aligned but isn’t) and enhances focus, especially on long-distance shots.
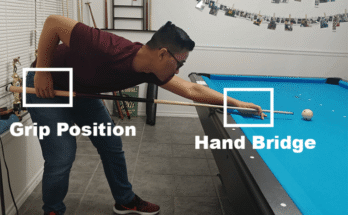
- Bridge Hand and Length for Control:
- Form a stable bridge with your front hand, typically an open bridge (fingers spread for visibility) or closed bridge (looped for power shots). Aim for an 8-9 inch bridge length – the distance from the cue tip to your bridge hand – as this provides a balance between control and power.
- The bridge should rest firmly on the table felt without sliding, acting as a pivot point for your stroke. Adjust based on shot type: Shorter bridges for delicate touch shots, longer for powerful breaks.
- Common Pitfall: An unstable bridge leads to miscues. Ensure your hand is dry and chalked to prevent slippage.
By integrating these elements, your stance becomes a repeatable setup that supports every aspect of play, from simple straight shots to complex position plays. Remember, consistency comes from practice – spend at least 15-20 minutes per session drilling your stance before moving to actual shots.
Section 2: Hitting the Cue Ball – Beyond Sinking Balls to Strategic Position Play
While sinking balls is the immediate goal, the second-most important aspect of pool is controlling the cue ball’s path after contact. This is where “English” – or spin – comes into play. Offsetting your striking point on the cue ball alters its speed, direction, and post-collision behavior, allowing you to set up your next shot effectively. Think of it like chess: Each move should position you advantageously for the future. The cue ball diagram highlights four primary striking zones: Follow (top), Draw (bottom), Left English, and Right English. Here’s a detailed breakdown:
- Understanding Cue Ball Contact Points:
- The cue ball is divided into quadrants for spin application. Always chalk your cue tip before each shot to ensure clean contact and prevent miscues.
- Tip for Precision: Don’t offset more than one cue tip’s width (about 1/2 inch) from center in any direction. Excessive offset can cause unpredictable deflection or scratches.
- Follow (Top Spin):
- Strike the cue ball above center to impart forward topspin.
- Effect: This causes the cue ball to continue rolling forward after hitting an object ball, ideal for following through to position for the next pocket.
- Applications: Use on straight shots where you need the cue ball to travel farther post-contact. It adds momentum, helping navigate clustered balls.
- Technique: Keep your stroke level and follow through smoothly. Practice by aiming to make the cue ball stop and then roll forward on an empty table.
- Draw (Bottom Spin or Backspin):
- Hit below center to create backspin.
- Effect: The cue ball rolls backward after contact or draws away, useful for pulling the cue ball out of tight spots or avoiding scratches.
- Applications: Perfect for draw shots to reverse direction or scratch-proof setups. It can also widen angles by causing the cue ball to curve slightly backward.
- Caution: Excessive draw can lead to jumping or miscues; start with light offsets and build up. Drill: Place the cue ball near a rail and draw it back to your starting position.
- Right English (Clockwise Side Spin):
- Strike to the right of center for clockwise rotation.
- Effect: Adds right-side spin, which can throw an object ball slightly left, alter trajectories off rails, or curve the cue ball on long shots.
- Applications: Use to add opposite spin to object balls for position control, change rail bounce directions, or curve around obstacles. It’s versatile for bank shots or avoiding blockers.
- Technique: Compensate for squirt (cue ball deflection) by aiming slightly left of your intended line.
- Left English (Counter-Clockwise Side Spin):
- Hit to the left of center for counter-clockwise rotation.
- Effect: Mirrors right English but in the opposite direction – throws object balls right, alters rail paths accordingly.
- Applications: Similar to right English; choose based on table layout. Effects are symmetrical, so practice both for balanced skill.
- Pro Tip: Side spin amplifies on longer shots due to friction, so test on your table’s felt condition.
- Advanced Considerations and Planning:
- Offsetting changes speed and direction: Higher/lower hits affect roll; side hits introduce curve (swerve) and throw.
- Always plan ahead: After hitting an object ball, visualize where the cue ball will end up. Use spin to avoid leaving your opponent easy shots.
- Common Mistake: Over-relying on spin without mastering center-ball hits first. Start neutral and add spin gradually.
- Practice Routine: Set up standard shots (e.g., straight-in with position) and experiment with each spin type. Track outcomes in a notebook for patterns.
Final Tips for Integration and Improvement
- Holistic Practice: Combine stance and striking in drills. For example, set up a line of balls and focus on position play, ensuring your stance remains consistent.
- Equipment Matters: Use a well-maintained cue with a medium-hard tip for balanced spin control. Table conditions (felt speed, humidity) influence spin, so adjust accordingly.
- Troubleshooting: If shots veer off, check stance alignment first, then tip contact. Video analysis tools like phone apps can provide instant feedback.
- Progression: Beginners should aim for 80% center-ball shots; intermediates, incorporate spin on 50% of shots; advanced players, use for every strategic advantage.
By internalizing these techniques, you’ll elevate your pool game from reactive to proactive, making every session more enjoyable and competitive. For visual references, refer to diagrams like the one provided, and consider watching professional matches to see these principles in action. Happy cueing – practice diligently, and the results will follow!