Base Drawing: The Complete Guide to Building Any Artwork From Scratch
I spent my first two years of drawing doing everything wrong in the same order. I’d stare at a reference photo, then immediately start sketching details — an eye here, a jawline there — and every single time the proportions fell apart by the end. The head was too small, the legs too short, and the pose felt stiff. I thought I just wasn’t talented enough.
Then a figure drawing instructor handed me a wooden mannequin and said: You’re building a house, starting with the roof. Start with the foundation.’ That was the moment the base drawing clicked.
A base drawing isn’t a step you skip when you get better. It’s the step that makes everything else possible. Every professional illustrator, character designer, and animation studio uses some version of it — from Disney’s animators roughing poses on paper to concept artists at studios like Blizzard blocking figures digitally before adding detail. The method is universal because it solves a universal problem: the human eye lies, and proportions are hard.

This guide covers everything about base drawing — what it actually is, how to build one from scratch, which approach works for different subjects, and the specific mistakes that keep beginners stuck. By the end, you’ll have a repeatable system you can use for every drawing, whether you’re working on figures, portraits, animals, or objects.
What Base Drawing Actually Means (And What It Doesn’t)
The term ‘base drawing’ gets used to mean different things in different communities, which creates real confusion for beginners. Let’s sort it out.
In the broadest sense, a base drawing is any simplified underlying structure you create before adding details. It’s the skeleton beneath the skin — the scaffolding that gets hidden once the building is complete. The goal is always the same: lock in correct proportions and believable structure before you commit to anything else.

The Three Main Types
Gesture base (action line): A single flowing line that captures the main movement and weight of a pose. Takes 30 seconds. Used by animators and figure drawing students at sites like Line of Action (line-of-action.com) for warm-up exercises. Prioritizes energy over accuracy.
Block/mannequin base: Simple 3D shapes — boxes, cylinders, spheres — assembled to represent the body’s major masses. The most common approach for character design. Used in animation studios and taught in courses like Proko’s Figure Drawing Fundamentals.
Shape construction base: Flat 2D shapes (ovals, rectangles, circles) are mapped out before converting to form. Works especially well for beginners and for stylized/cartoon figures. The standard approach in manga and anime illustration.
📌 NOTE: Base drawing is NOT the same as ‘underdrawing’ (which refers specifically to the initial sketch in painting) or ‘line art’ (the clean final lines). It’s a structural planning stage that exists before either of those.
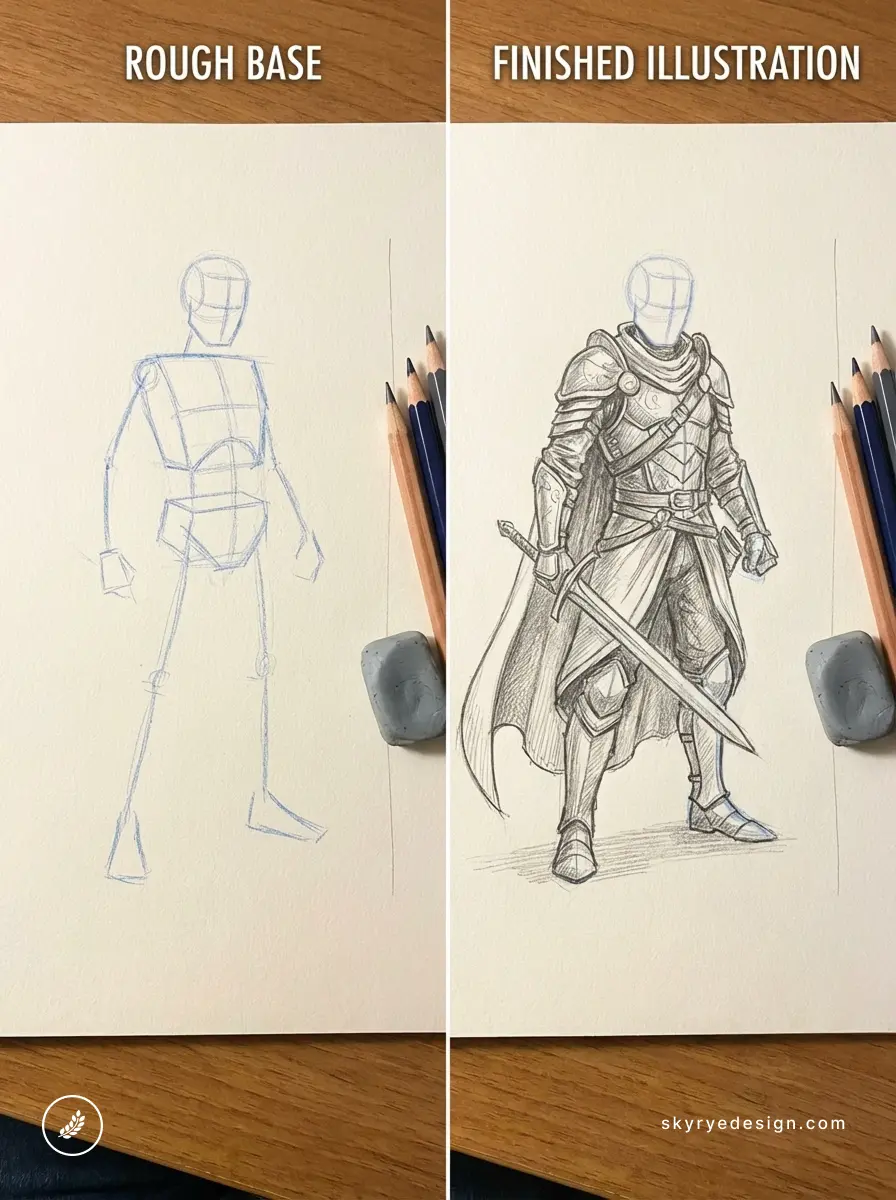
In figure drawing specifically, the base almost always comes first: gesture line or action line to capture pose flow, then block forms to establish mass, then anatomical refinement, then final line art. Skipping the base and jumping to details is the single most common mistake beginners make — and the reason proportions consistently go wrong.
The 7-Step Base Drawing Method That Works for Everything
This system works for figures, portraits, animals, and objects.

The key principle: always move from largest to smallest, from rough to refined. Never add detail until the structure is solid.
1 Establish your canvas proportions first
Before drawing anything, decide your figure’s height in ‘head units.’ Standard adult figures are 7–7.5 heads tall. Fashion illustration uses 8–9 heads for elongation.

Chibi/cartoon characters may be 2–3 heads. Mark the top (crown of head) and bottom (soles of feet) as two light dots on your page — this prevents the common problem of running out of space mid-drawing.
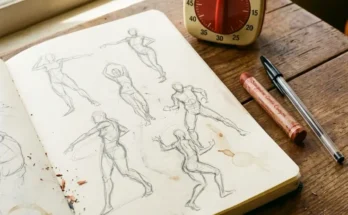
2 Draw the gesture line (action line)
A single flowing line from the top of the head through the spine to the weight-bearing foot.

This line captures the pose’s main direction and energy. Don’t think about anatomy yet — think about movement. Is the figure upright? Leaning? Twisted? The gesture line decides. This takes 10–20 seconds and is the single most important mark you’ll make.
3 Blocks in the 3 main masses
Head (oval or egg shape), torso (rounded box or barrel shape), and pelvis (wedge or bowl shape).

These three shapes are at slightly different angles to each other — that’s what creates natural movement rather than a stiff, robotic pose. Don’t draw them as flat shapes; try to suggest they have depth, even slightly.
4 Add the shoulder and hip lines
Draw a straight line across the top of the torso block (shoulder line) and one across the pelvis block (hip line).

In a natural, relaxed pose, these lines tilt in opposite directions — when one shoulder drops, the opposite hip rises. This ‘contrapposto’ principle is what makes figures look alive. Ignore it, and everything looks like a cardboard cutout.
5 Attach the limbs as cylinders
Arms and legs are simple tapered cylinders. Mark the joints — shoulder, elbow, wrist/hip, knee, ankle — as small spheres or circles.

Don’t draw the hand and foot yet; mark where they end. The key check: limb lengths. The upper arm and forearm are roughly equal. The thigh is slightly longer than the shin. A full arm (raised overhead) reaches roughly to mid-torso when dropped to the side.
6 Place the head details (center line + eye line)
Even at the base stage, two lines on the head oval are essential: the vertical center line (divides face left/right, follows the face direction) and the horizontal eye line (halfway down the head, not halfway down the face — a very common mistake).

These two lines tell you exactly where every facial feature goes without guessing.
7 Check proportions before adding anything else
Hold your paper at arm’s length. Does the figure read clearly? Is the gesture still visible? Are the masses balanced?
 | Sky Rye Design")
Fix structural problems now — after you add detail, fixing proportions becomes 10x harder. Use a knitting needle, pen, or the edge of your pencil as a measuring tool by holding it against the reference.
✏️ PRO TIP: The number-one pro habit: flip your drawing horizontally (or look at it in a mirror) after step 7. Proportion errors that your brain learned to ignore become immediately obvious from the flipped view. On iPad/Procreate, use the Transform > Flip Horizontal shortcut.

Base Drawing for Figures: The Proportions Every Artist Needs to Know
Proportions are the core reason for drawing. Human proportions are unintuitive — we misremember them because we process faces and bodies emotionally, not geometrically.
These are the measurements that matter:

Adult Figure Proportions (Realistic)
• Total height: 7–7.5 heads
• Shoulder width: approximately 2 head-widths
• Hip width: slightly narrower than shoulders for males, slightly wider for females
• Elbow: at roughly waist level when the arm hangs naturally
• Wrist: at roughly crotch level
• Knee: at roughly the mid-leg point, about 2 heads above the ground
• Foot length: approximately 1 head-length
The Mistakes Beginners Always Make
Hands too small. A relaxed hand is roughly the same height as the face from chin to hairline. Most beginners draw hands at 60% of the correct size.
Head too large. When drawing from imagination, the brain defaults to a larger-than-life head because faces are emotionally important. Measure the head first and commit to it before drawing the body.
Legs too short. Legs are half the total figure height. Draw the midpoint of the figure (crotch/hip area) first to prevent this.
Torso too long. The torso (shoulder to hip) is roughly 2.5 head-lengths. When it creeps to 3 or 3.5, the figure starts looking elongated and strange.

✏️ PRO TIP: Before drawing from imagination, spend 5 minutes on Line of Action (line-of-action.com) doing 30-second gesture drawings. It resets your eye to real proportions and makes the base stage dramatically easier. It’s free, runs in any browser, and is used by students at RISD, CalArts, and professional animation studios.
Tools for Base Drawing: What Actually Makes a Difference
You don’t need expensive equipment to do base drawing well. But the right tools do make the process faster and less frustrating.

Traditional Tools
Pencils: Use a 2H or H pencil for initial base lines — light enough to erase cleanly but visible enough to work from. Staedtler Mars Lumograph HB (~$8 for a pack of 12) is a reliable standard. Avoid 2B or softer pencils for the base stage; they smear and make erasing messy.
Mechanical pencil: A 0.5mm mechanical pencil gives you consistent, fine lines for the base without sharpening. The Pentel GraphGear 1000 (~$15) or the Uni Kuru Toga (~$12) are both excellent and used by manga and illustration students worldwide.
Kneaded eraser: Essential for base drawing. You can shape it to erase precise areas, lighten lines without fully removing them (for the transition from base to refined sketch), and lift graphite without damaging the paper surface. Faber-Castell kneaded erasers (~$3) are standard.
Wooden drawing mannequin: A jointed wooden figure you can pose and trace from. The Mont Marte 30cm wooden mannequin (~$15–$18) is the most widely available. Limit: they’re good for basic upright poses but struggle with extreme foreshortening or dynamic action.
Paper: Strathmore 400 Series Sketch Pad (9×12″, ~$10) is the standard choice for pencil base work — tooth is right for pencil grip, weight handles erasing. For cleaner bases you’ll ink over, Canson Bristol 250gsm gives a harder, smoother surface.
Digital Tools
iPad Pro + Procreate: The most popular digital-based drawing setup. Use a separate layer for your base (set to ~30% opacity), then draw the refined sketch on a layer above. The ability to flip horizontally, adjust opacity, and transform shapes makes the base stage dramatically faster than traditional ones. Procreate costs $12.99 (one-time purchase).
Clip Studio Paint: Preferred by manga and comic artists. Has a built-in 3D mannequin you can pose directly on the canvas and use as a base reference — effectively replacing the physical wooden mannequin—subscription from $4.49/month or one-time purchase from $49.99.
Sketchbook by Autodesk: Free, minimal, and fast. Good for quick gesture bases when you don’t need Procreate’s full feature set.

📌 NOTE: For digital artists: always keep your base drawing on its own layer and set it to blue or another non-black color. This makes it visually distinct from your detail layers and prevents confusion during the refinement stage. It’s standard practice in professional character design.
Base Drawing Approaches for Different Subjects

The same core principles apply across subjects, but the specific base shapes change. Here’s how to adapt the method:
Portrait / Head Base
The Loomis Method — developed by illustrator Andrew Loomis in his 1943 book ‘Drawing the Head and Hands’ — is still the standard head base used in illustration schools and character design studios.

Start with a sphere for the cranium, slice off the side plane to create the face plane, add the brow line and center line, then divide the face into equal thirds (hairline to brow, brow to nose base, nose to chin). This single-base method solves the most common portrait problem: the face being too flat or too wide.
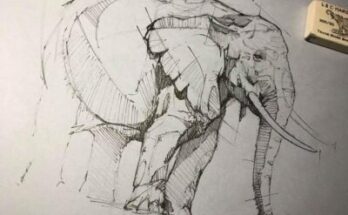
Animal Base
Animals work on the same mass-based principle as human figures, but the proportions and mass arrangements differ by species.

For quadrupeds (dogs, cats, horses), the base consists of an oval for the ribcage, a smaller oval for the pelvis, a sphere for the head, a tube for the neck, and four cylinders for the legs.

The key: the shoulder and hip ovals tilt differently depending on the animal’s stance. A trotting dog has tilted masses; a sitting dog has nearly level masses.
Object / Environment Base
Objects use perspective-based box construction as their base. Draw a horizon line, establish your vanishing points, then block in the main form as a simple box in perspective.


Details — curves, cutouts, surface features — all get added to that box structure. This is the foundation of industrial design sketching and is taught in every automotive and product design program.


✏️ PRO TIP: For anime and manga-style characters, the base approach is slightly different: start with the face shape (inverted triangle or heart shape) and place the eyes first, then build the head around them. The body base follows the same block method, but proportions use stylized 7–8 head measurements for standing figures in shonen/shojo styles.
How to Practice Base Drawing Effectively (Not Just More)
More practice isn’t automatically better practice. Most beginners plateau because they practice the same comfortable subjects at the same comfortable level. Here’s a structured approach that actually builds skill:

The 10-Minute Daily Base Routine
Minutes 1–5: Five 60-second gesture drawings on Line of Action or Quickposes.com. Capture only the gesture line and main masses — no hands, no faces, no detail. Pure proportion and movement.
Minutes 6–8: One single base drawing from reference, applying the 7-step method. Use a pose from your gesture practice or from a photo reference.
Minutes 9–10: Compare your base to the reference. Measure one element you got wrong (head size, leg length, torso proportion) with a ruler or screen tool. Write the correct measurement in the margin. This feedback loop is what turns repetition into learning.
This 10-minute routine, done consistently, produces faster visible improvement than irregular 2-hour sessions. Psychologist Anders Ericsson’s research on deliberate practice shows that focused short sessions with immediate feedback outperform unfocused long sessions — in any skill domain.
The Reference Problem
Drawing from imagination is harder than drawing from reference, but most beginners avoid reference because they feel it’s ‘cheating.’ It’s not. Every professional artist uses reference constantly. The goal is to understand structure deeply enough that reference becomes a check rather than a crutch — but you get there through reference, not by avoiding it.


Use real photo reference (not other illustrations) whenever possible. Sites like Unsplash, ShotDeck, and SketchDaily on Reddit provide free high-quality pose references. For anatomy specifically, Bridgman’s Complete Guide to Drawing from Life (~$20 on Amazon) is the most cited anatomy reference in illustration and character design programs.
Common Base Drawing Mistakes (And How to Fix Each One)
Mistake 1: Pressing too hard in the base stage. Dark baselines are impossible to erase cleanly and create a visual ‘noise’ that makes the refinement stage harder. Always use the lightest touch possible for the base. If you can read your baselines in normal lighting, they’re already too dark.

Mistake 2: Adding detail before the structure is right. Drawing eyes, fingers, fabric wrinkles, and hair before the figure’s proportions are confirmed is the single most common time-wasting error. Finish the complete base first. Every time. No exceptions.
Mistake 3: Using the same base for every pose. A standing straight-on figure needs a different base emphasis than a twisting dynamic pose. The gesture line and mass tilt have to match the actual pose — a stiff upright base applied to a leaping figure produces a stiff-looking leaping figure.
Mistake 4: Skipping the contrapposto principle. In a natural standing pose, the shoulder and hip lines tilt in opposite directions. Draw both straight and horizontal lines, and the figure immediately looks like a zombie. Even in a simple standing pose, introduce at least a 5–10 degree tilt difference between them.
Mistake 5: Not erasing the base. Once your final lines are down, the base should disappear. Beginners often skip this step, leaving a muddy, layered mess of lines. Erase (or hide the layer) once you’ve committed to the refined sketch — the cleaner the final line, the stronger the drawing reads.
Frequently Asked Questions About Base Drawing
Q: What is a base drawing in art?
A base drawing is a simplified structural sketch used as the foundation for more detailed artwork. It uses basic shapes — spheres, cylinders, boxes, and lines — to establish correct proportions and pose before any details are added. Think of it as the skeleton that everything else gets built on top of. It’s used in figure drawing, character design, animation, illustration, and concept art.
Q: How do I start a base drawing for a figure?
Start with a gesture line — a single flowing line from the top of the head through the spine. Then block in the three main masses: head (oval), torso (box or barrel), and pelvis (wedge). Add the shoulder and hip lines, then attach limbs as simple cylinders, marking joints as small circles. Don’t draw hands or faces yet. The complete base takes 3–5 minutes and happens before any detail work.
Q: How many heads tall is a normal figure in base drawing?
A standard realistic adult figure is 7 to 7.5 heads tall. Fashion illustrations typically use 8–9 heads for an elongated, elegant look. Heroic/comic book figures use 8–8.5 heads. Chibi and cartoon characters range from 2 to 4 heads. Always establish this ratio before starting your benchmark — mark the total height, then divide it into head-sized units as your proportion guide.
Q: What pencil should I use for base drawing?
Use a 2H or H pencil for base lines — light enough to erase cleanly, dark enough to see clearly. Avoid softer grades (2B, 4B) for the base stage; they smear and make erasing messy. The Staedtler Mars Lumograph H (~$8 for a 12-pack) is a reliable standard. Pair it with a kneaded eraser (Faber-Castell, ~$3) for lightening lines without fully removing them.
Q: What is the difference between a base drawing and a sketch?
A base drawing is purely structural — it uses simplified shapes to establish proportions and pose. A sketch is a more developed preliminary drawing that may include details, textures, and expressive line work. The base drawing comes first, and the sketch builds on top of it. Many artists combine both into a single ‘rough sketch’ phase, but thinking of them as separate stages helps prevent the common error of adding detail before structure is confirmed.
Q: Can I use a wooden mannequin as a base drawing reference?
Yes — wooden drawing mannequins are designed exactly for this. A 30cm jointed mannequin (like the Mont Marte model, ~$15–$18) lets you set a pose and trace the basic masses directly, giving you an instant base. The limitation is that mannequins are less useful for extreme foreshortening, seated poses, or poses with significant twists. For those, a photo reference or a 3D app like Clip Studio Paint’s built-in mannequin is more accurate.
Q: How do I practice base drawing actually to improve?
The most effective practice: 5 timed gesture drawings (60 seconds each) at line-of-action.com as a daily warm-up, then one measured base drawing from reference, where you actually compare your proportions to the reference afterward. This feedback loop — draw, compare, identify the error, note it — is what separates improvement from repetition. Ten consistent minutes daily beats irregular two-hour sessions.
Your Base Drawing Is Your Competitive Advantage
Here’s something most drawing tutorials won’t tell you: the artists who improve fastest aren’t the ones with the most talent or the best tools. They’re the ones who build a reliable process — and base drawing is the foundation of every reliable drawing process.


When you have a solid base, everything downstream gets easier. Proportions hold. Poses feel natural. Details have somewhere logical to sit. The drawing doesn’t fall apart when you add color or shading. You stop erasing and starting over from scratch halfway through every piece.


The Loomis method, the block mannequin approach, the 7-step figure base — these techniques are in use at Pixar, at manga studios in Japan, in illustration programs at RISD and the School of Visual Arts, and in the sketchbooks of working concept artists around the world. Not because they’re complicated, but because they work.


Start with the gesture line. Block in the masses. Check your proportions before you add a single detail. Do that consistently for 30 days and compare the drawings at the end of month one to the drawings at the start. The difference will be obvious — and it will keep compounding.