The Intricate Process of Fossilization: A Comprehensive Step-by-Step Tutorial on How Organisms Become Fossils

Description: Understanding Fossilization Through Illustrated Stages
Fossilization is a remarkable geological and biological phenomenon that transforms the remains of once-living organisms into enduring records preserved in the Earth’s rock layers. This process, which occurs over millions of years, provides invaluable insights into the history of life on our planet, from ancient dinosaurs to marine creatures. In this detailed tutorial, we will explore the step-by-step mechanisms of fossilization, drawing from a classic illustrative diagram that depicts the journey from an organism’s death to its preservation as a fossil. This guide is designed for students, educators, paleontology enthusiasts, and anyone curious about Earth’s ancient past. We’ll break it down into phases, explain the scientific principles involved, and highlight real-world examples to make the concepts accessible and engaging.
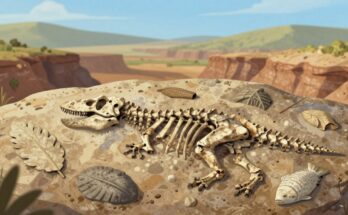
Whether you’re a beginner in Earth sciences or seeking to deepen your knowledge, follow along as we dissect each stage. Note that fossilization is rare—most organisms decompose without leaving traces—but when conditions align, the results are spectacular. The diagram we’ll reference features a Stegosaurus as the primary example, alongside other organisms like ammonites and fish, to illustrate various fossil types such as molds, casts, permineralization, and bacterial preservation.
Step 1: Death of the Organism
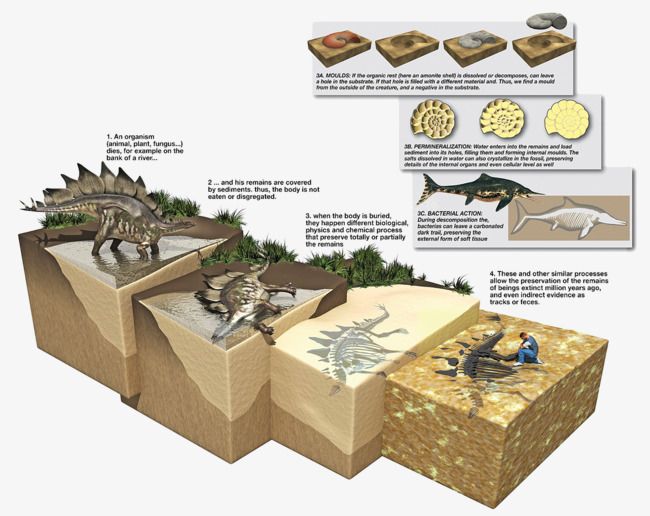
The fossilization process begins with the death of an organism. In the illustrative diagram, a Stegosaurus—a herbivorous dinosaur from the Late Jurassic period—is shown dying on the bank of a river. This stage is critical because rapid burial is often necessary to prevent complete decomposition.
- Key Factors: For fossilization to occur, the organism must die in an environment conducive to preservation, such as near water bodies (rivers, lakes, or oceans) where sediments can quickly cover the remains. Scavengers, weathering, and bacterial decay typically break down soft tissues within days or weeks, so isolation from these elements is essential.
- Scientific Insight: Death can result from natural causes like predation, disease, or environmental events (e.g., floods or volcanic eruptions). In aquatic settings, sinking to the bottom minimizes oxygen exposure, slowing decay.
- Tutorial Tip: To visualize this, imagine a modern analogy: a fish dying in a muddy pond. If not buried swiftly, it would be consumed or decomposed. In paleontology labs, simulate this by observing organic matter in controlled burial experiments using clay or sand.
- Example from Diagram: The Stegosaurus collapses near water, setting the stage for sediment coverage. This highlights why many fossils are found in sedimentary rock formations like river deltas or ocean floors.
Step 2: Coverage and Burial of Remains
Once the organism dies, its remains must be covered by sediments to protect them from further decay and erosion. The diagram shows the Stegosaurus being gradually buried under layers of mud, sand, or silt.
- Key Factors: Sediments act as a barrier against oxygen, scavengers, and physical weathering. Over time, additional layers accumulate, compressing the lower ones into rock through lithification (the process of turning sediment into stone).
- Scientific Insight: This stage involves physical processes like sedimentation rates, which vary by environment—faster in floodplains or deltas. Chemical factors, such as low pH or anoxic (oxygen-poor) conditions, can further inhibit bacterial activity.
- Tutorial Tip: Conduct a simple home experiment: Place a small organic item (like a leaf or bone fragment) in a jar, cover it with layers of sand and water, and observe over weeks how it resists decay compared to an exposed sample. In professional settings, geologists use core samples from drill sites to study burial depths.
- Example from Diagram: The remains are depicted as being covered with sediment, preventing disintegration. If not buried, the body would be scattered or destroyed, as noted in the caption: “When the body is buried, they have different biological, physical, and chemical processes.”
Step 3: Bacterial Action and Initial Preservation
As burial progresses, bacterial processes play a dual role: they can cause decay but also aid in preservation under certain conditions. The diagram illustrates “Bacterial Action” with a fish example, where dark minerals preserve the bone structure.
- Key Factors: Anaerobic bacteria (those thriving without oxygen) break down soft tissues but can leave behind carbon films or mineral deposits. This stage often results in carbonization, where volatile compounds escape, leaving a thin carbon residue.
- Scientific Insight: Bacteria facilitate mineralization by altering the chemical environment, such as reducing iron or sulfur compounds. In some cases, like in the Burgess Shale fossils, rapid bacterial sealing creates exceptional preservation of soft parts.
- Tutorial Tip: Explore this through microbiology kits: Culture bacteria on organic samples in oxygen-free environments to see decomposition patterns. Paleontologists use CT scans on fossils to detect bacterial traces, revealing microstructures.
- Example from Diagram: A mosasaur-like reptile is shown undergoing bacterial action, preserving fine details. The caption explains: “Bacterial action: Dark preserving the bone structure from some basic altered.”
Step 4: Permineralization (Petrification)
This is one of the most common fossilization methods, where minerals infiltrate the porous remains, replacing or filling organic material. The diagram labels this as “Permineralization,” showing water entering bones and depositing minerals.
- Key Factors: Groundwater rich in minerals (e.g., silica, calcium carbonate, or iron) seeps into bones, shells, or wood. Over time, the original material may dissolve, but the mineral infill maintains the structure.
- Scientific Insight: This process, also called petrification, occurs via precipitation from supersaturated solutions. It’s why petrified wood retains tree rings or dinosaur bones show cellular details under microscopes.
- Tutorial Tip: Replicate this in a lab by soaking porous materials (like sponges) in mineral solutions and allowing evaporation. Use a microscope to examine cross-sections of real petrified samples, available from educational suppliers.
- Example from Diagram: The Stegosaurus skeleton is permineralized, with captions noting: “Permineralization: Water enters the bone and mineral material is deposited. The details of the internal organs even could be seen as well.” This stage transforms the buried remains into durable stone replicas.
Step 5: Formation of Molds and Casts
For organisms with hard parts like shells, dissolution can create molds, which may later fill to form casts. The diagram features an ammonite example, showing the creation of an internal mold and cast.
- Key Factors: After burial, acidic groundwater dissolves the original shell, leaving a void (mold) in the surrounding rock. If sediments fill this void, a cast forms, replicating the shape.
- Scientific Insight: Molds preserve external or internal features, while casts are three-dimensional replicas. This is common in mollusks and arthropods, aiding in species identification.
- Tutorial Tip: Create your own mold and cast: Press a shell into clay (mold), remove it, then fill with plaster (cast). Compare to fossil collections to identify types like external molds (impressions of the outer surface).
- Example from Diagram: An ammonite shell dissolves, forming a mold in the sediment: “Mold: If the organism had a hard shell like an ammonite is dissolved, these can have a mold of the creature, a cast in the sediment.” Insets show pebble-like casts and spiral molds.
Step 6: Additional Preservation Processes and Indirect Evidence
Beyond direct body fossils, the process can preserve traces like footprints or burrows. The diagram concludes with notes on these and other similar processes.
- Key Factors: Trace fossils (ichnofossils) record behavior rather than anatomy, such as dinosaur tracks. Exceptional preservation (e.g., in amber or tar pits) captures soft tissues.
- Scientific Insight: These provide behavioral data, like migration patterns. Factors like rapid entombment in resin or anoxic lakes enable rare soft-tissue fossils.
- Tutorial Tip: Map out trace fossils by creating imprints in wet sand and hardening them. Visit museums or virtual tours of sites like the La Brea Tar Pits to see real examples.
- Example from Diagram: The final panel shows a person examining a fossil slab, with captions: “These and other similar processes allow the preservation of the remains and even indirect evidence as tracks or icons.”
Conclusion: The Significance of Fossils in Science
By following these steps—from death and burial to permineralization and mold formation—you now have a tutorial-level understanding of fossilization. This process not only preserves life’s history but also informs evolutionary biology, climate reconstruction, and even oil exploration (as fossils indicate ancient environments). Remember, the diagram simplifies a complex, variable process; actual fossils may combine multiple methods.
For further study, explore resources like the Smithsonian’s paleontology exhibits or books such as “The Fossil Book” by Donald Prothero. If you’re inspired to start collecting, begin with safe, legal sites and always document findings. Fossils bridge the gap between past and present—happy exploring!