Step-by-Step Tutorial: How to Draw a Charming Bumblebee in Watercolor Style

Description:
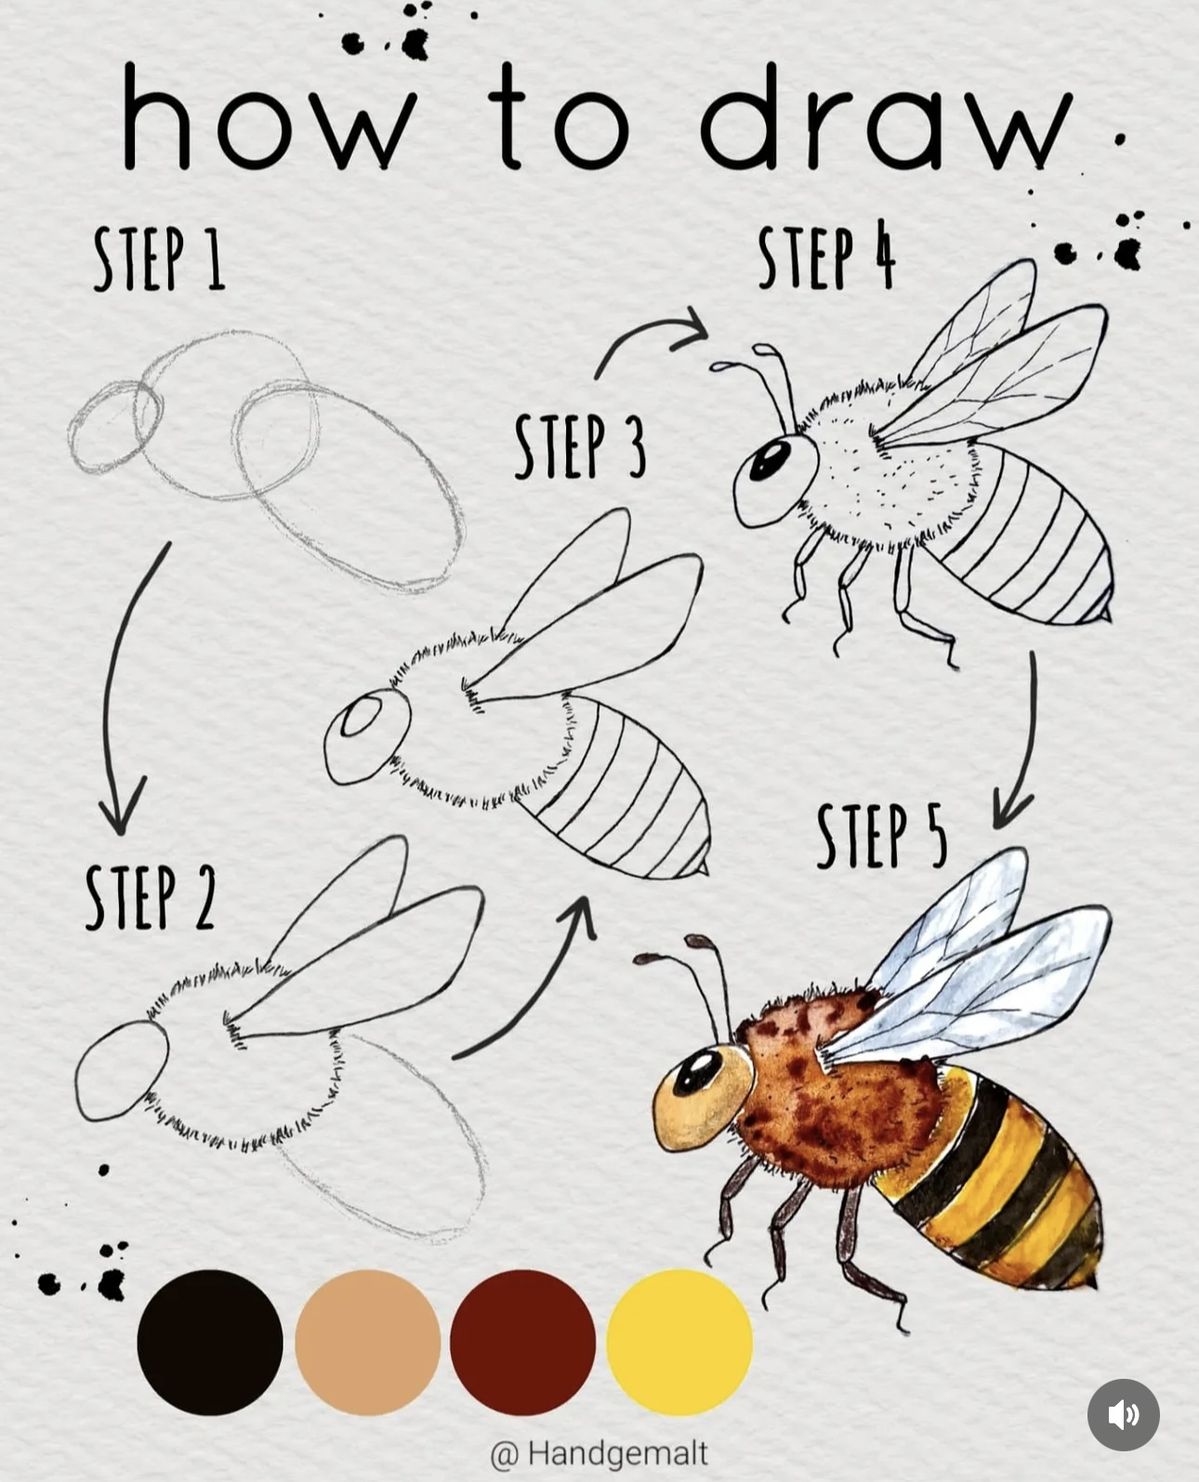
Discover the joy of illustrating one of nature’s most beloved pollinators with this detailed, beginner-friendly step-by-step tutorial on drawing a cute bumblebee. Inspired by the whimsical, hand-drawn aesthetic of artist @Handgdemalt, this guide transforms simple shapes into a vibrant, textured bumblebee complete with fuzzy details, striped body, delicate wings, and a cheerful expression. Perfect for artists of all levels—whether you’re sketching with pencil, adding watercolor washes, or exploring digital tools like Procreate—this tutorial emphasizes easy-to-follow stages, helpful guiding arrows, and a thoughtful color palette to bring your bee to life.
Bumblebees symbolize hard work, community, and the sweetness of spring, making them an inspiring subject for both relaxing doodles and polished artwork. By breaking the process into clear, progressive steps, you’ll build confidence in shape construction, texture application, and shading while capturing the bee’s endearing personality. Follow along to create your own adorable bee illustration that could adorn greeting cards, journal pages, nursery decor, or social media posts.
Materials You’ll Need:
To achieve the soft, painterly look shown in the tutorial image, prepare these supplies:
- Sketching pencil (HB or 2B for light guidelines) and eraser.
- Fine liner pen (optional for clean outlines).
- Watercolor paints or colored pencils/markers in black, warm browns (light tan to deep reddish-brown), bright yellow, and white for highlights.
- Watercolor paper or mixed-media sketchbook (cold-press for texture).
- Small round brush for washes, blending stumps or tortillons for fuzzy effects.
- Reference photo of a real bumblebee (optional but helpful for proportion and fur details).
Work lightly at first to allow adjustments, and don’t hesitate to practice each step on scrap paper. Let’s buzz into the tutorial!
Step 1: Basic Shapes – Laying the Foundation
Start with simple overlapping ovals and circles to establish the bee’s overall form. Draw a large oval for the thorax (middle section) and a slightly larger, rounded oval for the abdomen (rear body). Add a smaller circle overlapping the front for the head. These basic geometric shapes capture the bee’s plump, segmented body without overwhelming detail. Use light, loose strokes—precision comes later. This stage focuses on proportion: the abdomen should be the largest part, with the head smaller and centered.
Step 2: Add Wings and Refine the Body
Attach two pairs of wings to the thorax—sketch them as elongated, teardrop shapes extending outward and slightly upward. The forewings are larger and more prominent, while the hindwings are smaller and tucked beneath. Curve the lines gently to suggest transparency and movement. At this point, refine the body contours: smooth the junctions between head, thorax, and abdomen, and add a subtle taper to the abdomen for a natural, bulbous look. Erase overlapping guidelines as needed to keep the sketch clean.
Step 3: Detail the Head, Antennae, and Texture
Focus on the face: draw a large, expressive eye (a simple circle with a highlight dot for sparkle), and add two curved antennae sprouting from the top of the head, ending in small knobs. Begin building fuzziness on the thorax and head by adding short, scribbly lines radiating outward—this creates the signature fuzzy appearance of bumblebees. For the abdomen, lightly sketch horizontal stripes as placeholders for the classic black-and-yellow banding.
Step 4: Define Stripes, Legs, and Wings
Outline the characteristic stripes: fill the abdomen with alternating bands of yellow and black/brown, curving them slightly to follow the body’s roundness. Add tiny legs—three on each side—emerging from the thorax as thin, jointed lines with small feet. Detail the wings with vein lines (gentle curves and cross-hatchings) to imply delicate membrane. Enhance the fuzzy texture with more layered scribbles, especially around the thorax and head, using a darker tone for depth.
Step 5: Final Coloring, Shading, and Details
Bring your bumblebee to vibrant life with color! Apply warm yellow to the striped bands, deep black or dark brown to the alternating sections, legs, antennae, and eye. Use lighter tans and reddish-browns for the fuzzy areas on the thorax and head to add warmth and realism. Add subtle shading: darker tones under the body and wings for volume, and soft highlights on the top curves to suggest light reflection. For a watercolor effect, layer thin washes, letting colors bleed naturally for softness, then add fine speckles or dots for extra texture and personality. Finish with white accents on the wings and eye for a glossy, lively shine.
Color Palette Reference:
- Black — Deep shadows, stripes, legs, antennae.
- Light Tan/Beige — Base for fuzzy thorax and head.
- Reddish-Brown — Deeper fur tones and warmth.
- Bright Yellow — Signature stripes and sunny highlights.
Congratulations—you’ve completed a delightful bumblebee illustration! This versatile drawing can be scaled up for posters, simplified for kids’ crafts, or customized with different expressions and poses. Experiment by adding flowers, honeycombs, or a flying motion for more dynamic scenes. Practice regularly to develop your own style, and tag your finished pieces with #HowToDrawABee or share them in art communities for inspiration. Bees play a vital role in our ecosystem, so let your artwork celebrate these tiny heroes. Happy creating—may your sketches be as sweet as honey! 🐝