Step-by-Step Tutorial: Mastering the Art of Drawing a Realistic Ladybug

Description:
Welcome to this comprehensive, beginner-friendly tutorial on drawing a realistic ladybug, inspired by the whimsical yet precise style of artist Ranu. Whether you’re an aspiring illustrator, a hobbyist looking to hone your sketching skills, or a parent guiding a young artist, this guide breaks down the process into six manageable steps. Ladybugs, with their vibrant spotted shells and delicate features, symbolize good luck in many cultures and make for an engaging subject that combines simple shapes with intricate detailing. By the end of this tutorial, you’ll have the confidence to create your own charming ladybug artwork using basic tools like a pencil, eraser, and paper. We’ll emphasize building from foundational forms to refined finishes, ensuring your drawing captures both anatomical accuracy and artistic flair.
Materials You’ll Need:
Before we dive in, gather these essentials to make your drawing experience smooth and enjoyable:
- A high-quality sketching pencil (HB or 2B for light lines, 4B for shading).
- An eraser (kneaded eraser preferred for precise corrections).
- Smooth drawing paper (at least 100gsm to handle shading without tearing).
- Optional: Fine-tip pens for outlining, colored pencils for adding red and black hues, and blending tools like tortillons for smooth gradients.
Now, let’s proceed step by step, starting with basic outlines and progressing to detailed enhancements. Remember to work lightly in the initial stages to allow for easy adjustments, and observe real ladybug references (such as photos from nature guides) to inspire your unique variations.
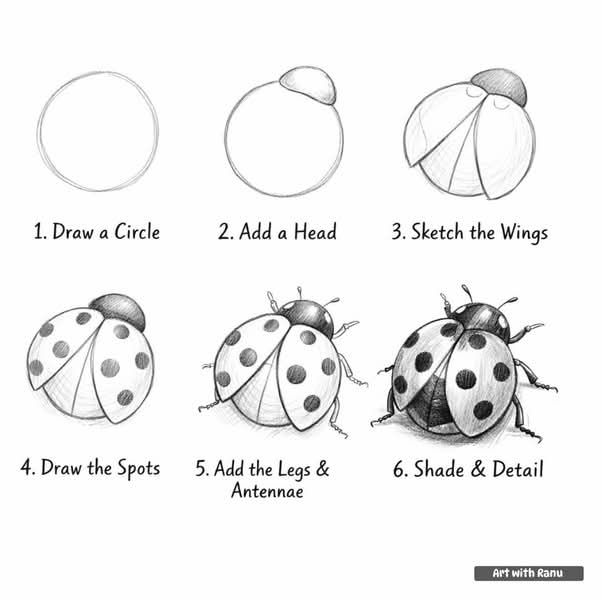
Step 1: Draw a Circle – Establishing the Body Foundation
Begin by lightly sketching a simple circle in the center of your paper. This circle will form the core of the ladybug’s body, specifically the rounded abdomen that gives it its iconic dome shape. Aim for a circle that’s approximately 2-3 inches in diameter, depending on your desired final size—use a compass if you prefer perfect symmetry, or freehand it for a more organic feel. The key here is proportionality: ensure the circle is neither too elongated nor flattened, as this sets the stage for the ladybug’s balanced, compact form. If you’re new to drawing, practice a few circles on scrap paper to warm up your hand. This foundational shape mimics the ladybug’s exoskeleton, providing a sturdy base for layering additional elements.
Step 2: Add a Head – Defining the Front Structure
Next, attach a smaller semi-circle or oval to the top of your main circle to represent the head. Position it slightly overlapping the main body, tilted forward to suggest the ladybug’s alert posture. The head should be about one-third the size of the body circle for realistic proportions—ladybugs have compact heads with pronounced mandibles. Lightly sketch two small lines extending from the head’s top for the antennae placeholders; these will be refined later. At this stage, focus on alignment: the head should seamlessly integrate with the body, creating a smooth transition that avoids sharp angles. Erase any overlapping lines from the initial circle to clean up the form. This step introduces asymmetry and personality, transforming your basic shape into a recognizable insect silhouette.
Step 3: Sketch the Wings – Outlining the Elytra
Now, add the wings, which are the hardened forewings (elytra) that protect the ladybug’s delicate hindwings. From the base of the head, draw a curved line down the center of the body circle to divide it into two symmetrical halves—this represents the seam where the wings meet. Then, sketch the wing shapes: gently curve the outer edges outward from the central line, following the body’s contour but flaring slightly at the bottom for a natural, rounded appearance. The wings should cover most of the abdomen, leaving a small exposed area at the rear. Pay attention to the subtle taper; ladybugs’ wings aren’t perfectly circular but have a soft, teardrop-like extension. Use light, flowing strokes to capture the organic curves, and if needed, reference the initial circle to maintain proportion. This step brings dynamism to your drawing, hinting at the ladybug’s potential for flight.
Step 4: Add the Spots – Incorporating Iconic Patterns
With the basic structure in place, it’s time to add the distinctive black spots that make ladybugs so visually striking. Depending on the species (like the common seven-spotted ladybug), place 3-7 circular or oval spots on each wing half. Start by marking small, evenly spaced dots along the wings—position them asymmetrically for realism, as natural spots vary in size and placement. The largest spots are typically near the center, tapering smaller toward the edges. Use your pencil to fill them in lightly, ensuring they don’t overlap the central seam. For added depth, vary the spot sizes: some can be perfect circles, others slightly irregular to mimic texture. This patterning not only enhances visual interest but also teaches principles of symmetry and negative space in composition. If you’re coloring later, remember these spots will contrast beautifully against a red background.
Step 5: Add the Legs & Antennae – Detailing the Appendages
Refine the finer features by adding the six legs and antennae. Ladybugs have jointed legs: three on each side, emerging from the underside of the body. Sketch them as thin, segmented lines—start with short strokes from the body’s edge, bending at the “knees” for a crawling pose. Position the front legs near the head, middle ones centrally, and rear ones toward the abdomen’s end; angle them slightly outward for stability. For the antennae, extend the placeholders from Step 2 into curved, segmented lines about the length of the head, ending in small bulbs. Include tiny feet or claws at the leg tips for authenticity. This step requires patience—use an eraser to refine any wobbly lines—and emphasizes observation: study how legs attach at thoracic joints for anatomical precision. These elements add life and movement, turning your static shape into a poised creature.
Step 6: Shade & Detail – Bringing It to Life with Texture and Depth
Finally, elevate your drawing with shading and intricate details to achieve a three-dimensional, realistic effect. Begin by outlining the entire figure with a darker pencil or pen for crisp edges. Then, apply shading: use hatching or cross-hatching techniques on the underside of the body and wings to create shadows, suggesting roundness and volume. Darken the spots fully, and add subtle gradients on the wings—lighter at the top (highlighting the dome) and deeper at the bottom for grounding. Texture the antennae and legs with fine lines to imply segmentation, and add tiny highlights (using your eraser) on the spots and head for a glossy sheen, as if reflecting light. If coloring, apply red to the wings (leaving spots black), black to the head and legs, and perhaps a white highlight for polish. Experiment with blending to soften transitions, and step back to assess balance. This final polish transforms your sketch into a professional-grade illustration, rewarding your attention to light, shadow, and detail.
Congratulations! You’ve now completed a detailed ladybug drawing that captures both simplicity and sophistication. Practice this tutorial multiple times, varying poses or adding backgrounds like leaves for context. Share your creations on social media or in art communities for feedback, and explore advanced variations, such as drawing ladybugs in flight or different species. If you’d like printable templates or video demonstrations, check resources from artists like Ranu for further inspiration. Happy drawing—may your artistic journey be as delightful as spotting a ladybug in the garden!


