Mastering the Anatomy of a Smile: Advanced Construction Schemes for Realistic Mouth and Jaw Drawing (Pencil Tutorial)

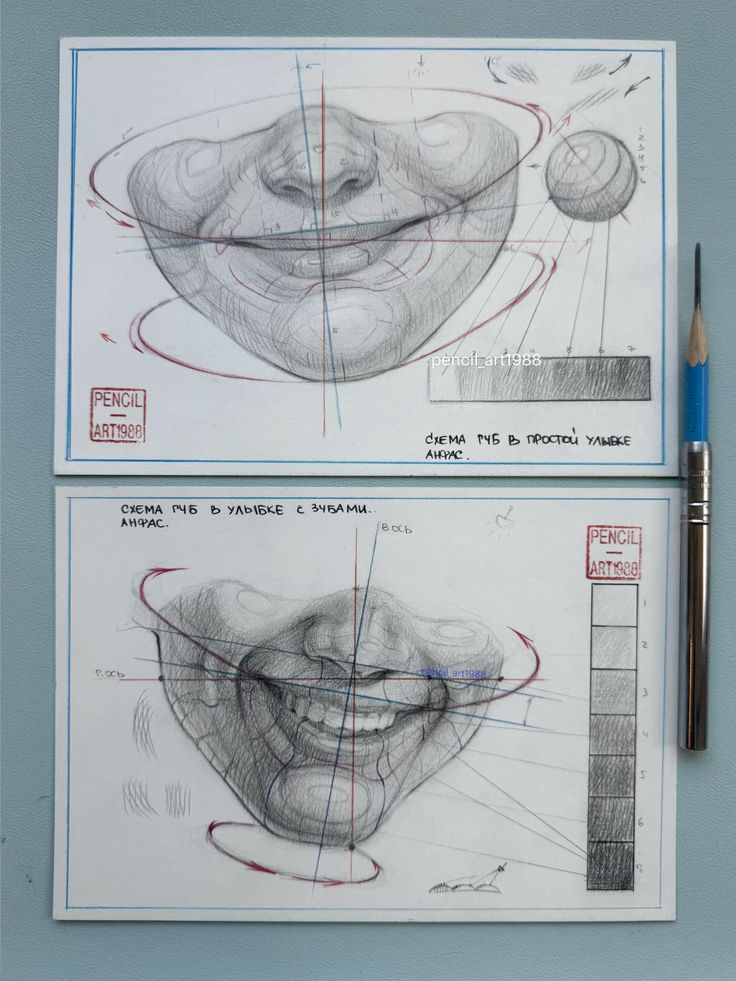
This in-depth pencil drawing tutorial focuses on the anatomical construction of the human smile, emphasizing the lower jaw (mandible), teeth visibility, and perspective-aware form. These detailed studies showcase professional-level construction techniques for drawing both a simple closed smile (without exposed teeth) and an open, toothy smile, using curved perspective guidelines, orbital arcs, and precise proportion lines to capture the three-dimensional structure of the lower face.
Created by the talented artist pencil_art988, these schematic drawings treat the mouth and chin as a dynamic, spherical form rather than a flat plane. Red and blue construction lines represent major perspective axes, while sweeping red arcs illustrate the curvature of the jaw and cheek muscles (primarily the zygomaticus major pulling the mouth corners upward). Numbers and labels guide proportional divisions, helping artists maintain accuracy even in foreshortened or angled views.
Ideal for portrait artists, character designers, comic illustrators, and anyone seeking to elevate their facial expressions from generic to anatomically convincing. This method bridges classical anatomy (inspired by Loomis, Hogarth, and Vilppu) with modern perspective application, ensuring smiles look natural, joyful, and structurally sound from any angle.
Tools and Materials Used in the Studies
- Pencils: Graphite range (likely HB–6B for light construction to dark shading)
- Paper: Smooth drawing sheet taped to a backing board
- Additional Aids: Ruler for straight axes, eraser for clean corrections, blue pencil for initial guidelines, red pencil/marker for emphasis on curves
- Optional: Compass or French curve for perfect arcs
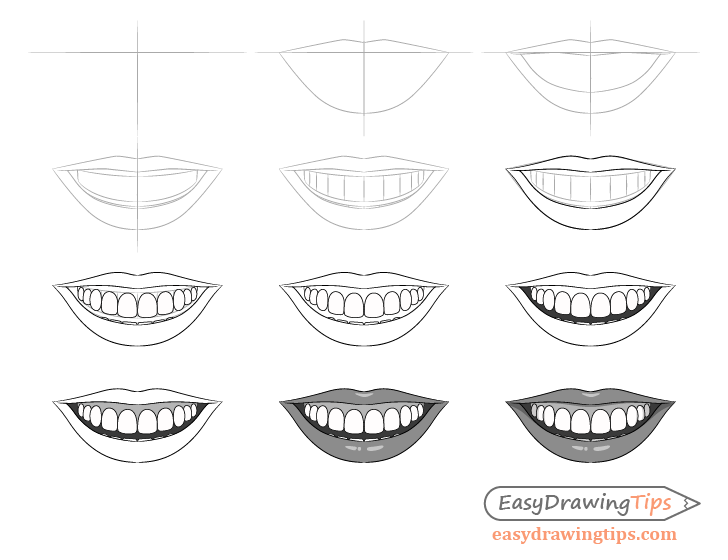
Step-by-Step Breakdown of the Construction Method
-
Establish the Spherical Foundation The lower face is conceptualized as part of a sphere (the cranial base) combined with a cylindrical or horseshoe-shaped jaw. Start by sketching a large oval or circular base representing the head’s curvature. Draw the central vertical axis (blue line) for symmetry and the horizontal eye-level line (if including the full face). In both sketches, notice the prominent vertical centerline dividing the mouth evenly—this is crucial for maintaining symmetry in smiles.
(Here are similar reference examples showing the curved construction of smiling mouths:)

-
Plot the Major Axes and Perspective Lines Introduce the primary perspective lines:
- Vertical midline (blue)
- Horizontal mouth level (red/blue intersection)
- Diagonal foreshortening lines converging toward implied vanishing points These ensure the mouth wraps correctly around the spherical form rather than appearing flat.
-
Draw the Sweeping Curved Arcs (Orbital Paths) The signature feature of these studies is the bold red arcs that trace the path of the jaw and cheek elevation during smiling.
- For the simple smile (closed lips): Gentle upward curves show subtle muscle pull without exposing teeth.
- For the toothy smile: Wider, more pronounced arcs lift the corners dramatically, revealing the teeth row. These arcs represent the action of the zygomaticus muscles and orbicularis oris, while also following perspective rules (curving upward above eye level, downward below).
(Progressive construction with perspective arcs and teeth placement:)
- Construct the Jaw and Chin Form Sketch the mandible as a wide, rounded base that tapers toward the chin. Add contour lines to indicate volume and shadow planes. In the open smile, the lower jaw drops slightly, creating a visible separation between upper and lower teeth.
- Add Teeth and Interior Details (Toothy Smile Variant)
- Upper teeth form a gentle downward curve following the arc of the upper lip.
- Lower teeth appear smaller due to perspective and are partially hidden behind the lower lip.
- Use light hatching to suggest gum line, tooth separation, and subtle shadows inside the mouth. The numbered value scale (1–6) on the right serves as a shading guide, from lightest highlights to deepest shadows.
- Refine with Shading and Volume Apply cross-hatching and directional strokes to build form:
- Cheeks puff outward and upward during a genuine smile.
- Shadows fall under the lower lip and along the jaw’s underside.
- Highlights appear on the most forward planes (chin tip, lip peaks). Erase lightly to create soft transitions and emphasize the three-dimensional bulge of the smiling expression.
Key Anatomical Insights Highlighted
- The face is spherical, not flat—curved guidelines prevent the common “stretched” look in smiles.
- Perspective affects tooth size and alignment: Front teeth appear larger, back teeth recede and curve.
- Muscle dynamics: The zygomaticus major creates the upward pull; orbicularis oris controls lip shape.
- Expression authenticity: A real smile involves cheek rise, slight squinting of eyes (not shown here but implied), and overall face widening.
Practical Tips for Artists
- Practice these schemes from multiple angles (three-quarter, profile) to internalize the curvature.
- Use a mirror to study your own smile and compare muscle movement.
- Start loose with construction lines, then refine gradually—never commit to final outlines too early.
- Combine with full-head Loomis-style construction for complete portraits.
These exceptional studies by pencil_art988 demonstrate how thoughtful anatomical schematics can make even complex expressions like smiles feel effortless and believable. Whether you’re a beginner refining basics or an advanced artist seeking precision, incorporate these curved perspective methods into your workflow for more dynamic and lifelike facial art.
Try recreating these schemes yourself—what expression will you tackle next? Share your results and tag the original inspiration! Happy drawing!