Mastering Two-Point Perspective: A Comprehensive Tutorial for Artists in Drawings and Paintings

Introduction to Two-Point Perspective
Two-point perspective is a fundamental technique in visual arts that allows artists to create the illusion of depth and three-dimensionality on a two-dimensional surface. Unlike one-point perspective, which uses a single vanishing point for scenes viewed head-on (such as a straight road or hallway), two-point perspective employs two vanishing points on the horizon line. This method is particularly effective for depicting objects or structures at an angle, such as buildings viewed from a corner, cityscapes, or architectural elements where parallel lines recede in two different directions.
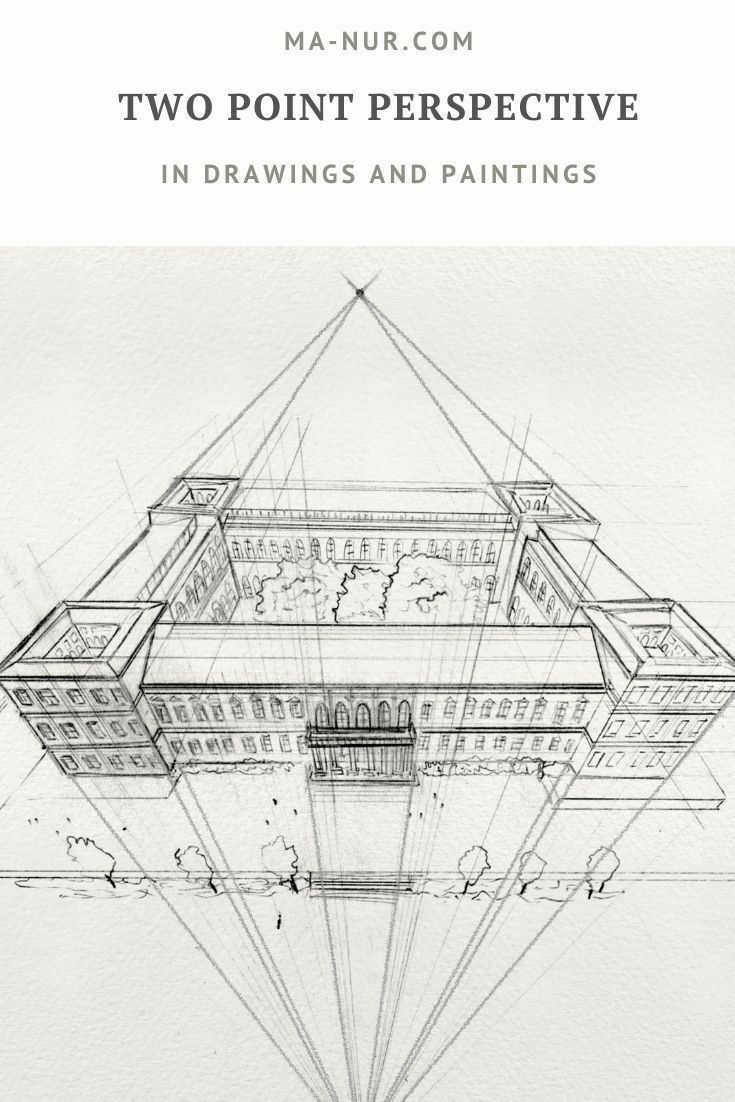
In this tutorial, we’ll explore two-point perspective in detail, drawing inspiration from the illustrative sketch provided—an elegant rendering of a grand architectural structure, possibly inspired by classical palaces like the Vatican or a similar edifice. The image, sourced from educational resources like MA-NUR.COM, showcases a building with symmetrical wings, a central courtyard, and surrounding foliage, all constructed using precise perspective lines converging toward two vanishing points. This example demonstrates how two-point perspective can transform a flat drawing into a convincing spatial representation, making it ideal for both beginners and advanced artists working in pencil sketches, ink drawings, or full-color paintings.
Whether you’re a hobbyist sketching urban scenes or a professional painter composing complex landscapes, mastering this technique will enhance your ability to convey realism and scale. We’ll break it down step by step, including tools needed, setup instructions, construction methods, common pitfalls, and advanced applications.
Tools and Materials You’ll Need
To follow along with this tutorial, gather the following essentials:
- Drawing Surface: High-quality sketch paper or canvas for paintings. Opt for smooth Bristol board for precise line work or textured watercolor paper for painted applications.
- Drawing Instruments: Graphite pencils (HB for light lines, 2B-4B for shading), a ruler or straightedge for accurate guidelines, and an eraser (kneaded eraser for subtle adjustments).
- Optional for Paintings: Acrylic, oil, or watercolor paints; brushes in various sizes; and a palette for mixing colors.
- Perspective Aids: A T-square or drafting triangle can help maintain straight lines, while grid paper might assist beginners in plotting points.
- Reference Image: Use the provided sketch as a model—note how the building’s horizontal lines converge toward two points above the structure, creating a dramatic upward view.
Ensure your workspace is well-lit and ergonomic to avoid strain during detailed work.
Step 1: Establishing the Horizon Line and Vanishing Points
The foundation of two-point perspective begins with the horizon line, which represents the viewer’s eye level. In the example image, the horizon line is implied high above the building, suggesting a low viewpoint (as if looking up at the structure), which adds grandeur and drama.
- Draw the Horizon Line: Lightly sketch a horizontal line across your paper. Its position determines the viewpoint—place it low for a “worm’s eye” view (looking up) or high for a “bird’s eye” view (looking down). In our reference sketch, it’s positioned above the building to emphasize height.
- Place the Vanishing Points: Mark two points on the horizon line, spaced apart based on the desired angle. These are where parallel lines will converge. In the image, the left vanishing point governs lines receding to the left, and the right one for lines to the right. For a balanced composition like this symmetrical building, space them equally distant from the center.
- Pro Tip: If your vanishing points fall off the page (common for wide angles), extend your paper or use tape to attach additional sheets for plotting.
This setup mimics how the human eye perceives parallel lines in reality, such as the sides of a building appearing to meet at infinity.
Step 2: Constructing the Vertical Lines and Basic Forms
With the horizon and vanishing points set, build the structure’s framework.
- Draw Vertical Lines: These remain perpendicular to the horizon and do not converge. In the sketch, the building’s corners and walls are defined by vertical lines, maintaining their upright orientation. Start with the nearest corner—a single vertical line representing the edge closest to the viewer.
- Connect to Vanishing Points: From the top and bottom of this vertical line, draw light guidelines to each vanishing point. These “orthogonals” form the receding sides. In the example, the building’s rooflines, balconies, and base all follow these paths, creating the illusion of depth.
- Define the Structure: Add additional vertical lines at intervals along the orthogonals to create windows, columns, or wings. In our reference, the symmetrical design features protruding towers on either side, with a recessed central courtyard. Measure proportions carefully—use a ruler to ensure even spacing.
For paintings, lightly outline these in pencil before applying base washes of color to establish shadows and highlights early.
Step 3: Adding Details and Refinements
Once the basic form is in place, layer in details to bring the scene to life.
- Incorporate Architectural Elements: Observe the image’s arched windows, balustrades, and roof details. Draw these by projecting lines from the vanishing points. For instance, the horizontal ledges on the building converge toward the points, ensuring consistency.
- Include Environmental Features: The sketch includes trees and ground elements in the foreground. These can follow the same perspective rules if they’re structural, but organic shapes like foliage allow for more freedom—use loose lines to suggest depth without strict convergence.
- Shading and Texture: To enhance realism, add value gradients. Areas farther from the viewer (near vanishing points) should appear lighter and less detailed, simulating atmospheric perspective. In the example, the building’s core is shaded more intensely, while distant parts fade subtly.
- Common Mistake to Avoid: Ensure all horizontal lines align with the vanishing points; misalignment can flatten the image. If working digitally, use software like Adobe Photoshop or Procreate with perspective grids for assistance.
For paintings, build layers: Start with underpainting in neutral tones, then add mid-tones, and finish with highlights and deep shadows to accentuate the perspective.
Step 4: Advanced Techniques and Variations
To elevate your work beyond basics, experiment with these enhancements:
- Curvilinear Elements: While two-point perspective excels at rectilinear forms, integrate curves (e.g., arches in the image) by plotting key points along perspective lines and connecting smoothly.
- Multiple Objects: In complex scenes, ensure all elements share the same vanishing points unless intentionally distorting for artistic effect.
- Lighting and Atmosphere: Use the perspective grid to guide light sources. In our example, implied overhead lighting casts subtle shadows, enhancing depth.
- Transition to Three-Point Perspective: For extreme angles (like the upward tilt here), introduce a third vanishing point vertically for even more dynamism—useful in skyscraper drawings or dramatic compositions.
- Digital vs. Traditional: Traditional artists might use vine charcoal for initial sketches, while digital tools offer undo functions for iterative refinements.
Practice by replicating the provided image, then adapt it—perhaps transform the building into a modern skyscraper or fantasy castle.
Common Pitfalls and Troubleshooting
- Distorted Proportions: If the structure looks “off,” double-check vanishing point spacing; too close creates exaggeration, too far results in flatness.
- Overcomplication: Start simple—draw a basic box in two-point perspective before adding details like the courtyard in the example.
- Erasure Marks: Work lightly to avoid paper damage; use a lightbox for clean transfers in paintings.
- Perspective in Color: In paintings, cooler colors recede (blues/grays for distant areas), while warmer tones advance, reinforcing the depth illusion.
Conclusion: Applying Two-Point Perspective in Your Art
Two-point perspective, as exemplified in this striking sketch of a palatial building with converging lines and balanced symmetry, is a versatile tool that bridges realism and creativity. By following these steps, you’ll not only replicate the image but also internalize the principles to apply in your original works—whether urban sketches, landscape paintings, or illustrative designs.
Remember, practice is key: Sketch daily, analyze real-world scenes (e.g., photograph a street corner and overlay perspective lines), and study masters like Canaletto or Edward Hopper who employed similar techniques. For further resources, explore sites like MA-NUR.COM for more tutorials. Share your progress in the comments below—what’s your next perspective project? Happy creating!