Fundamentals of Dynamic Sword Poses: Mastering Proportions, Gesture, and Grip for Action Illustration

Introduction
Creating convincing action illustrations—especially those involving weapons like swords—requires a strong foundation in both anatomy/proportions and dynamic gesture, followed by precise control over how the hands interact with the weapon. This tutorial breaks down essential principles using clear, annotated sketches that compare static vs. dynamic approaches and explore practical hand grips for two-handed sword handling (commonly seen in katana, longsword, or fantasy blade styles).
Whether you’re drawing manga/anime-style characters, comic book fight scenes, or realistic historical warriors, these concepts help avoid stiff, mannequin-like poses and instead produce energetic, believable motion. The original sketches highlight two core stages of study (#1: Proportions & Anatomy, #2: Gesture & Action) plus a detailed comparison of sword grips, making this an ideal reference for intermediate artists looking to level up their action figure drawing.
Key takeaways from these studies:
- Prioritize gesture and flow over perfect anatomical detail in early action sketches.
- Simplify forms aggressively during dynamic poses to emphasize direction and force.
- Choose grips based on the desired balance of power, control, and flexibility.
Below we explore each section step by step with practical advice you can apply immediately in your sketchbook or digital canvas.
Part 1: Building Strong Foundations – Proportions & Anatomy vs. Gesture & Action
Action poses fail when artists treat every drawing like a static anatomy study. The two side-by-side sketches demonstrate this contrast perfectly.
Sketch #1 – Studying Proportions + Anatomy (Blue Lines)
This kneeling pose shows a figure with accurate shoulder-to-hip ratios, correct limb lengths, and properly aligned joints. Blue construction lines emphasize:
- Vertical and horizontal alignment
- Weight distribution across the knees and hips
- Realistic muscle groups and bone structure
Common Issue Highlighted:
“Looks like posing rather than actual action”
Even though the anatomy is correct, the pose feels staged and lacks momentum. The figure appears frozen mid-photoshoot instead of mid-swing. This is a frequent trap when artists spend too much time refining details early.
When to Use This Approach:
- Character design sheets
- Reference for calm or deliberate stances
- Final clean-up pass after gesture is locked in
Sketch #2 – Studying Gesture/Action (Red Lines)
The same basic action (upward or diagonal sword swing) is now redrawn with explosive energy:
- Exaggerated angles and overlapping forms
- Simplified body mass into flowing, directional shapes
- Action lines showing force path through the blade and torso
- Sweeping leg movement and forward lean for weight shift
Key Principles Demonstrated:
- Intensify angles — Push hips, shoulders, and elbows into extreme but believable positions
- Simplify forms — Reduce the body to basic volumes and curves so the action reads clearly even at small size
- Don’t dwell on details — Skip muscles, fingers, facial features until the overall motion feels powerful
Practical Workflow Tip: Start every action pose with 30-second–2-minute gesture sketches using only big sweeping lines. Ignore accuracy at first. Only after the energy feels right should you overlay proportion checks. This order prevents “over-posed” stiffness.
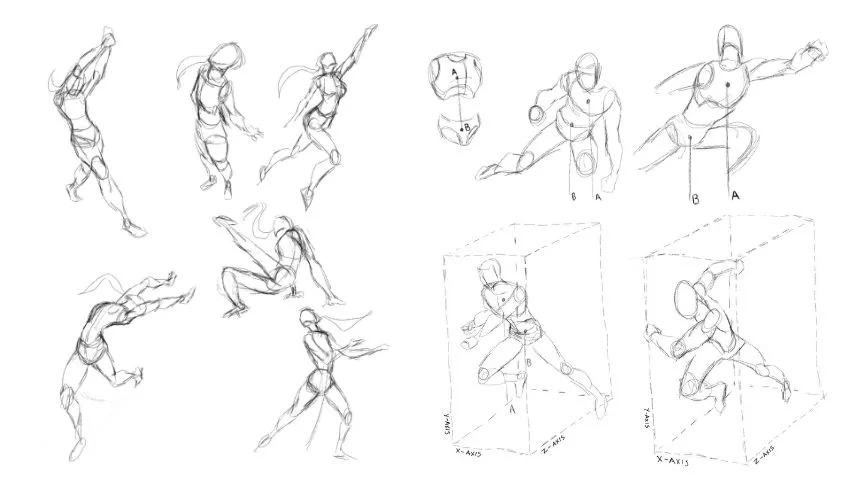

Part 2: Sword Grip Fundamentals – Choosing the Right Hold for Your Action
The lower section compares three two-handed grips on a Japanese-style sword (tsuka/katana handle), showing how subtle hand placement dramatically affects power, control, and blade behavior.
1. Half-Closed Grip
- Fingers wrapped tightly around the handle
- Thumb pressed firmly along the side or wrapped over
- Lower (right) hand close to the pommel, upper (left) hand higher up
Pros:
- Very strong / powerful Cons: − Less flexible / reduced range of motion − Can feel rigid during fast transitions
Best for: Heavy downward cuts, committed finishing blows, or moments requiring maximum force transmission.
2. Open Grip (Recommended for Most Dynamic Action)
- Fingers more relaxed and slightly spread
- Thumb position optional — can rest along the ridge for extra control or float slightly for fluidity
- Lower hand leads the motion, guiding the blade’s path
- Upper hand provides pivot and follow-through
Pros:
- Excellent control
- High flexibility / quick adjustments
- Natural whip-like action Cons: − Slightly less raw power than a locked grip
Best for: Fast combos, fluid iaijutsu-style draws, spinning cuts, or any sequence requiring mid-motion corrections.
Critical Note from Sketch:
“Lower hand leads blade”
This is one of the most important rules in two-handed sword art (both historical and stylized). The dominant lower hand sets direction and torque; the upper hand stabilizes and adds snap. Reversing this creates unnatural, weak-looking swings.
3. Incorrect / Too Stiff Grip (Marked with X)
- Overly tight fist-like clench
- Both hands squeezed equally hard
- No differentiation between leading and supporting roles
Result: Rigid, robotic motion. Blade appears “stuck” rather than slicing through space. Avoid this in dynamic illustrations.


Final Tips for Applying These Concepts in Your Artwork
- Gesture First, Anatomy Second — Always nail the flow and energy before refining muscle definition or exact proportions.
- Exaggerate for Clarity — In illustration (especially small panels or thumbnails), push angles 20–30% beyond real life so the action reads instantly.
- Grip = Storytelling — A relaxed open grip suggests skill and confidence; a locked half-closed grip shows brute force or desperation. Use hand position to convey character personality.
- Practice Drills:
- 30 quick gesture poses focusing only on sword arc and body twist
- Redraw the same action pose five times, each with a different grip intensity
- Trace real kenjutsu/HEMA footage, then exaggerate the lines
- Digital Tools Tip — Use perspective grids or 3D pose models (e.g., DesignDoll, Clip Studio 3D) to check proportions quickly, then turn them off and focus on gesture flow.
By combining explosive gesture with intentional grip choices, your sword-wielding characters will feel alive, powerful, and believable—even in a single static illustration.
Happy drawing, and keep pushing those dynamic angles!
— Inspired by studies by miyuli