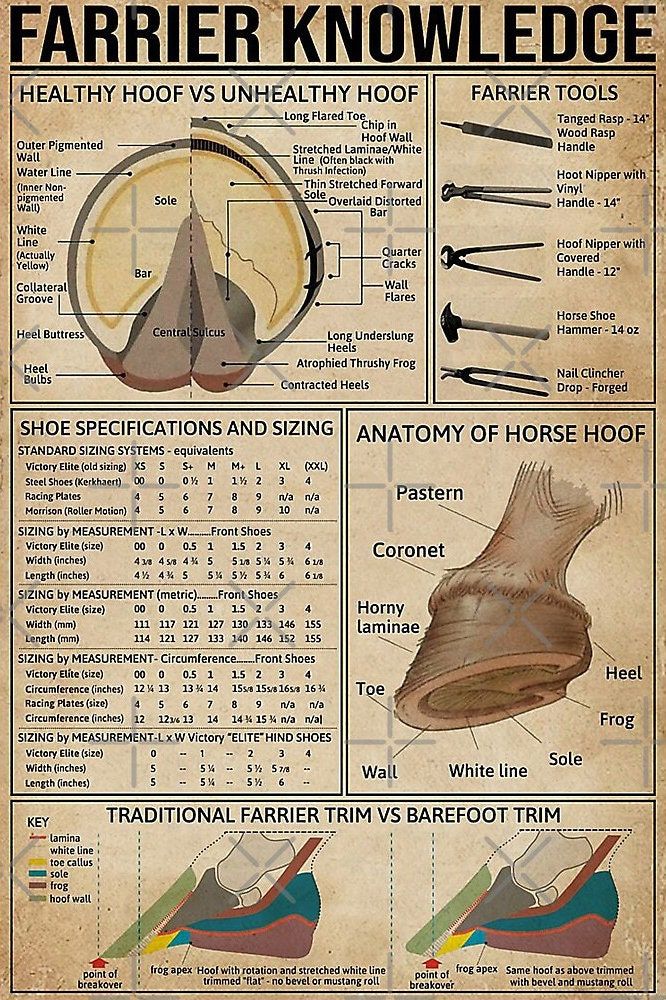
Farrier Knowledge: An In-Depth Tutorial on Horse Hoof Care and Maintenance

Farriery, the art and science of hoof care and horseshoeing, is a critical aspect of equine health that directly impacts a horse’s performance, comfort, and longevity. As a farrier or horse owner, understanding hoof anatomy, identifying healthy versus unhealthy traits, selecting appropriate tools, mastering shoe sizing, and choosing between trimming methods can prevent lameness, enhance gait, and promote overall well-being. This comprehensive tutorial, drawn from a detailed illustrative chart, serves as an educational resource for beginners and experienced equestrians alike. We’ll dissect each section of the diagram step by step, providing explanations of structures, functions, common issues, and practical tips. Remember, while this guide offers foundational knowledge, consulting a certified farrier or veterinarian is essential for hands-on application, as individual horses vary by breed, workload, and environment.
The tutorial is organized by the chart’s key sections: comparing healthy and unhealthy hooves, essential farrier tools, shoe specifications and sizing systems, hoof anatomy, and contrasting traditional farrier trims with barefoot approaches. By the end, you’ll have a solid grasp of how to assess and maintain equine hooves effectively.
Healthy Hoof vs. Unhealthy Hoof: Identifying Key Indicators
The foundation of farriery begins with recognizing the differences between a healthy hoof and one plagued by imbalances or pathologies. A healthy hoof is symmetrical, resilient, and well-proportioned, supporting the horse’s weight (up to 1,000 pounds or more) while absorbing shock. In contrast, an unhealthy hoof often results from poor nutrition, improper trimming, environmental factors, or neglect, leading to pain, lameness, and reduced mobility. The diagram contrasts cross-sections and bottom views to highlight these traits.
Healthy Hoof Features:
- Outer Pigmented Wall: The external layer of the hoof wall, typically dark and tough keratin, providing protection against wear and moisture. It grows downward from the coronet band at about 1/4 to 3/8 inch per month, ensuring continuous renewal.
- Water Line (Inner Non-Pigmented Wall): A lighter inner wall layer that seals in moisture while allowing flexibility. It prevents cracks by maintaining hydration balance.
- White Line: The junction between the wall and sole, visible as a pale band. In healthy hooves, it’s uniform and free of separation, acting as a guide for nailing shoes without penetrating sensitive tissues.
- Sole: The concave underside protecting internal structures. A healthy sole is thick (about 3/8 inch), callused for traction, and free of bruises.
- Bar: Extensions of the wall folding inward at the heels, providing structural support and aiding in heel expansion during weight-bearing.
- Collateral Groove: Depressions alongside the frog, allowing for natural flex and cleaning out debris.
- Central Sulcus: The midline groove in the frog, which should be shallow and clean to prevent infections like thrush.
- Heel Buttress: The angled rear wall supporting the heel, ensuring stability.
- Heel Bulbs: Soft, bulbous tissues at the heel top, cushioning impacts and expanding/contracting for shock absorption.
Unhealthy Hoof Features:
- Long Flared Toe: Excessive length at the front, causing leverage stress and potential laminitis (founder), where the coffin bone rotates.
- Chip in Hoof Wall: Breaks or chips from dryness or trauma, leading to uneven wear.
- Stretched Laminae/White Line (Often Black with Thrush Infection): Elongated sensitive laminae indicate separation, often due to poor diet or overload, fostering bacterial infections like thrush (foul odor, black discharge).
- Thin Stretched Forward Sole: Thinning from over-trimming or imbalance, increasing bruise risk and sensitivity.
- Sole Overlaid Distorted Bar: Bars that overgrow or distort, trapping debris and causing pressure points.
- Quarter Cracks: Vertical splits in the side wall from imbalance, often painful and requiring corrective shoeing.
- Wall Flares: Outward bulging walls from uneven growth, weakening structure and promoting cracks.
- Long Underrun Heels: Low-angled heels that “run forward,” reducing support and leading to contracted heels.
- Atrophied Thrushy Frog: Shrunken, infected frog (central cushion) from poor hygiene, impairing traction and circulation.
- Contracted Heels: Narrowed heels from lack of stimulation, limiting expansion and causing navicular issues.
Practical Tip: Regularly inspect hooves for these signs—clean daily, trim every 4-8 weeks, and monitor for changes post-exercise. A healthy hoof angle is typically 50-55 degrees at the toe, matching the pastern slope for optimal biomechanics.
Farrier Tools: Essential Equipment for Hoof Work
Farriers rely on specialized tools for trimming, shaping, and shoeing. These instruments must be sharp, ergonomic, and sanitized to ensure precision and prevent injury. The diagram illustrates common tools with their sizes and handles.
- Tanged Rasp – 14″: A flat file with coarse teeth for removing excess hoof material and leveling the wall. The tang fits into a wooden handle; use in long strokes to avoid gouging.
- Wood Rasp Handle: Ergonomic grip for rasps, reducing hand fatigue during extended sessions.
- Hoof Nipper with Vinyl Handle – 14″: Plier-like cutters for trimming the wall and toe. Vinyl handles provide comfort; apply even pressure to prevent crushing.
- Hoof Nipper with Covered Handle – 12″: Similar to above but shorter for finer control, with padded handles for better leverage on tough hooves.
- Horse Shoe Hammer – 14 oz: A claw hammer for driving and clinching nails, with a balanced head for accuracy. The 14 oz weight suits most farriers.
- Nail Clincher (Drop-Forged): Tool for bending nail tips after shoeing, securing the shoe. Drop-forged steel ensures durability.
Practical Tip: Maintain tools by sharpening rasps weekly and oiling moving parts. Beginners should practice on cadaver hooves to master technique, as improper use can cause splits or uneven balance.
Shoe Specifications and Sizing: Fitting for Function
Horseshoes protect hooves from wear, provide traction, and correct imbalances. Sizing varies by system (traditional, measurement-based), with equivalents for brands like Victory Elite. The chart covers standard systems for front and hind shoes, emphasizing length, width, and circumference.
Standard Sizing Systems – Equivalents:
- Systems like Victory Elite, Old Sizing, XS to XXL correlate to numerical sizes (e.g., Victory Elite 00 = Old 0, XS). Kerckhaert and others follow similar progressions up to 10 or n/a for larger hooves.
- Sizing by Measurement – L x W (Front Shoes): Victory Elite sizes from 00 (4 x 4 inches) to 6 (6 1/8 x 6 inches), with metric equivalents (e.g., 00 = 111 x 111 mm).
- Sizing by Measurement (Metric) – Front Shoes: Ranges from 00 (111 mm width/length) to 4 (155 mm), ensuring precise fit.
- Sizing by Measurement – Circumference (Front Shoes): From 00 (12 inches) to 4 (16 1/2 inches), measuring the hoof’s outer perimeter.
- Sizing by Measurement – L x W Victory ‘Elite’ Hind Shoes: Hind shoes are often narrower (e.g., 0 = 5 x 5 inches) to match the rounder hind hoof shape.
Practical Tip: Measure the hoof post-trim: width at widest point, length from toe to heel. Choose shoes 1/8 inch larger than the hoof for expansion. Materials like steel offer durability, aluminum lightness for racing. Custom forging may be needed for therapeutic shoes addressing issues like founder.
Anatomy of Horse Hoof: Structural Breakdown
Understanding hoof anatomy is vital for effective care, as the hoof encapsulates sensitive internal structures like the coffin bone and digital cushion. The diagram shows a side and bottom view with labels.
- Pastern: The sloping bone above the hoof (proximal and middle phalanges), influencing hoof angle. Ideal slope is 45-50 degrees for shock absorption.
- Coronet: The coronary band at the hoof top, where new wall grows. Rich in blood vessels; injuries here can cause permanent defects.
- Horny Laminae: Interlocking leaves attaching the wall to the coffin bone, providing suspension. Sensitive to inflammation (laminitis).
- Toe: The front wall, bearing most weight during propulsion. Should be rounded for smooth breakover.
- Heel: Rear support area, contracting/expanding for circulation.
- Frog: Triangular rubbery pad aiding traction, circulation (pumps blood), and shock absorption. Healthy frogs contact the ground.
- Wall: Protective outer shell, thickest at toe, thinning at quarters.
- White Line: As above, critical for shoe placement.
- Sole: Protective floor, shedding naturally.
Practical Tip: The hoof is a “living” structure—bloodless externally but vascular internally. Laminitis disrupts laminae, causing rotation; prevent with balanced diet and regular farriery.
Traditional Farrier Trim vs. Barefoot Trim: Techniques Compared
Trimming shapes the hoof for balance, whether shod or barefoot. Traditional trims prepare for shoes, while barefoot mimics natural wear for hoof health.
Key (Color-Coded):
- White Line: Trim guide.
- Toe Callus: Hardened toe area.
- Sole: Retained for protection.
- Frog: Preserved for function.
- Hoof Wall: Beveled or rolled.
Traditional Farrier Trim:
- Focuses on flat sole preparation for shoe attachment, removing flares and excess toe. Results in a “flat” hoof with no bevel, suitable for shod horses. Point of breakover is at the toe apex; may stretch white line if overdone.
Barefoot Trim:
- Emphasizes natural contours with beveling (mustang roll) around the wall for smooth rollover, reducing stress. Frog apex aligns with breakover; promotes heel-first landing and stronger walls. Ideal for pasture horses or those with good terrain for self-wear.
Practical Tip: Traditional trims suit working horses needing traction (e.g., via shoes), while barefoot benefits from rocky ground for stimulation. Transition slowly, monitoring for tenderness. Use boots temporarily if needed.
In conclusion, farrier knowledge empowers you to collaborate with professionals for optimal hoof care, potentially extending a horse’s athletic career. Regular assessments—every 4-6 weeks—combined with proper nutrition (high forage, balanced minerals) and environment (dry, clean footing) are key. For advanced study, consider certification programs or resources from the American Farrier’s Association. This tutorial equips you with the tools to spot issues early and make informed decisions, fostering healthier, happier horses.